It’s officially summer, and as much as I am loving it, I’m already complaining about how hot it is. #CaliforniaProblems But in reality, summer is one of my favorite seasons, and I love mostly everything that comes along with it, namely no school (not really a thing for me, but I love having Matt home!) and day drinking. Below is a collection of some of my favorite summer themed posts for you to peruse and soak in the summer spirit!
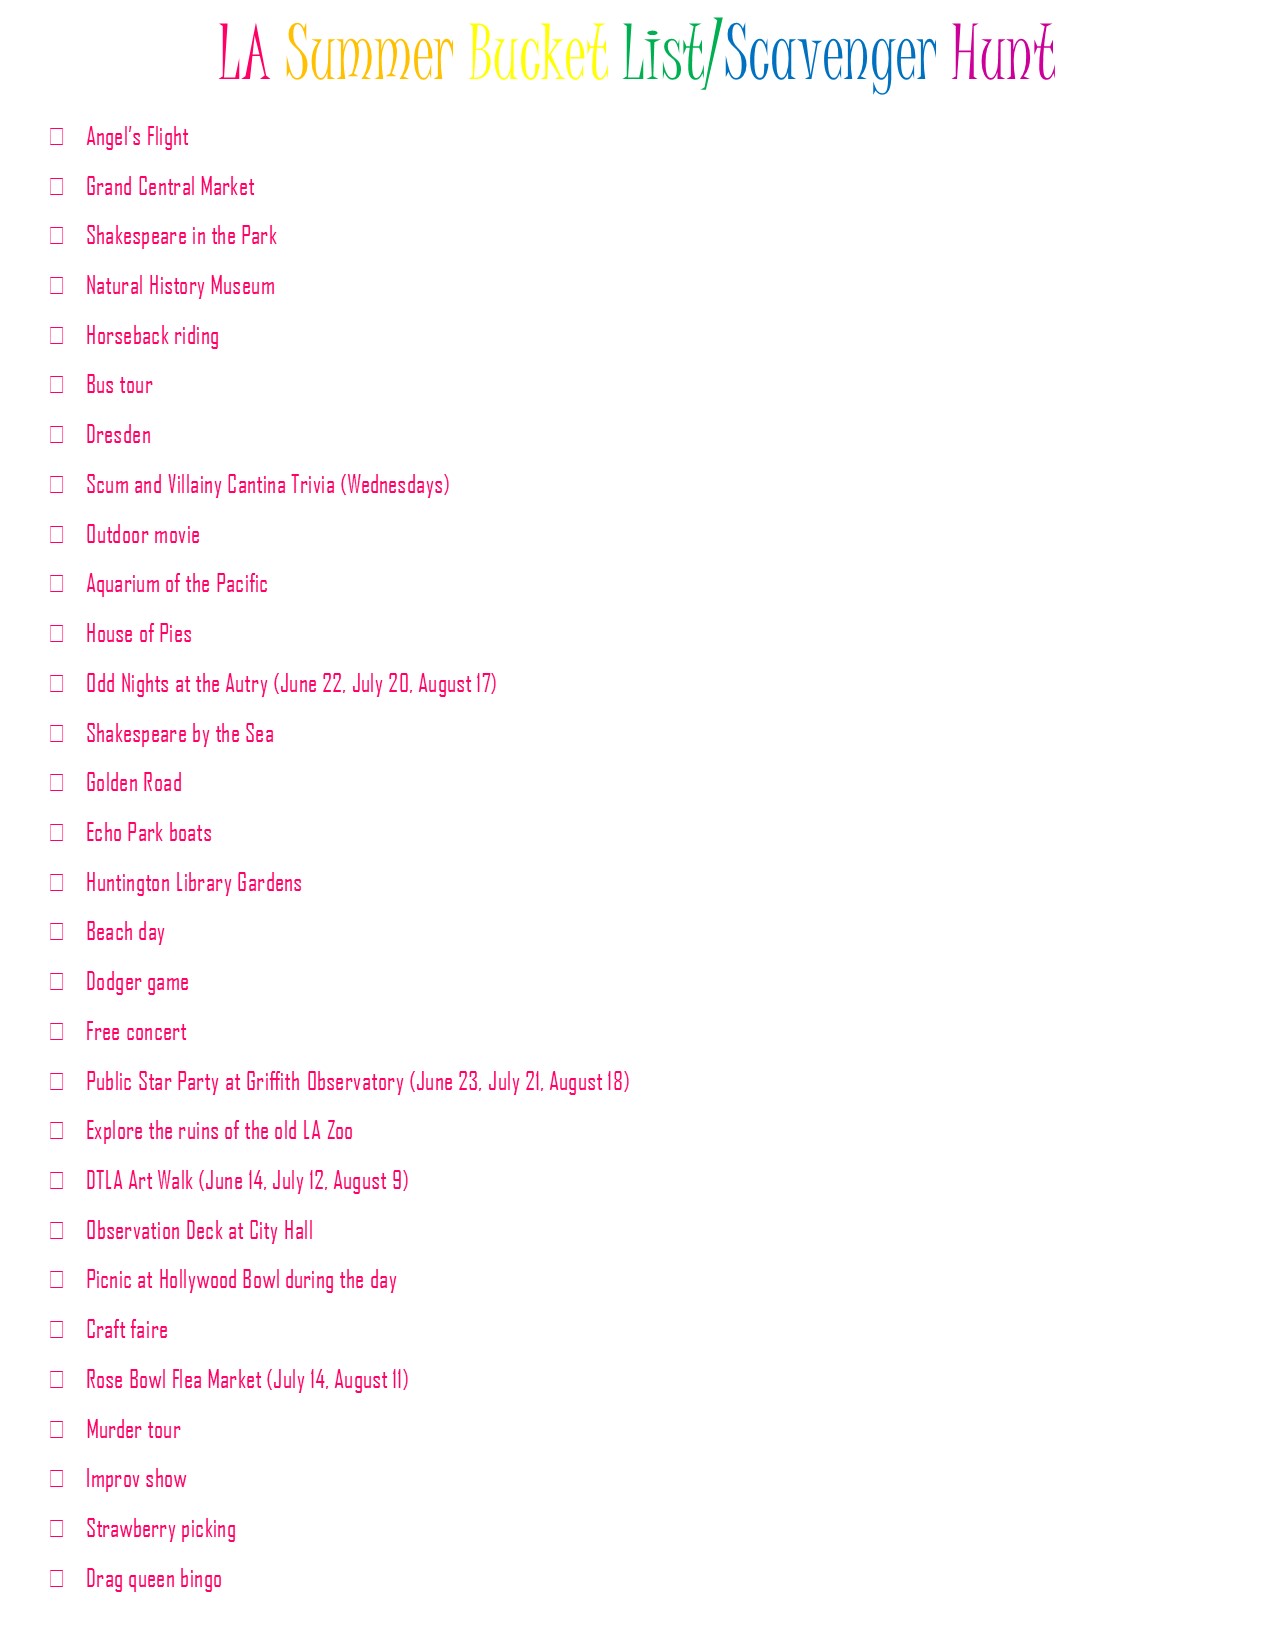
I recently published my 2018 Los Angeles Summer Bucket List. I suck at these things, but I am trying really hard to make many of these events actually happen!
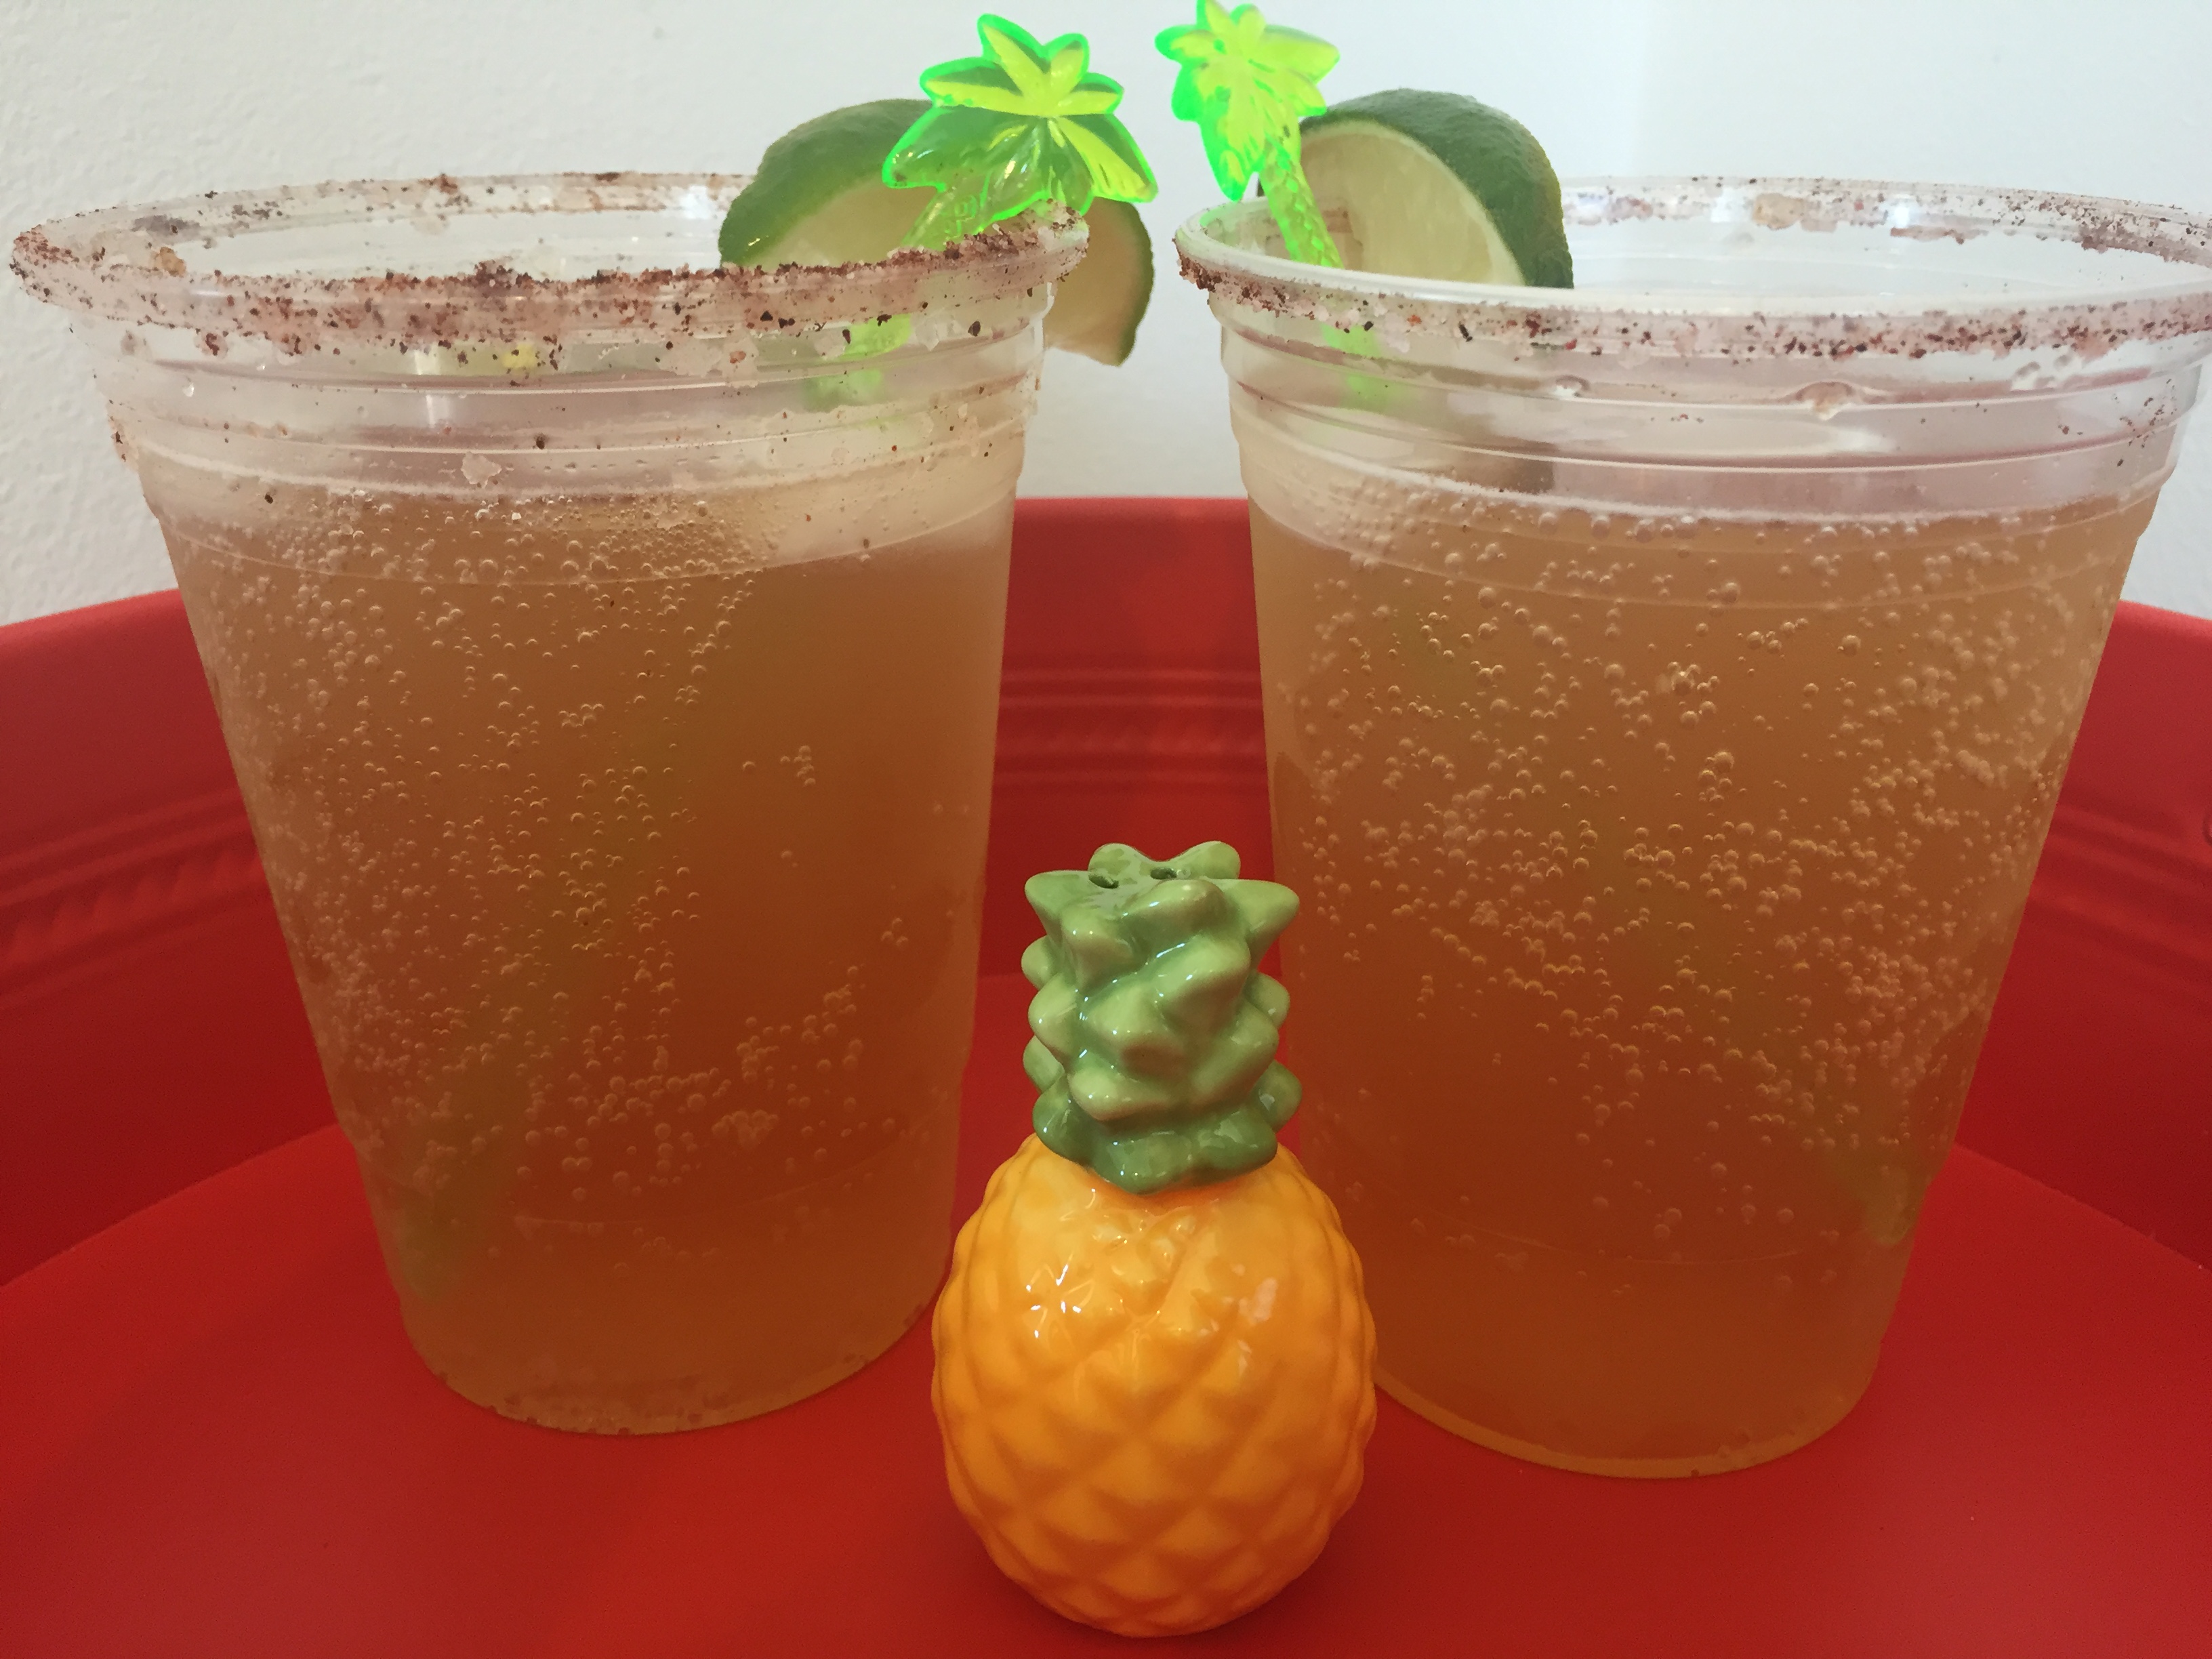
Summer is not summer without some tasty drinks! During the summer months, my go to beer is a Corona Light, so it’s no surprise that a michelada is one of my favorite beverages to beat the heat!
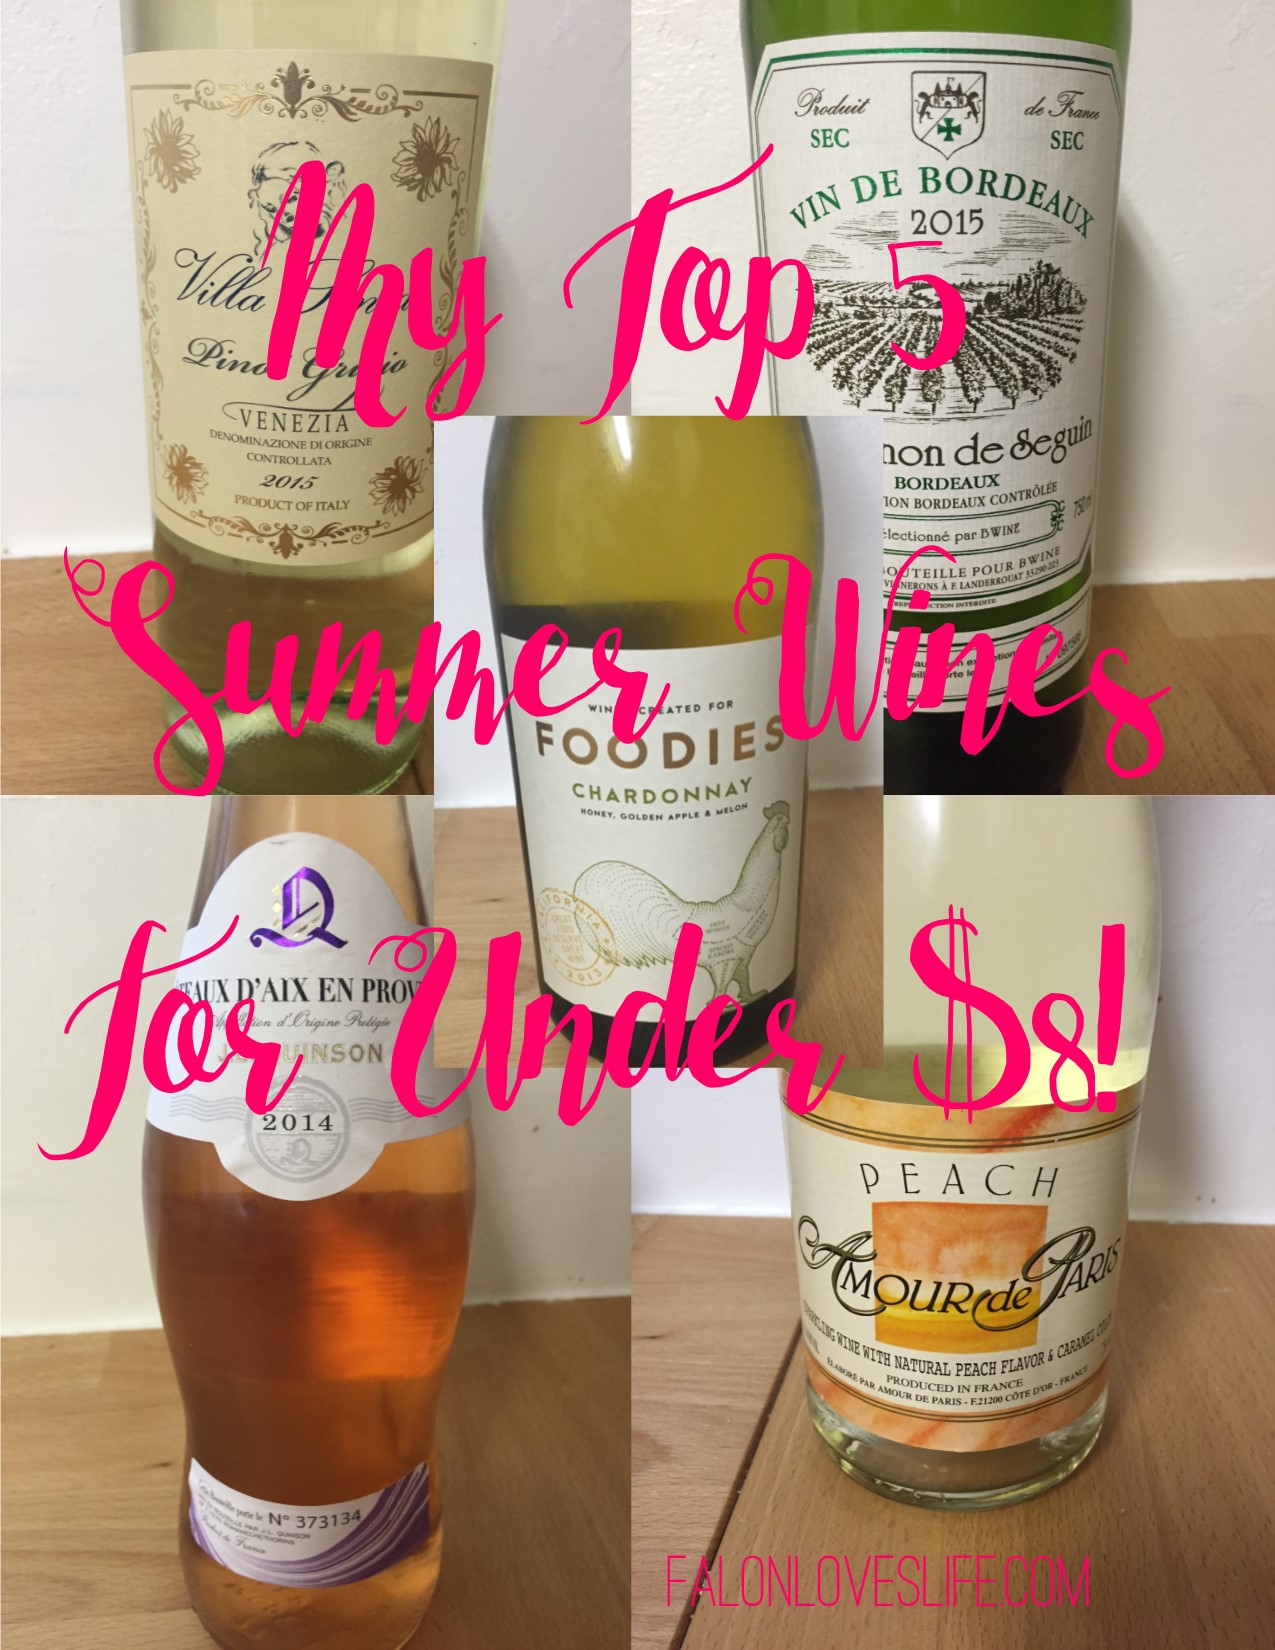
As much as I love a good beer on a hot day, my alcoholic allegiance will always be to wine. Here’s a collection of perfectly light and refreshing summer wines that are all available for under $10. Score!
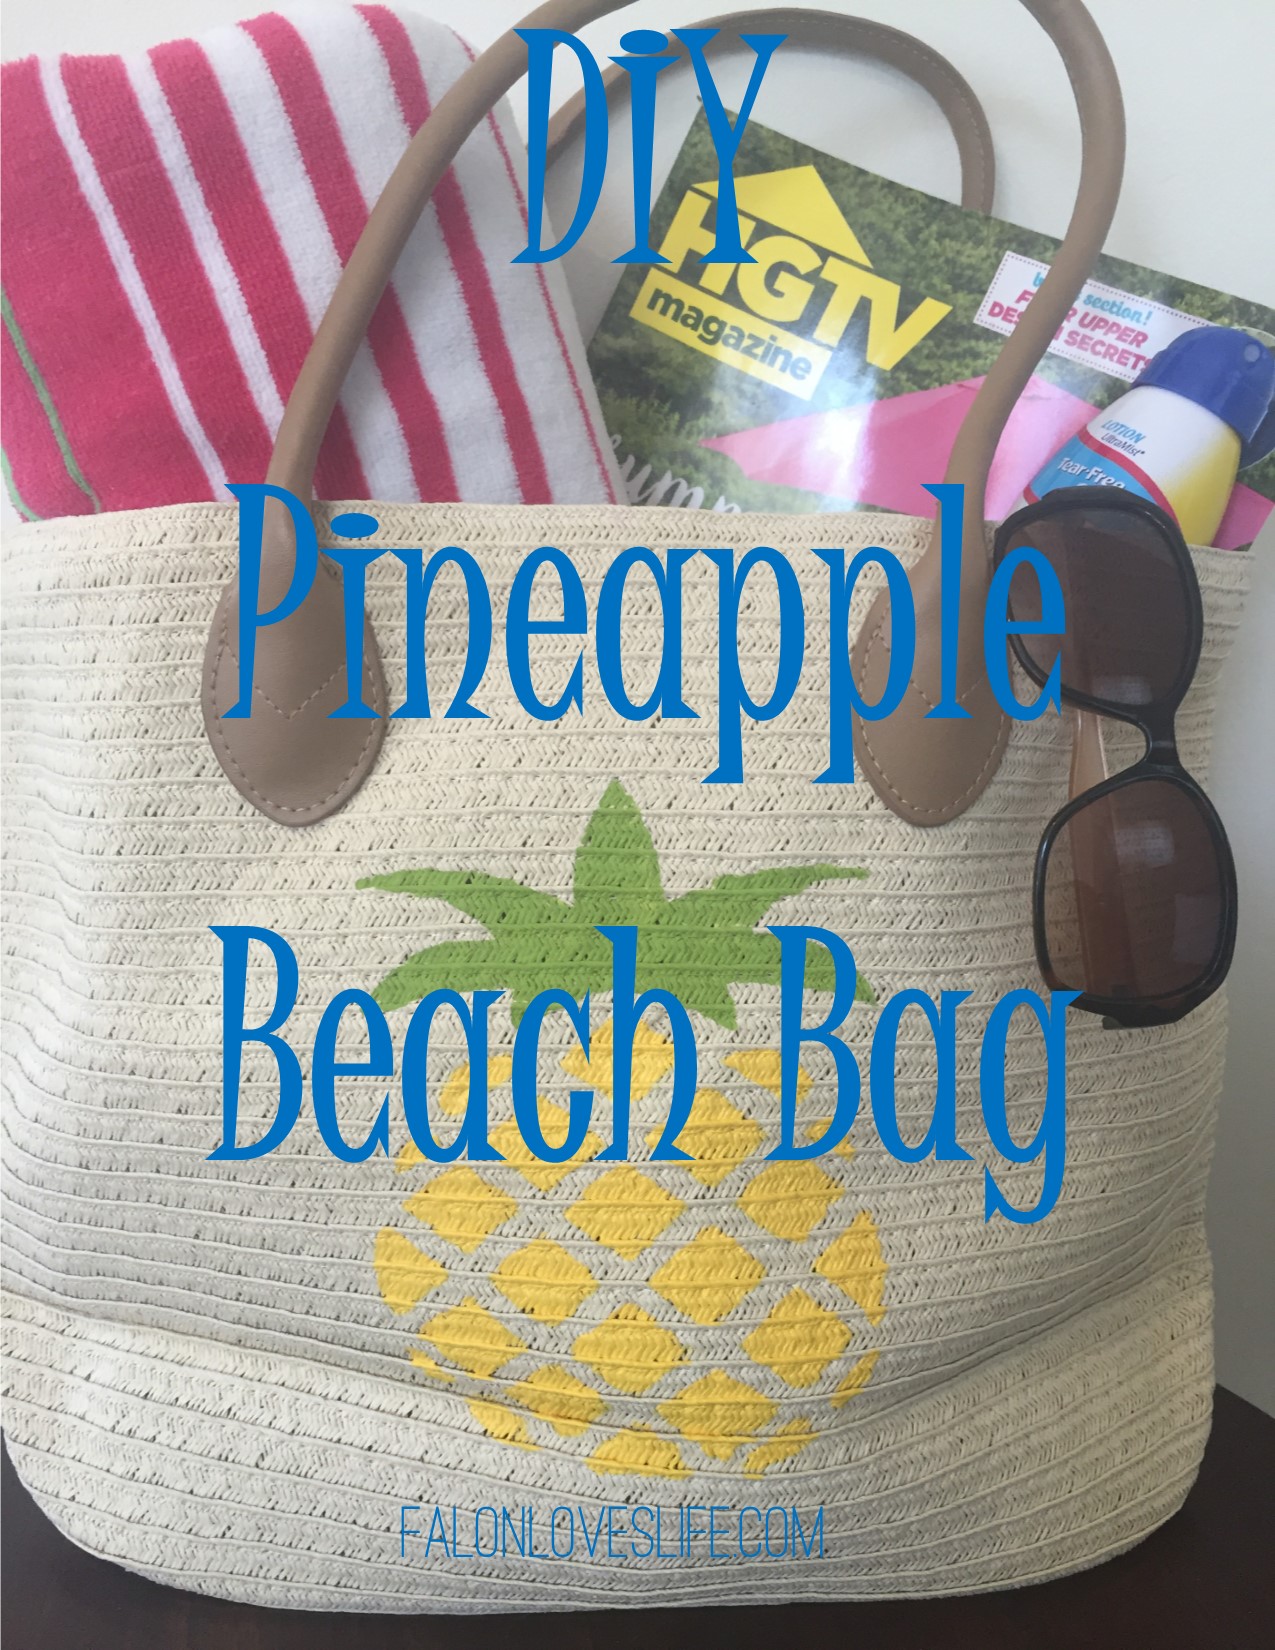
Summer wouldn’t be summer without a little crafting, and at least one trip to the beach. I am still obsessed with this pineapple bag I crafted a couple of years ago. It’s my go-to beach bag, and I will for sure be busting it out again this summer!
Just because it’s a million degrees doesn’t mean I can give up my Disney days, and there are plenty of ways to beat the heat in the parks. This post shares some of my favorite ways to stay cool during the warm months at the Disneyland Resort.
I’m so looking forward to creating some more cocktails, making some more crafts, and of course, spending some more hot days at Disneyland this summer. What are your favorite parts of the summer months?
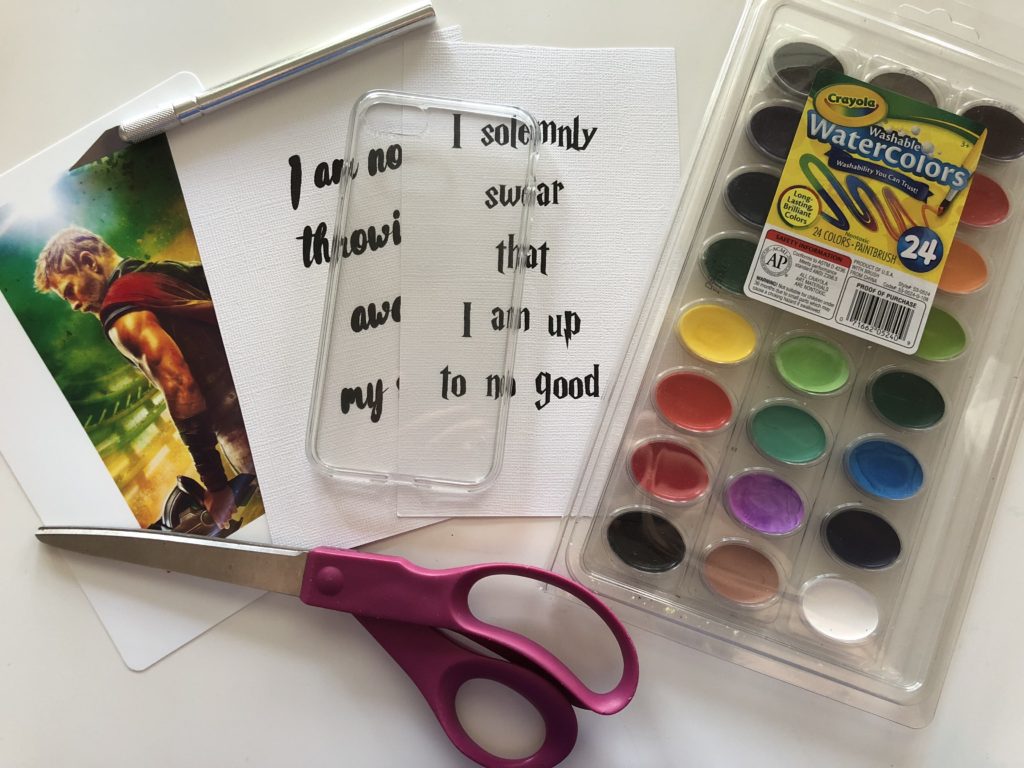
Hi kids, and welcome to the first DIY post of 2018! Yay crafts! Since I made crafting part of my must accomplish for 2018 list, I figured I should start the year off right. Also, I just got a new phone so this craft is one I’m actually going to use in my everyday life. Bonus! Here’s how to make your own super cool phone case!
I decided to go with two different types of case, one a photo and one a watercolor quote. You will need your printed photo and quotes (approximately 3 inches by 5.5 inches if you have an iPhone 8), a clear phone case, watercolor paints, an X-acto knife, and scissors.
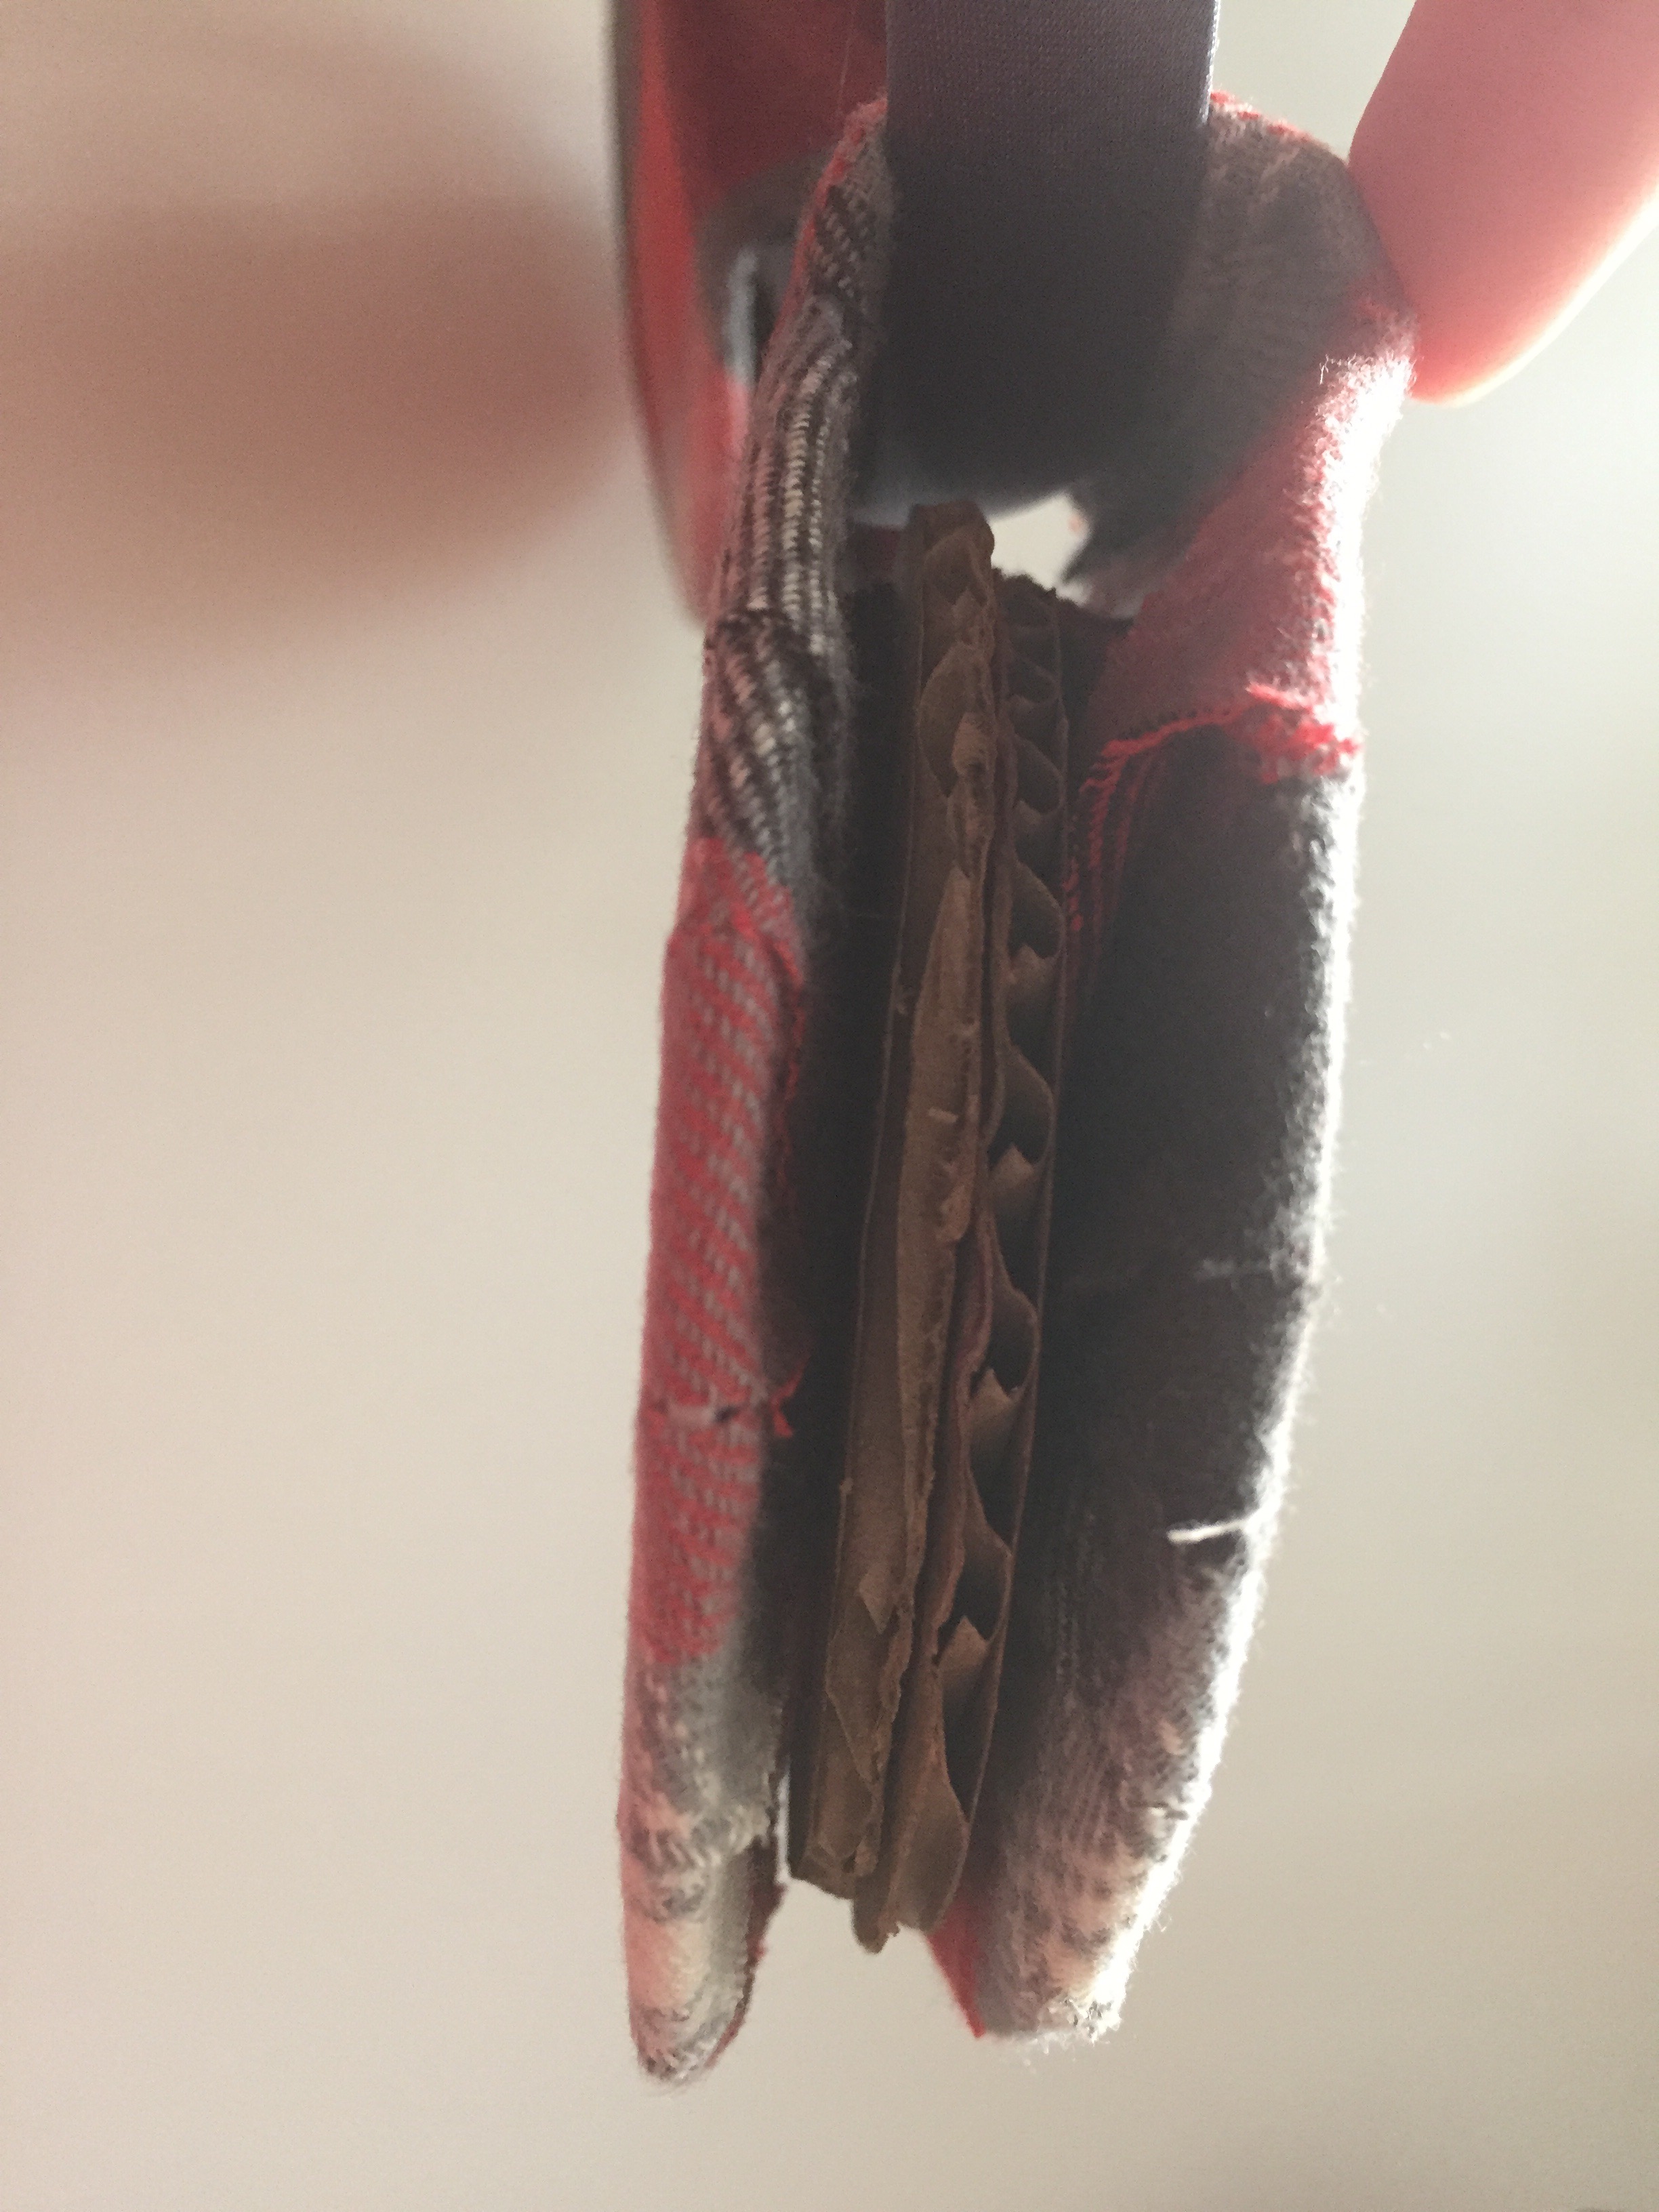
Using the case as a template, cut out the basic iPhone shape on your photo and quote, then trace out the oval at the top where the camera lens is on your phone.
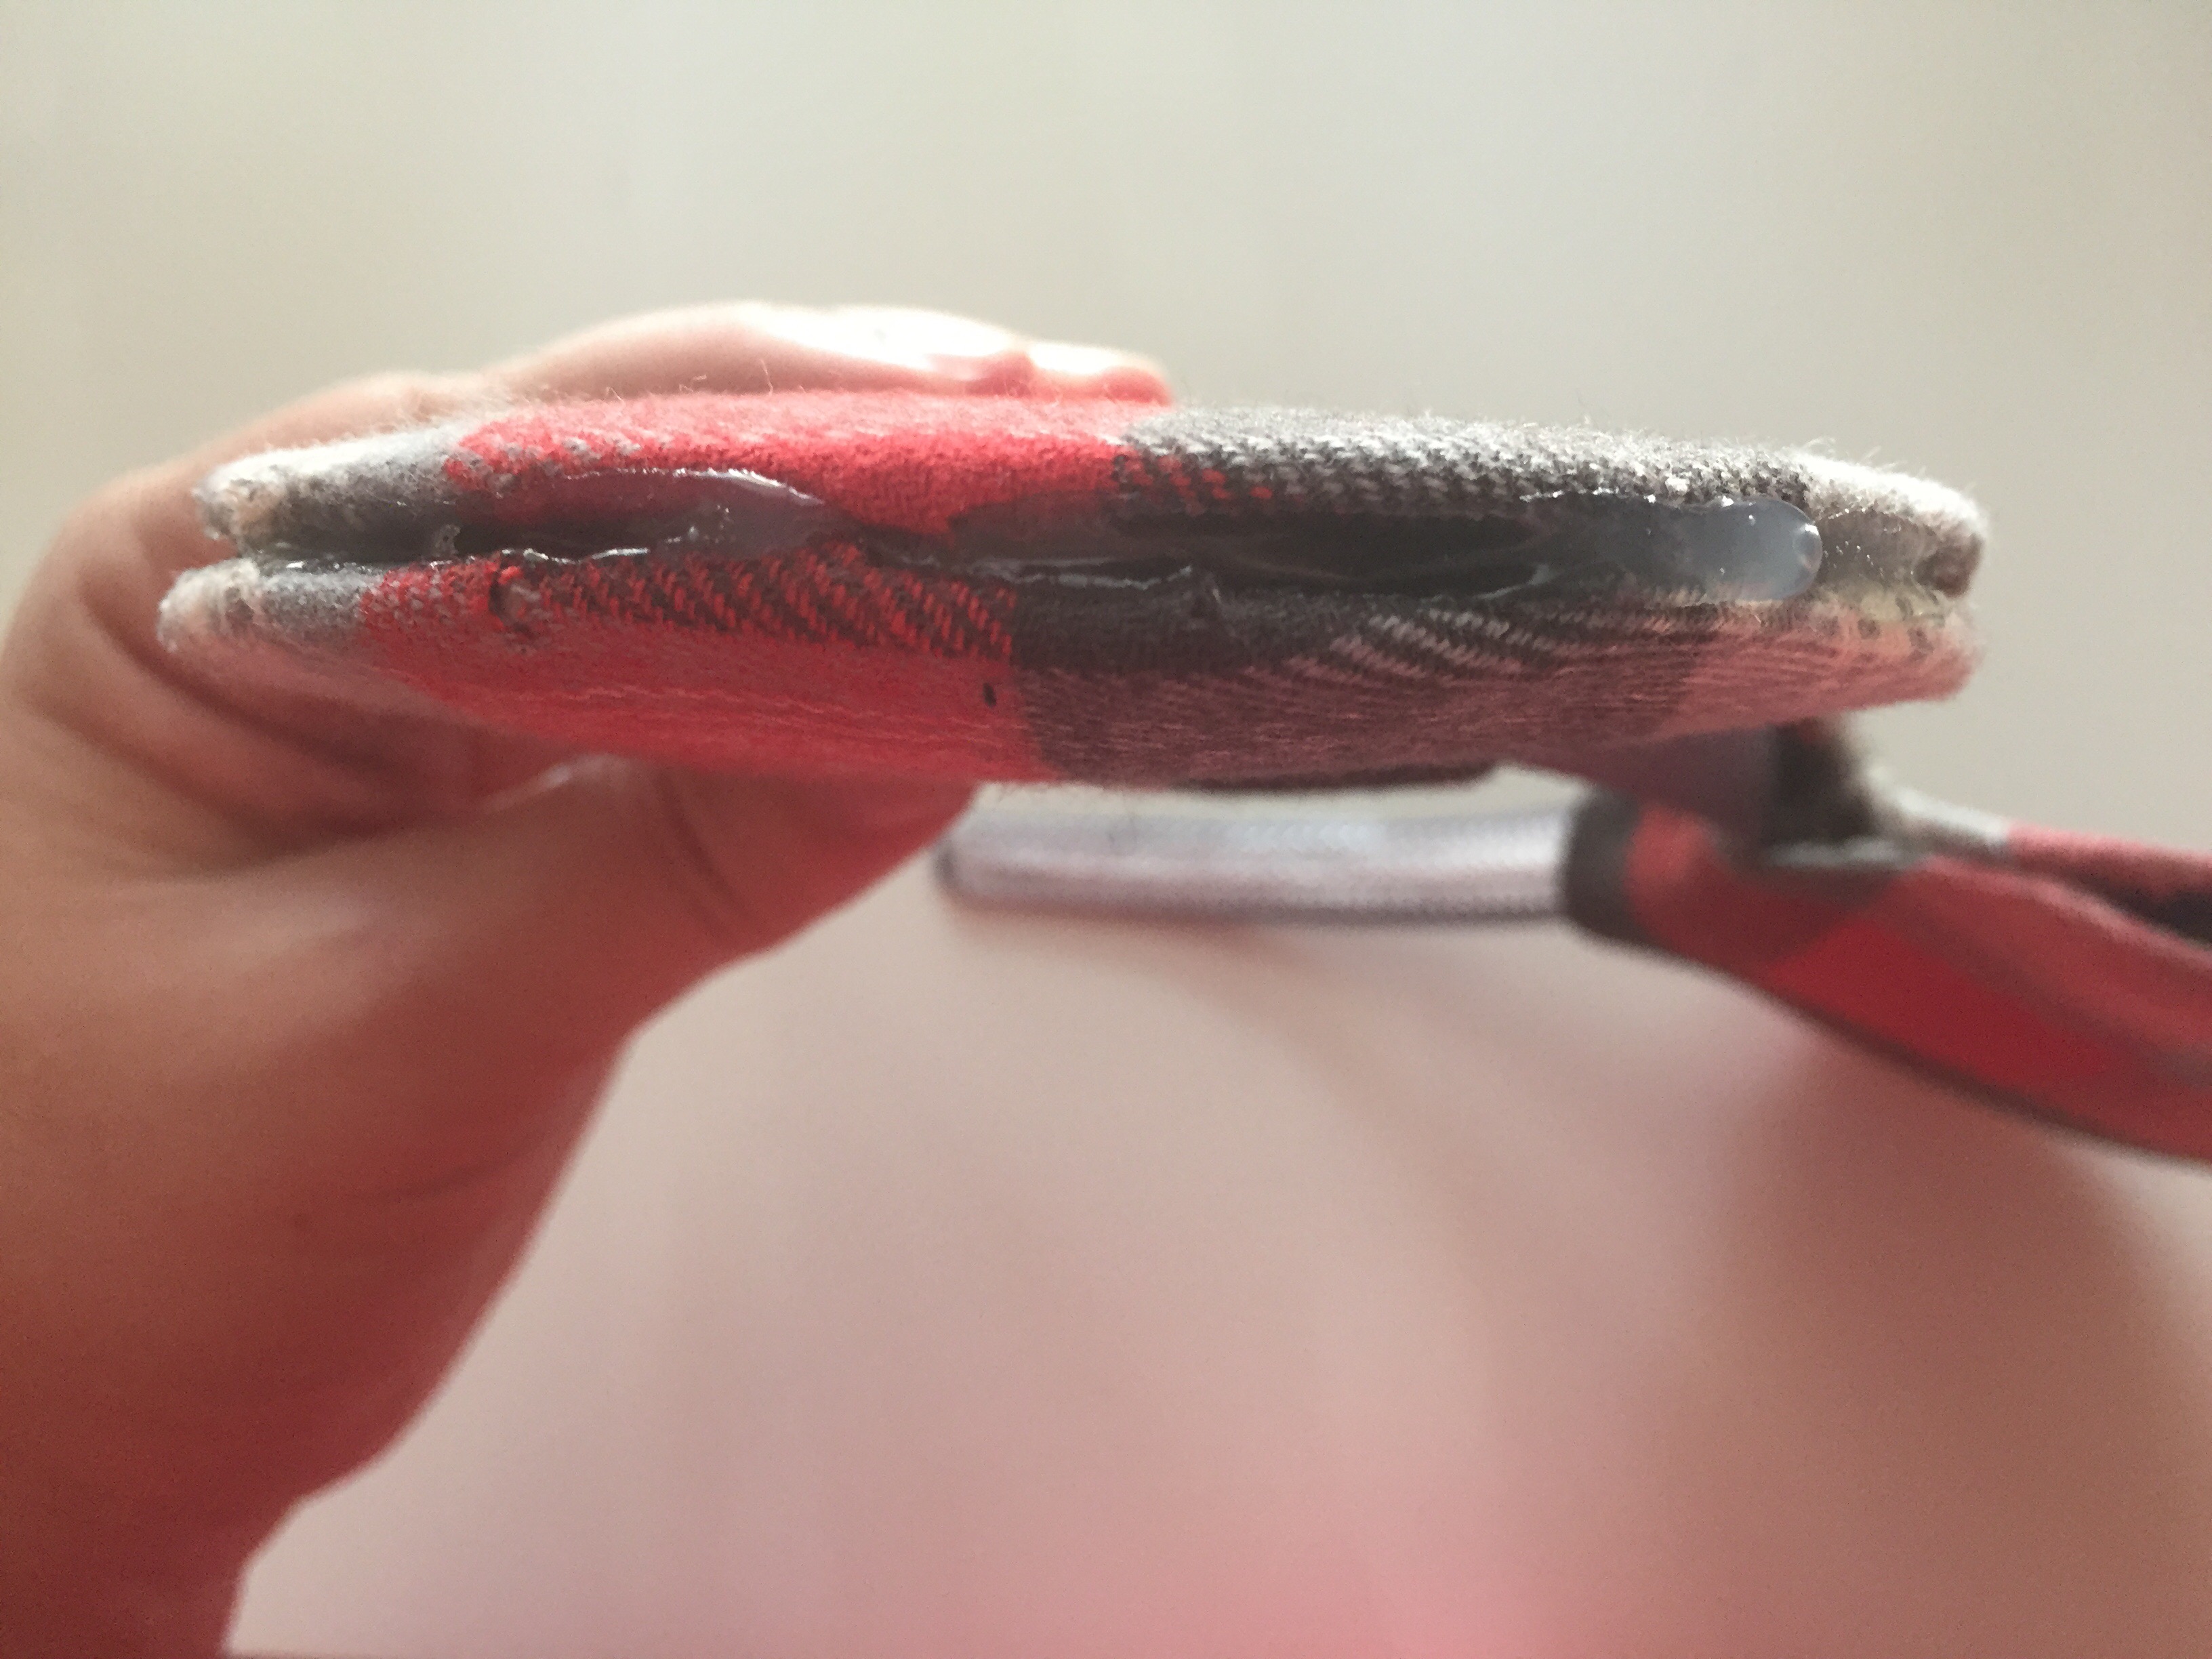
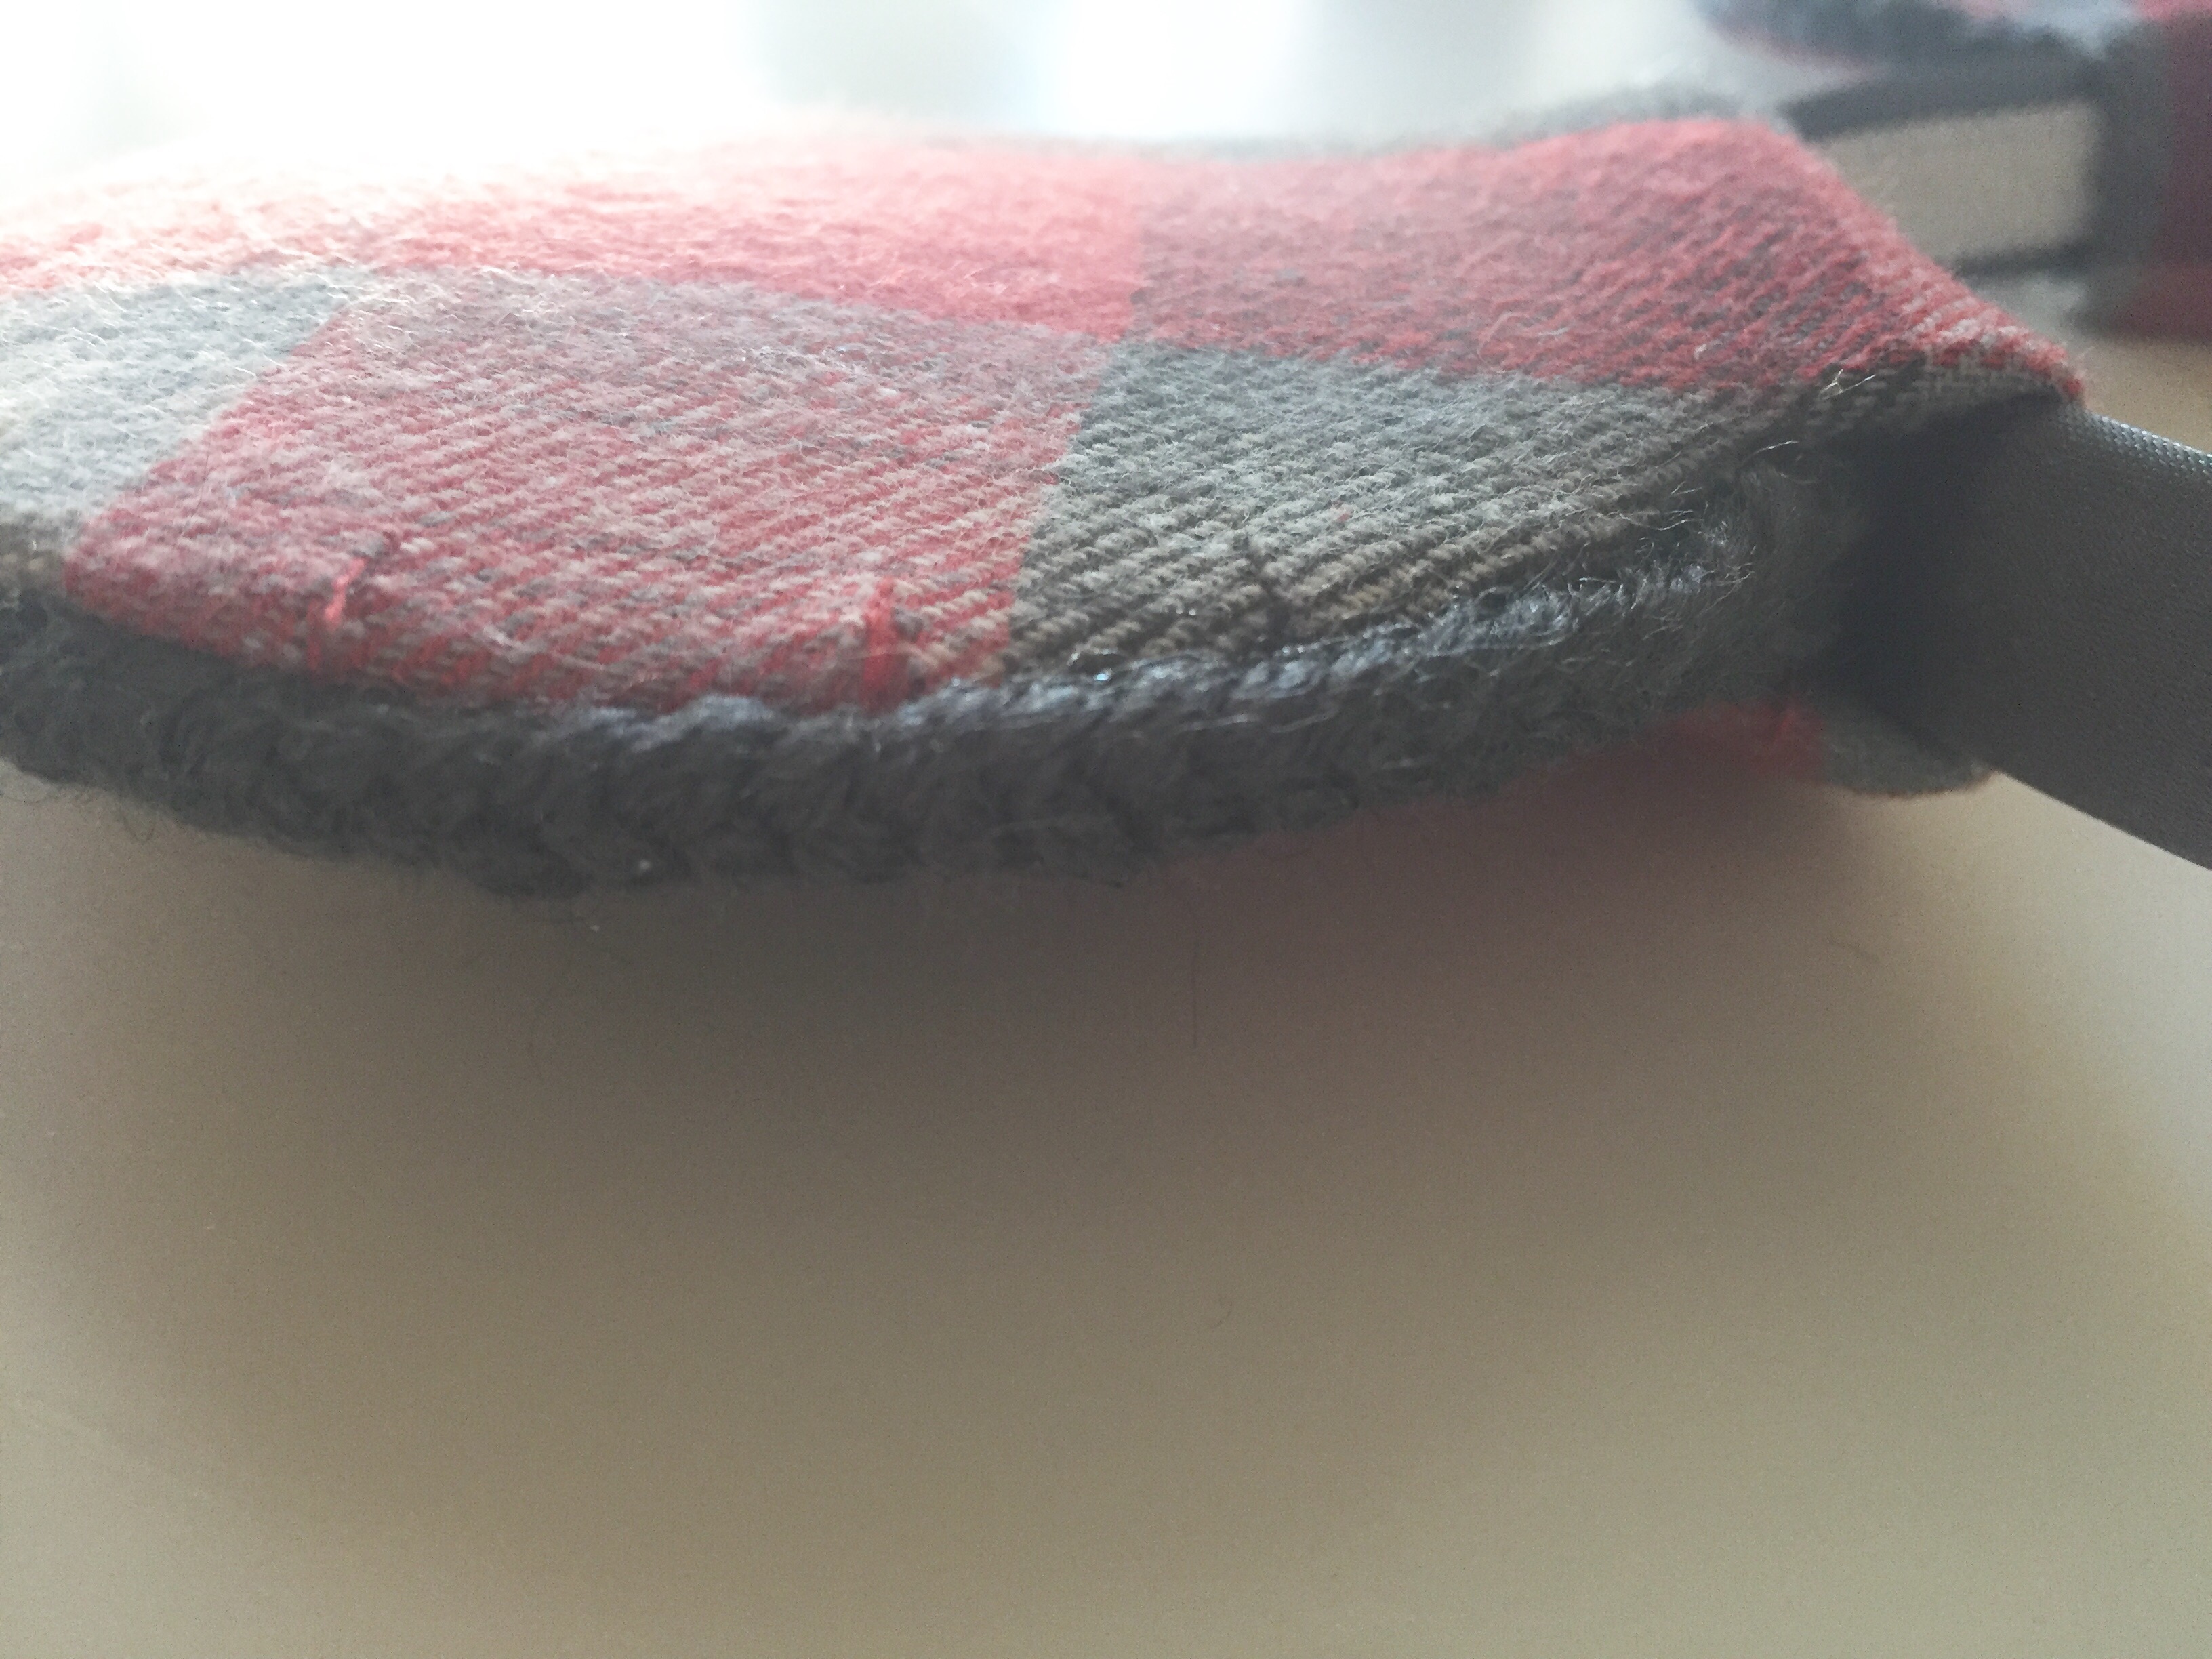
Use the X-acto knife to cut out the oval. For the photo print case, once you have it cut out, you are done. Just slip it into the plastic case and you are good to go. For the quote cases, once you have them cut out, use your watercolor paint to add some color in whatever way suits your fancy.
Let the paint dry, and leave the quote under a heavy book overnight so it flattens out. Note that with both types of design, the shape doesn’t have to be perfect. When you put the design in the case, the imperfections are camouflaged. No surprises here, but I’ve been rocking my Thor case for the past couple of weeks and I have gotten lots of compliments, mainly from the ladies. I do love the quote design too, so I will probably swap out Thor for Hamilton at some point. Overall, this is a super simple project that can be completed quickly and easily and with few supplies. I had everything I needed for this project at home, so even better. Plus, the sky is the limit when it comes to designs! I love having the option to change out the design when I get bored, saving me from buying multiple phone cases. Instead I just change the insert, and I’m good to go. Hopefully this is a project you try for yourself!
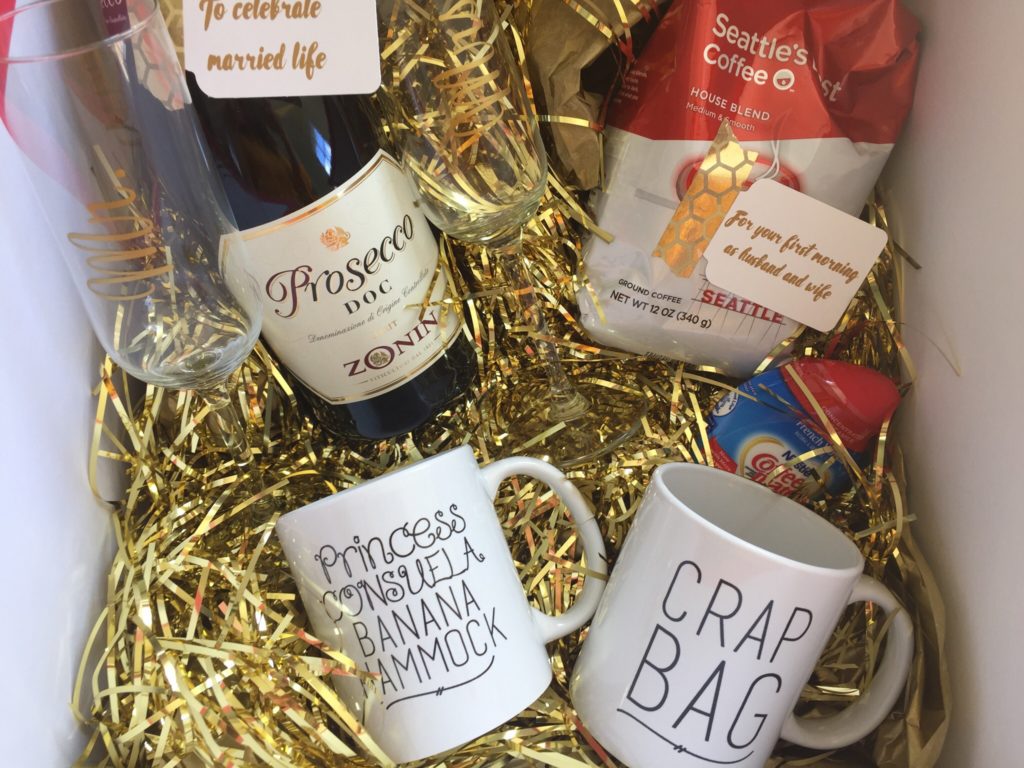
Okay, so full disclosure here: I should have posted this months ago, but I totally forgot until I was recently going through my iPhone pics to clear out some space. I found these and remembered that I never shared this bridal shower basket I put together for my sister back in like April. So yay me for being on top of things!
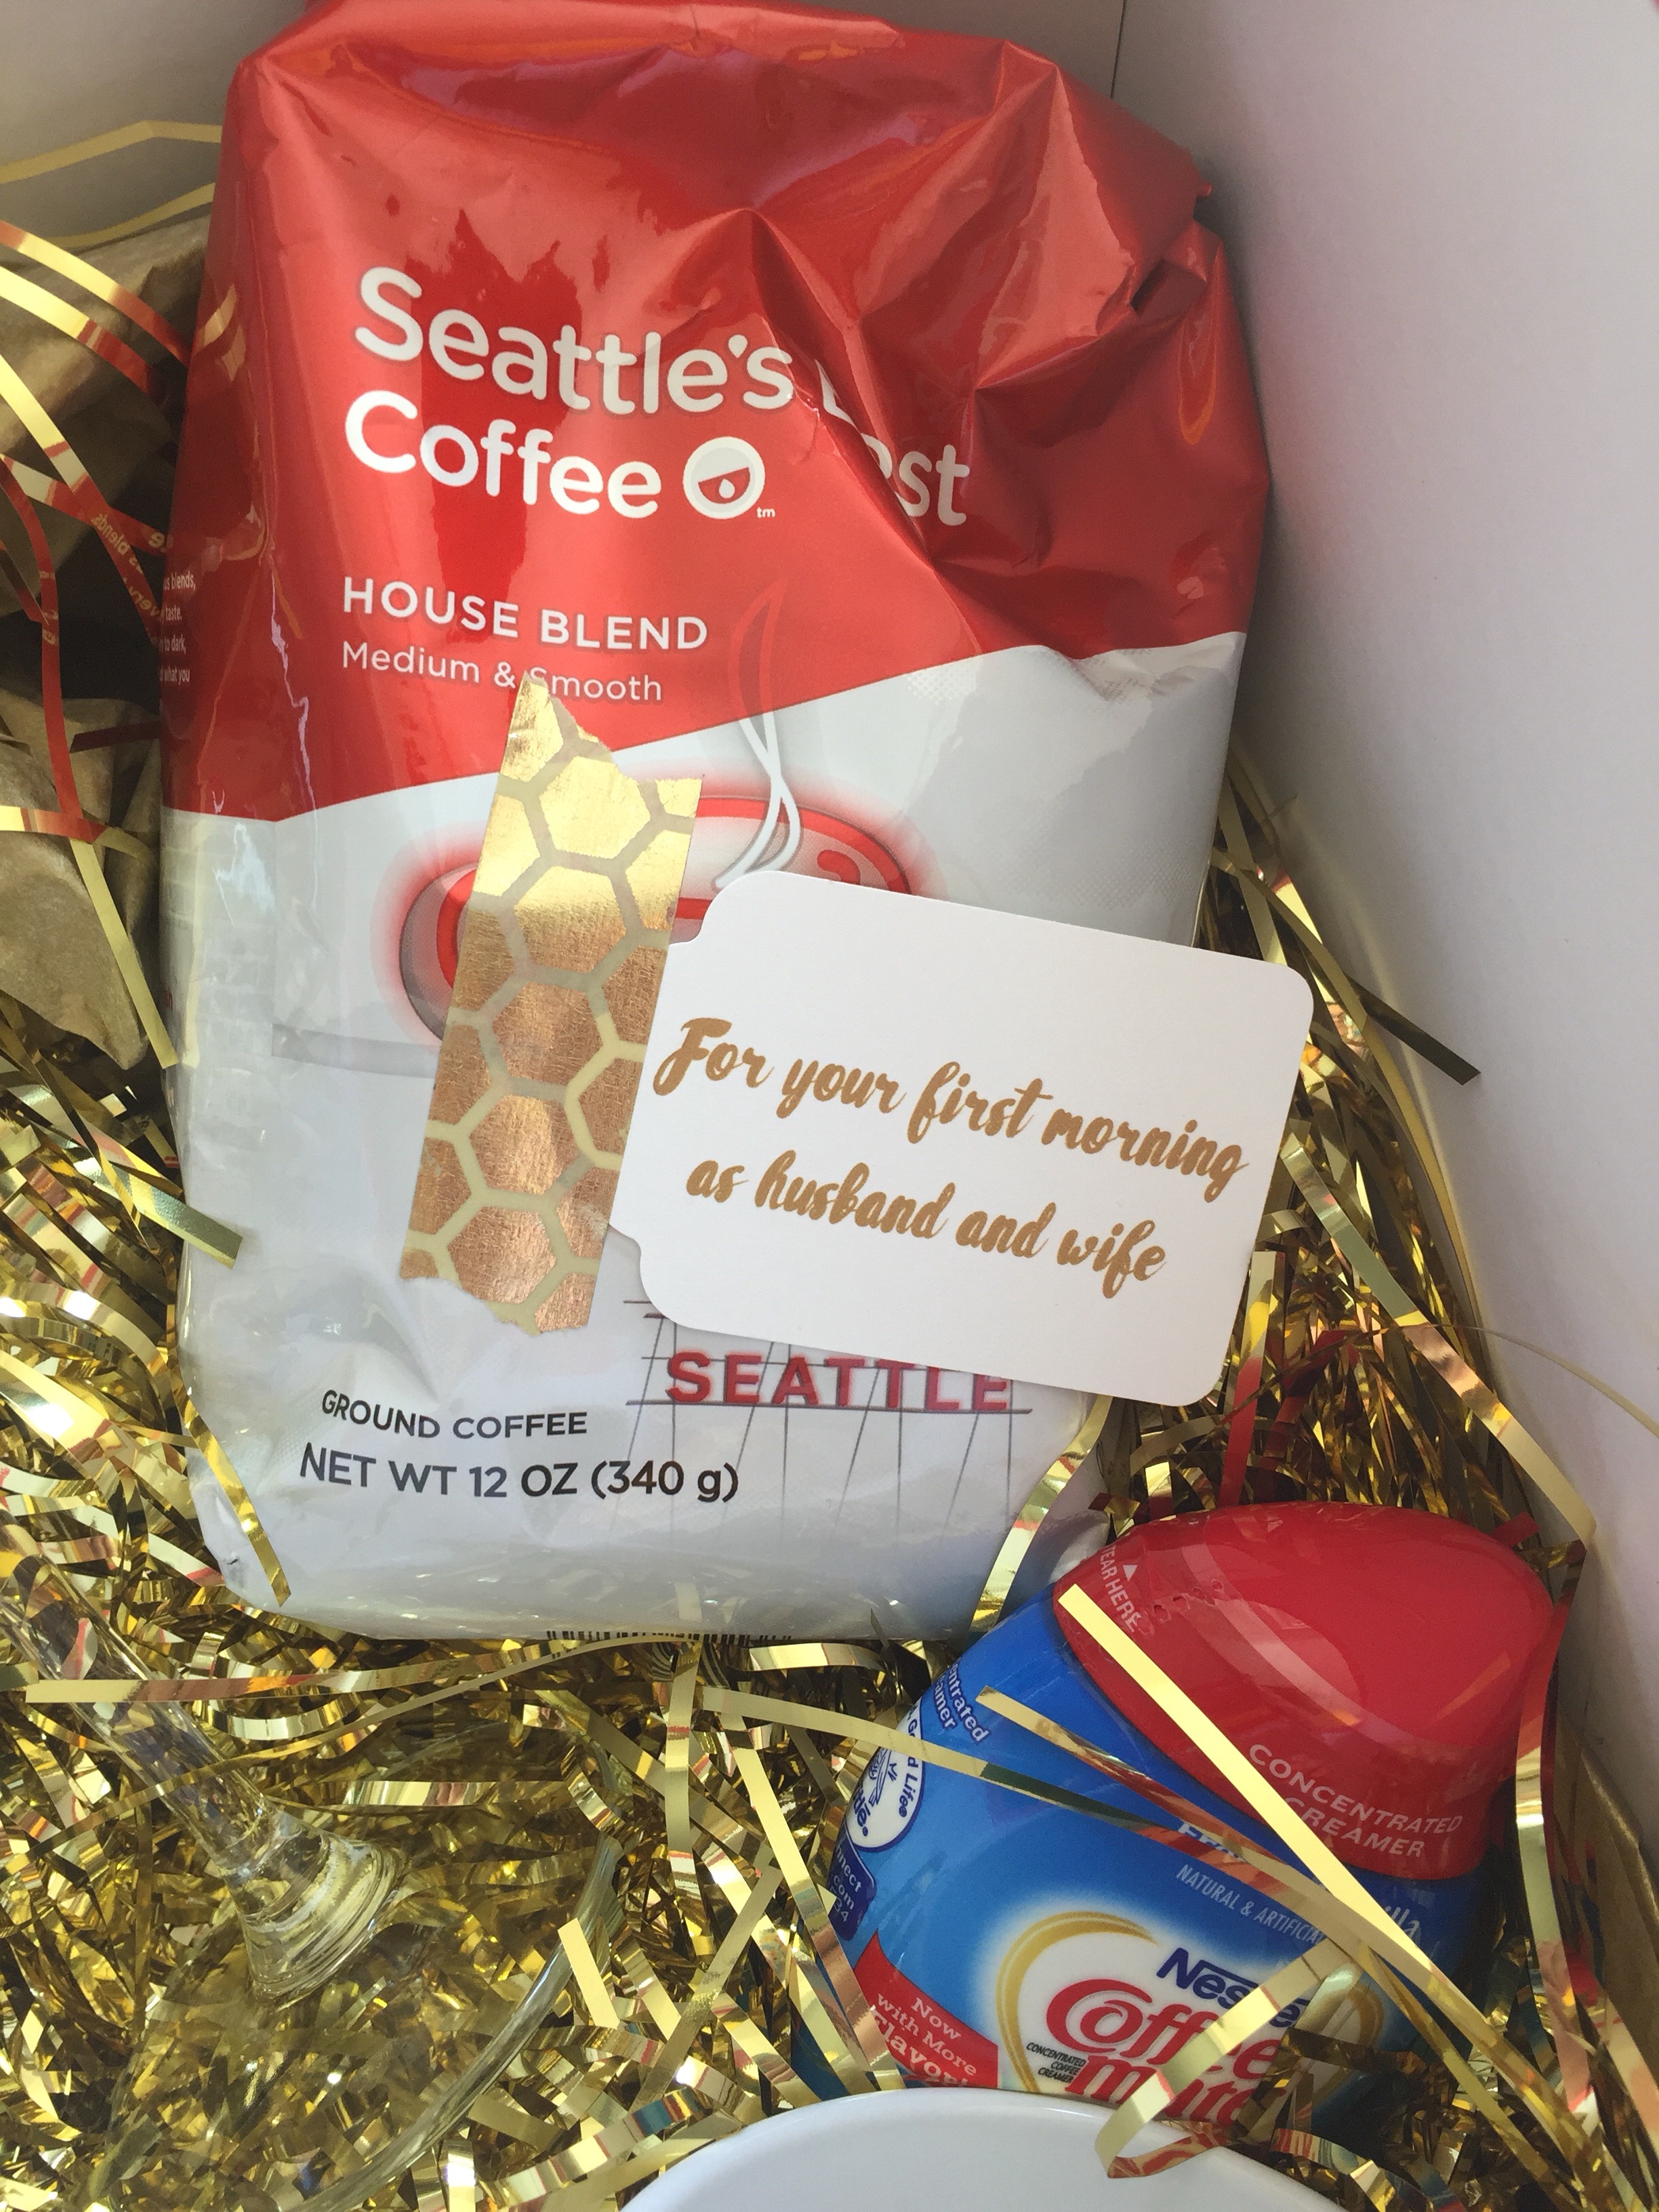
But I did want to share this idea with you because it’s super cute and such an easy gift to put together, and it’s awesome for any bride who likes coffee and champagne (and if you don’t like those two things, then you are no friend of mine…no offense, just literally all my friends like coffee and champagne).
For the first part of the gift, I bought two champagne glasses which I then decorated with Mr. and Mrs. gold decals that I found on Etsy. You can also find these champagne glasses on Amazon or at many retailers (including Home Goods, whose wedding section is the shit). I picked up a bottle of champagne (prosecco if we’re being specific) and attached a tag that reads “To celebrate married life”. I made the design in Microsoft Word, used a tag punch to cut it out, and attached it with gold washi tape.
The second tag reads “For your first morning as husband and wife” (it rhymes!) and I fashioned it the same way as the prosecco tag and attached it to a bag of coffee.
The highlight of this box is these mugs I found that are perfect for my sister. We’re huge fans of the TV show Friends, and these mugs reference the episode where Phoebe is changing her name after getting married. If you don’t know Friends, the mugs are weird, but if you do, and you love it like my sister does, they’re awesome. You could always do some cute Mr. and Mrs. mugs too if your friends don’t like Friends.
Put all together, this is a super cute little basket perfect for any bride-to-be. It got lots of awwwwws at the shower and it was lots of fun to put together.
Do you have a go to bridal shower gift? Fill me in on your secrets!
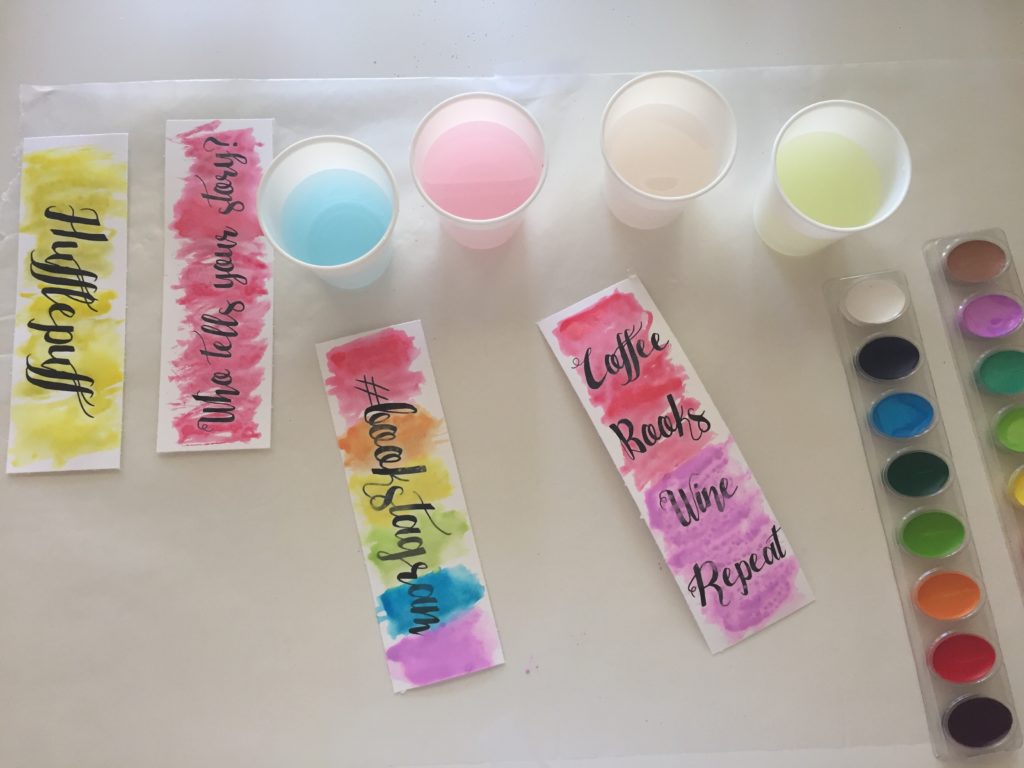
Since so much of my life has been consumed with books these days-reading, writing, reviewing, Instagramming-it’s only fitting that I become obsessed with bookmarks. When I was younger and had a significantly better memory, I never used bookmarks because I could just remember what chapter or page I left off on (seriously, how was that a thing I could do?). But now I am old. And I have one or two billion other things on my mind. And I refuse to fold down the pages of my books. So bookmarks it is! I’ve started quite a collection, and while some of my favorites are the free ones from bookstores, I have also been buying some cute ones on Etsy. Which of course, led me to the idea to make some for myself. And I found out how easy it is to make some super cute bookmarks with just a few supplies. I love how they turned out and I can’t wait to make more!
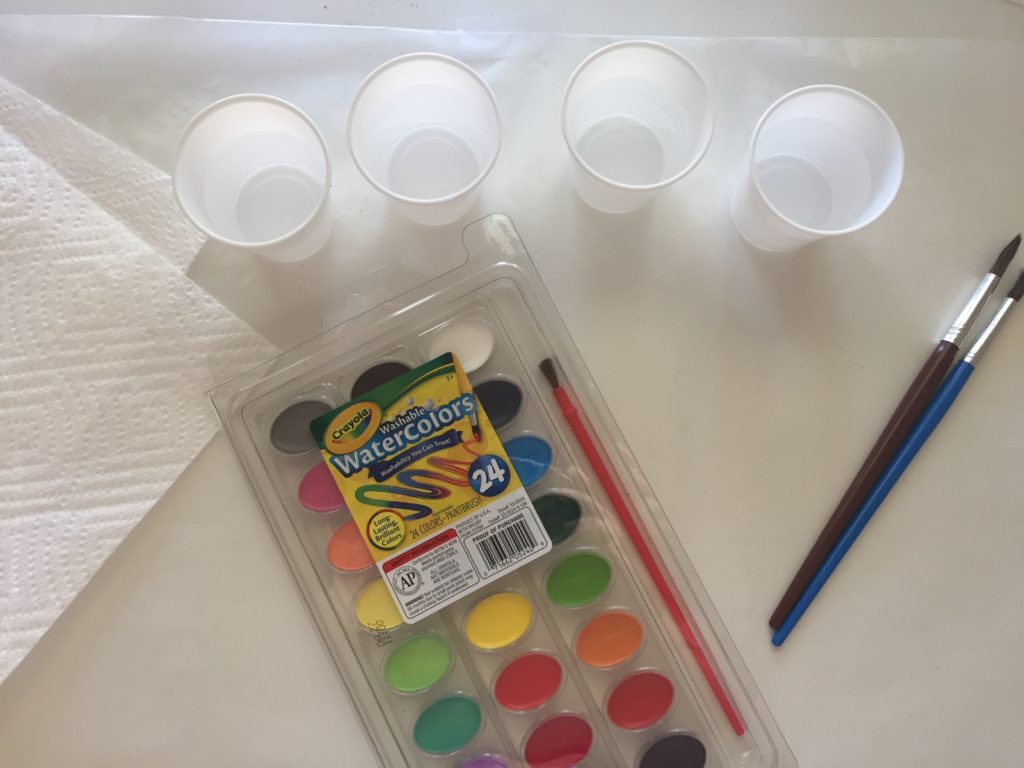
First, I printed out some designs on white cardstock. When I do this project again, I will use paper that is thicker than standard cardstock so the bookmarks have a little more weight. These were super easy to design in Word, I just made a text box the size I wanted and then typed in some fun book-themed phrases. I suck at cutting a straight line so I used my paper cutter, but you could just cut out the rectangles with scissors if you are cool like that.
I let the printer ink dry for a little while to make sure it didn’t smear. In the meantime I set up my watercolors. I used a simple Crayola set that had all the colors I wanted. I had some extra brushes ready but I really only used the one that came with the set. I also had some mini cups of water ready and paper towels on hand for clean up and brush wiping.
I waited about an hour after printing the bookmarks from my computer before I started the painting, which was plenty of time. I chose to do a couple of different color combos and kept two of the bookmarks one color. I have to say that the rainbow one is probably my favorite.
I let the bookmarks dry overnight and then I took a black Sharpie and went over some of the lettering that had faded from the paint. I also put them under some hardback books for a few hours so they flattened out a little since the paint made the edges curl up a bit. This is the final product…
I love how these came out and I will definitely be making some more in the future. What book quotes or phrases do you like? Give me some idea so I have some for my next round! And make sure you follow my bookstagram account, @coffeebookswinerepeat!
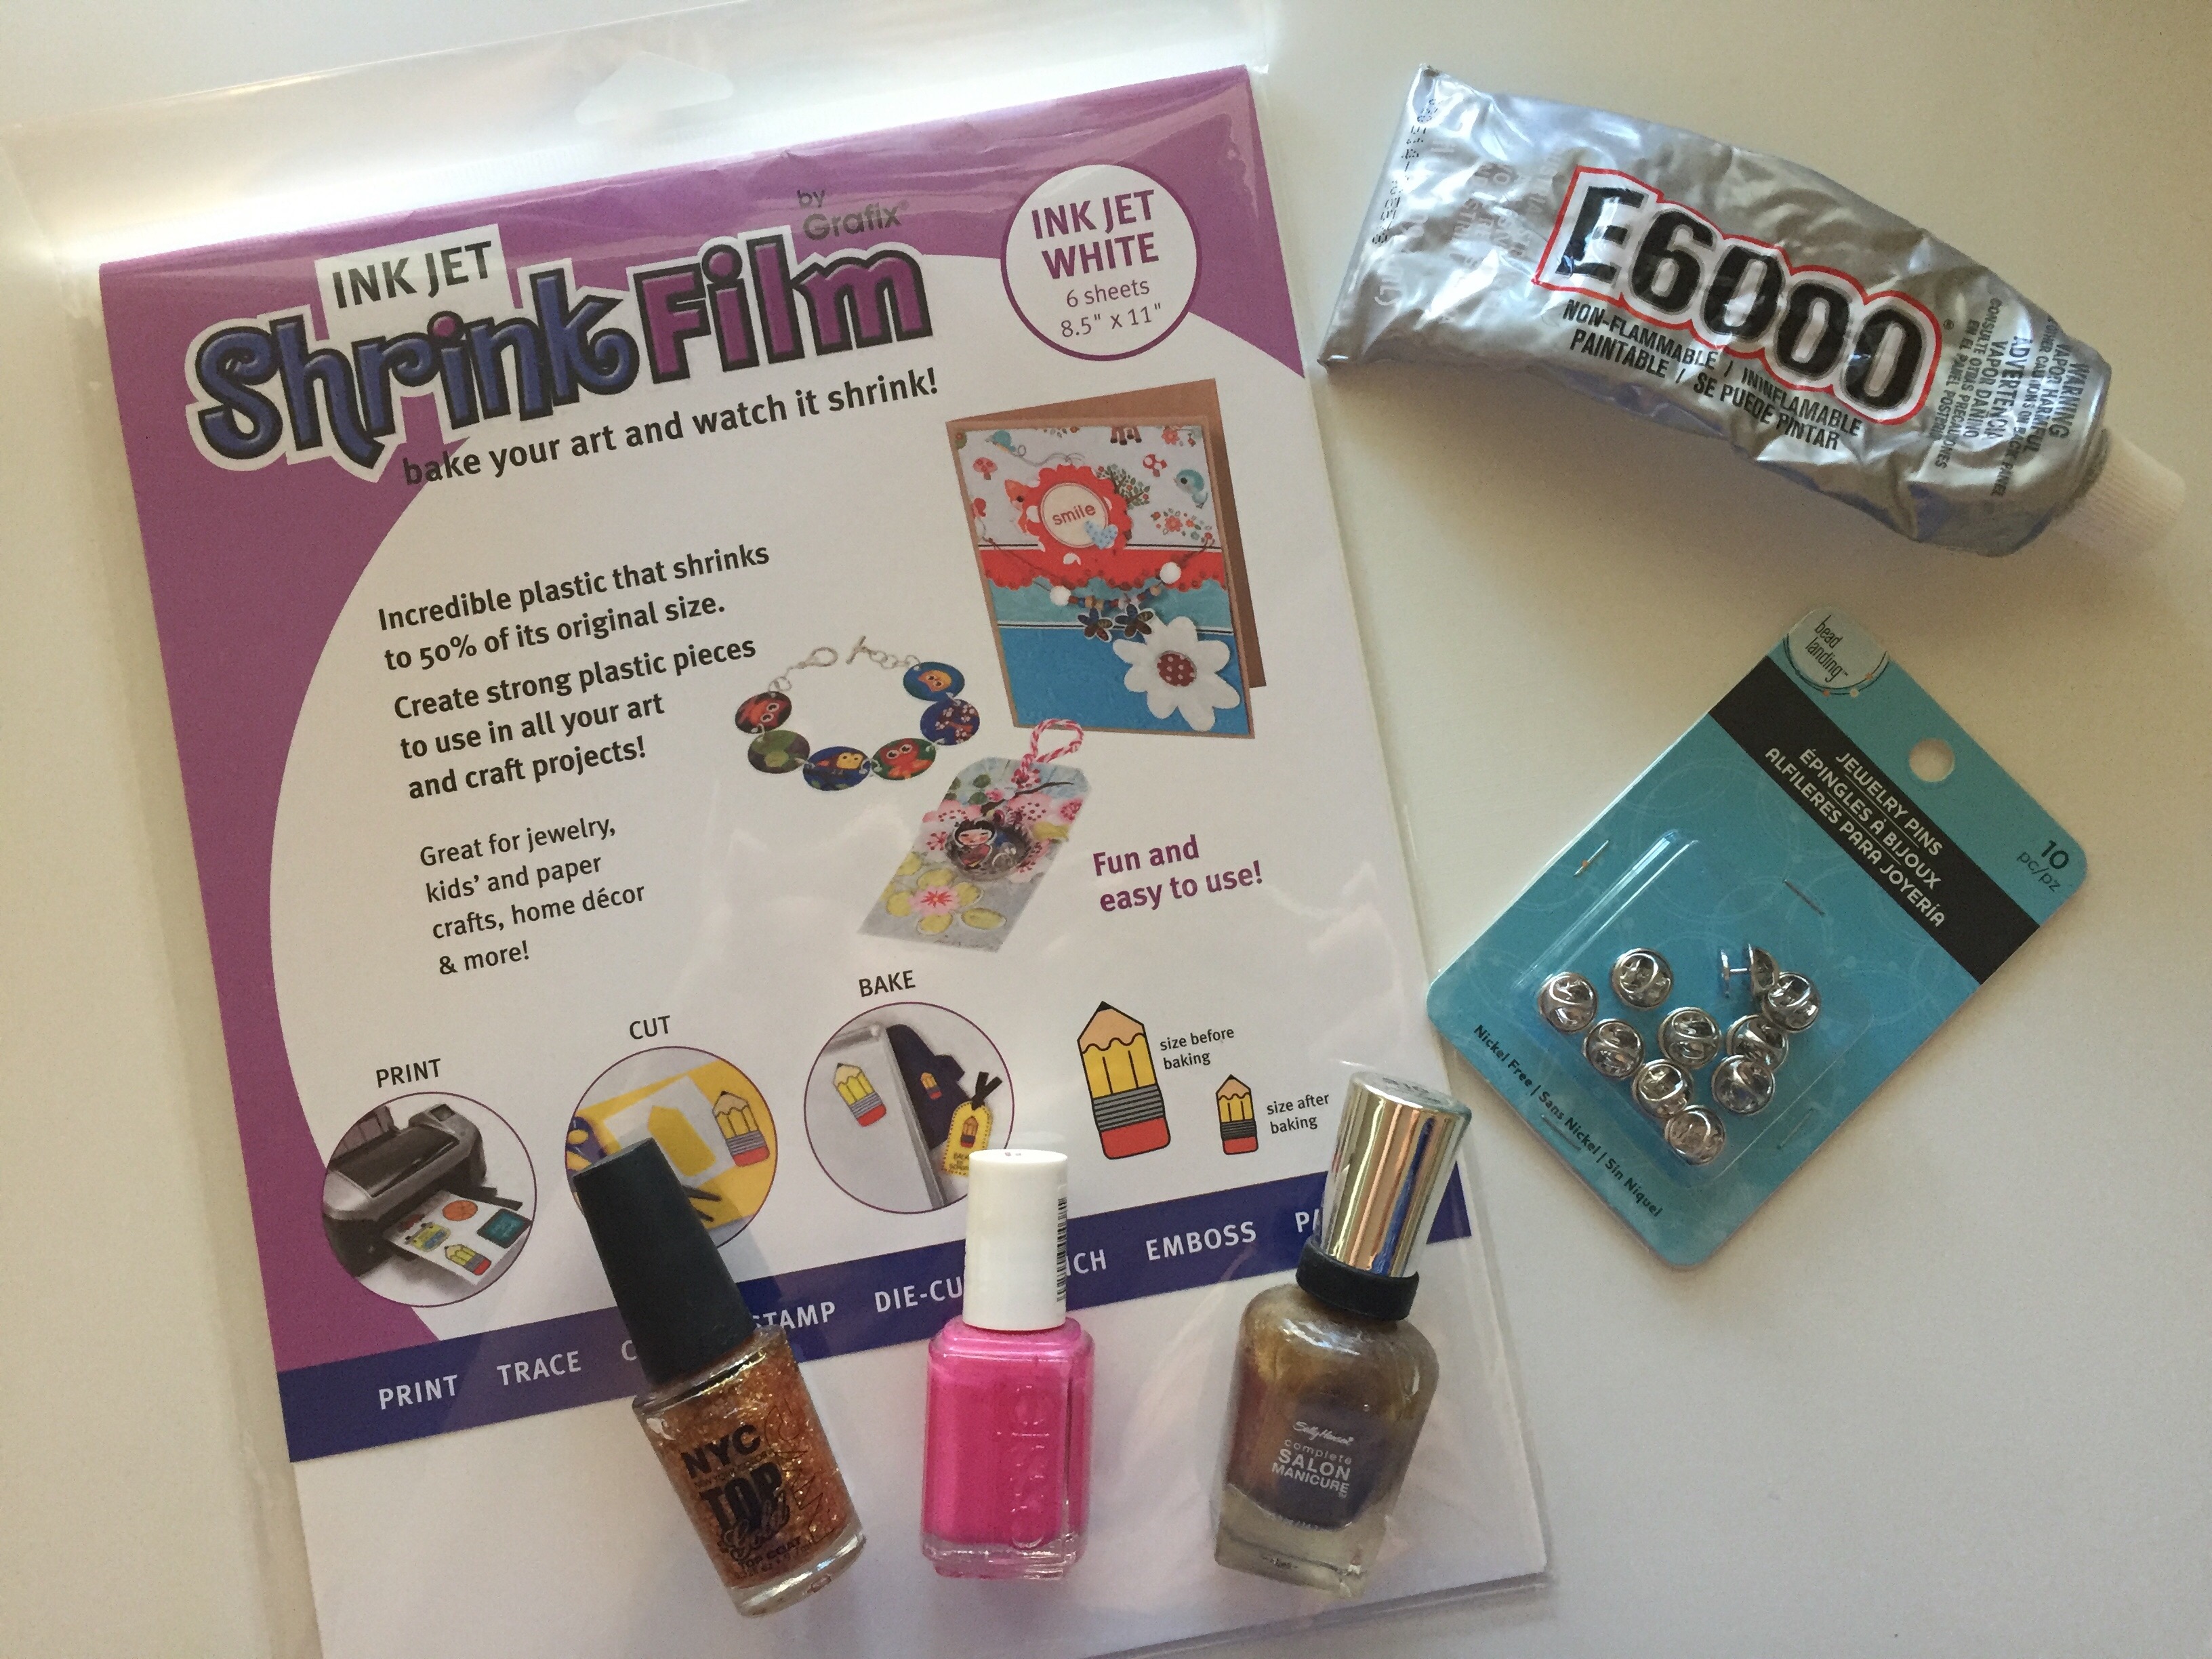
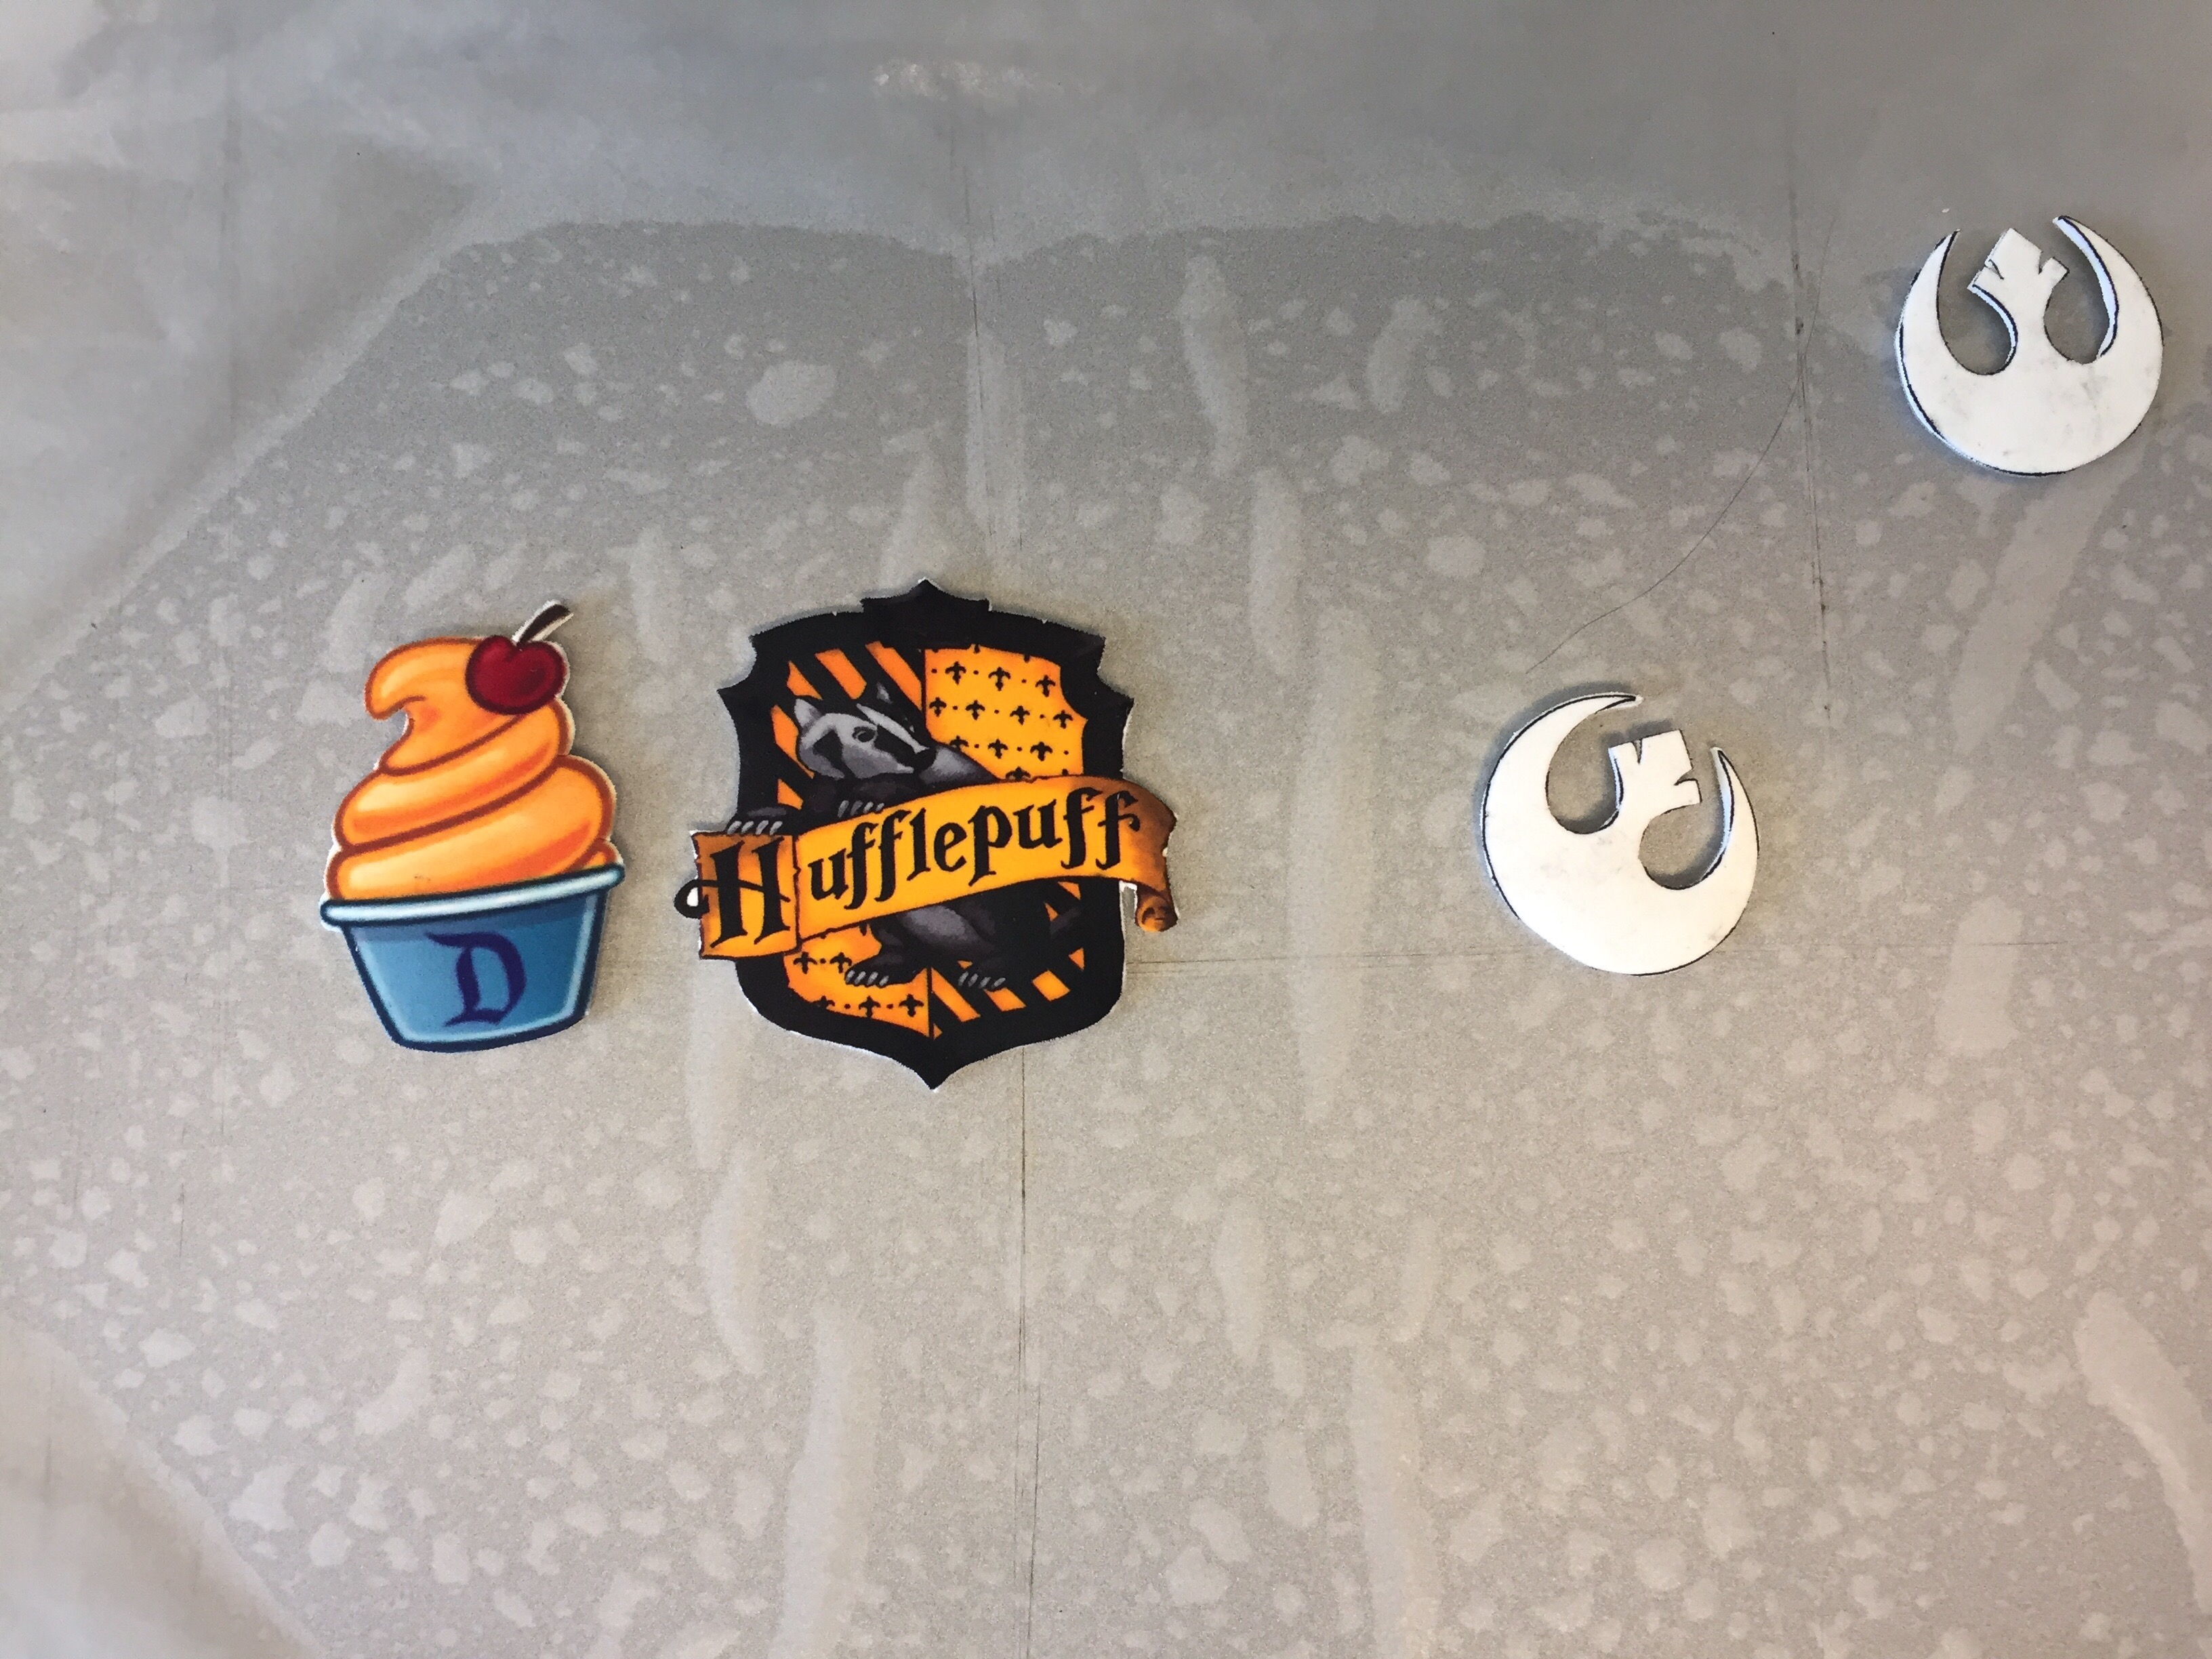
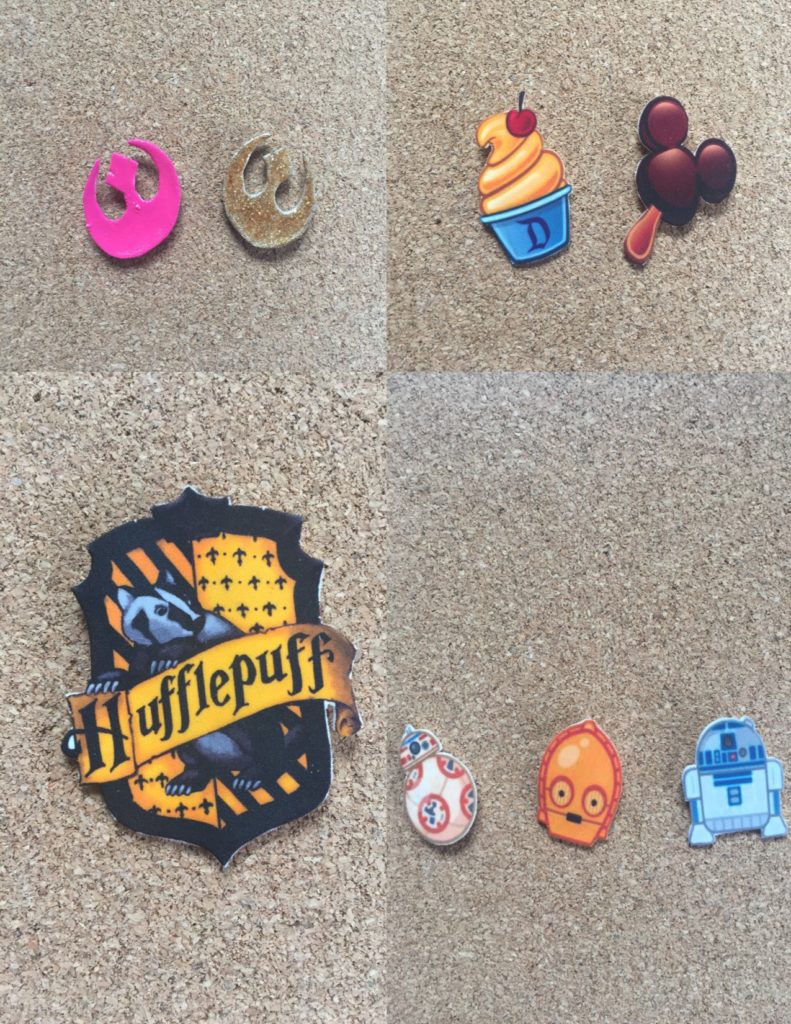
So I got the idea for this craft because I wanted to figure out how to make a name tag for myself for when I am coordinating weddings. I was looking for different DIY methods and came upon a blast from my past: Shrinky Dinks. I did not know Shrinky Dinks were still a thing, but they are, and they are even more awesome than I remembered! Of course, I have yet to make my name tag for my, you know job, but I did find time to make some fun Disney and Harry Potter pins! These were all super easy to make and they came out so cute!
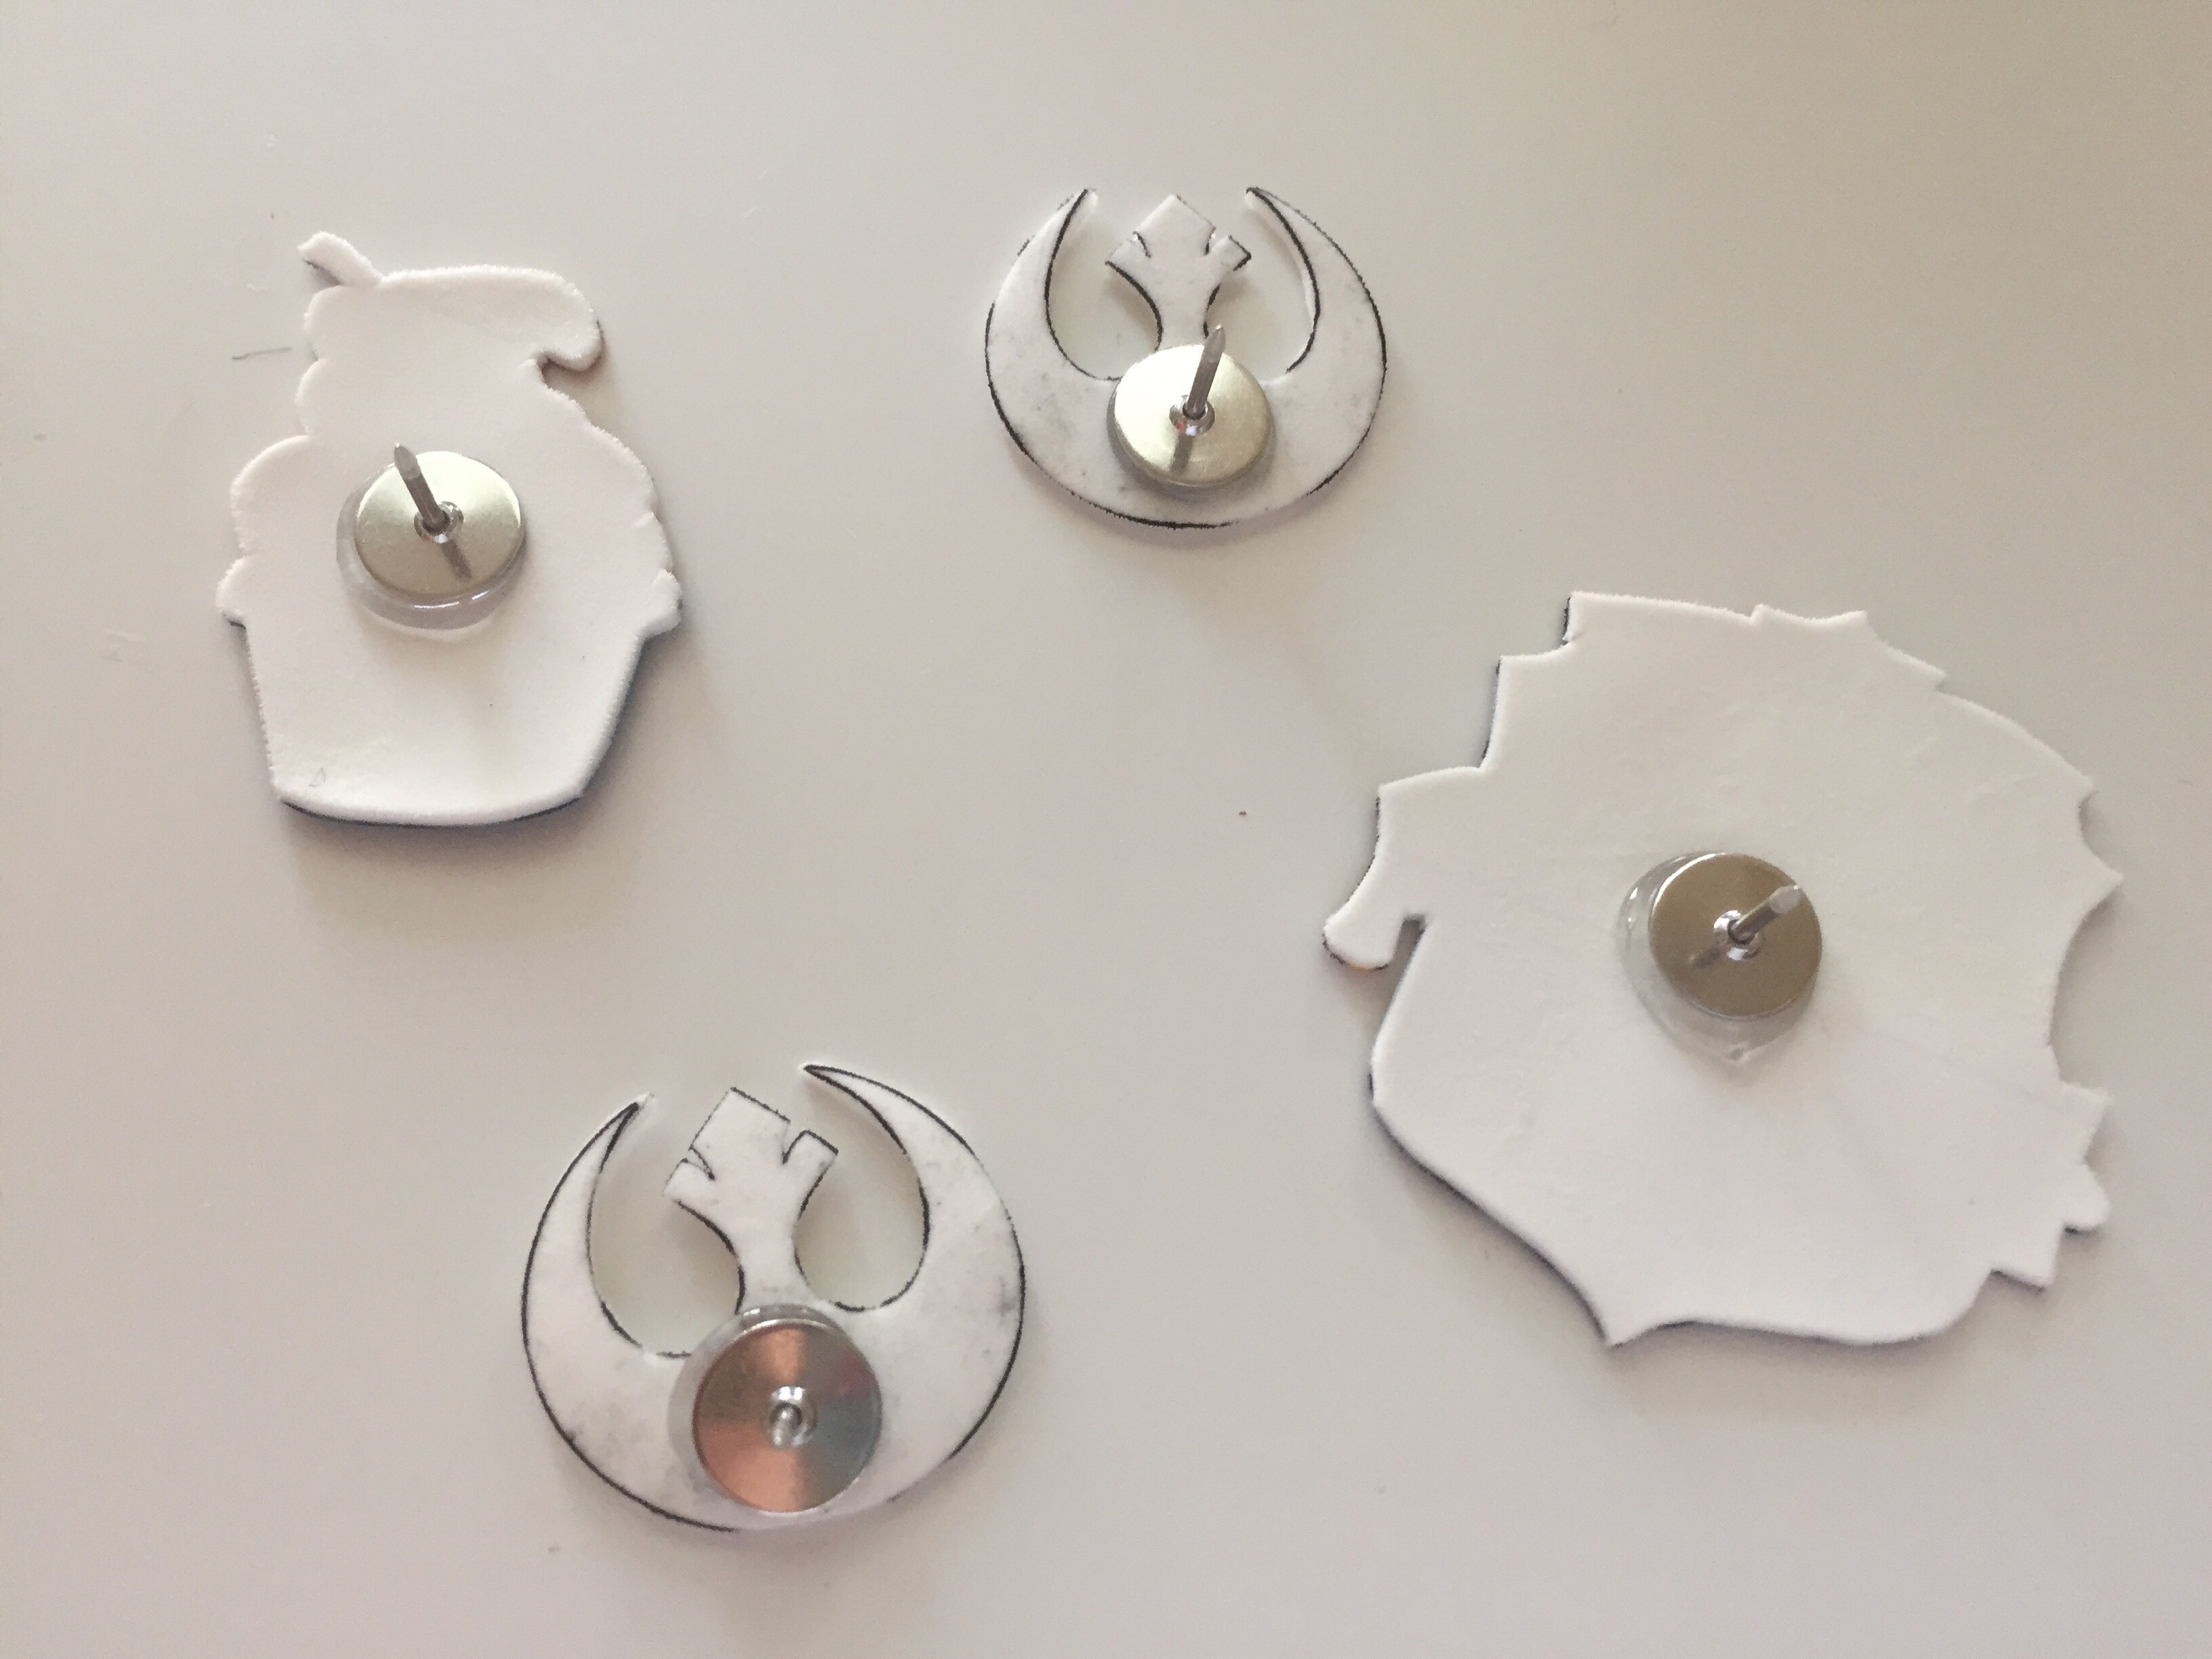
Here’s what you need to make the pins: Shrinky Dink printable paper, pins and backs, E6000 glue, and nail polish.
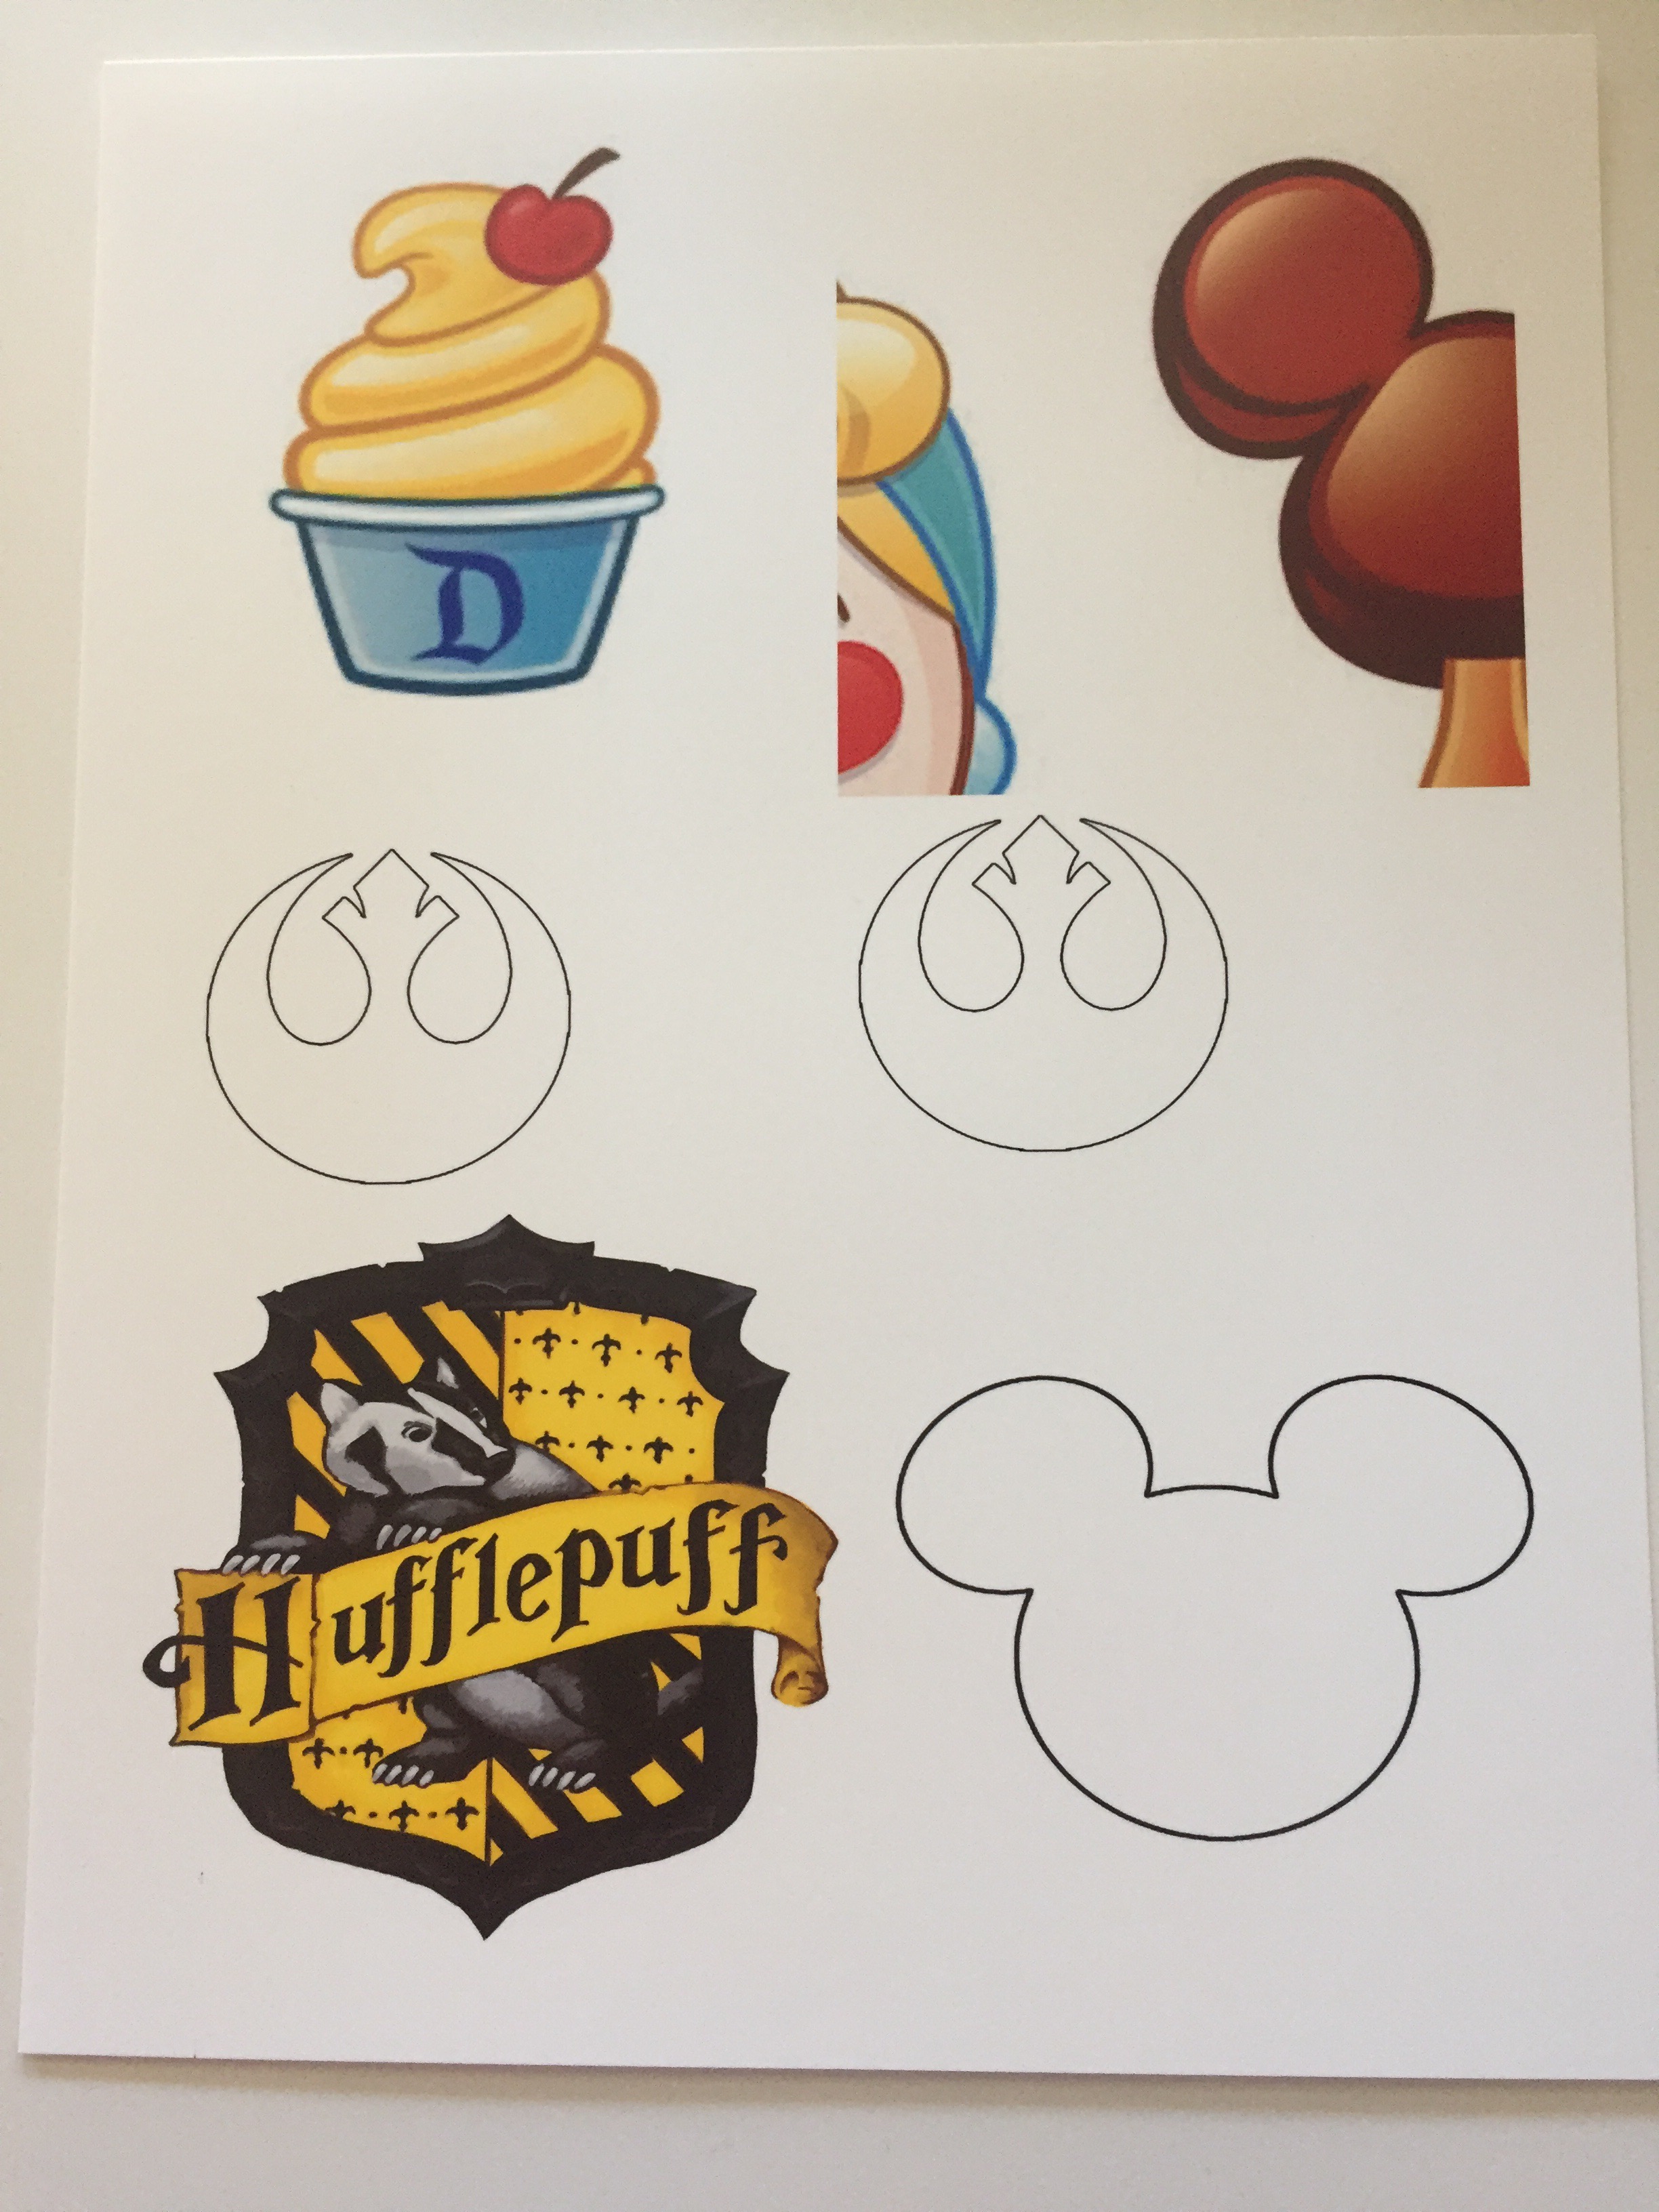
First, print off your chosen designs on the Shrinky Dink paper. I did two different versions of pins. Some of the designs are full color, and the Rebel Alliance sign is just the outline. Remember that the designs are going to shrink to about half their size, so you want to print them out to be about twice as big as you want the final product to be.
Cut out the designs as close as possible to the lines. You may need to use an Xacto knife or a small pair of scissors to get in the tight places.
Lay the shapes out on a baking sheet that is covered in wax paper. Cover the shapes with an additional piece of wax paper and then bake in your oven according to the directions on the package.
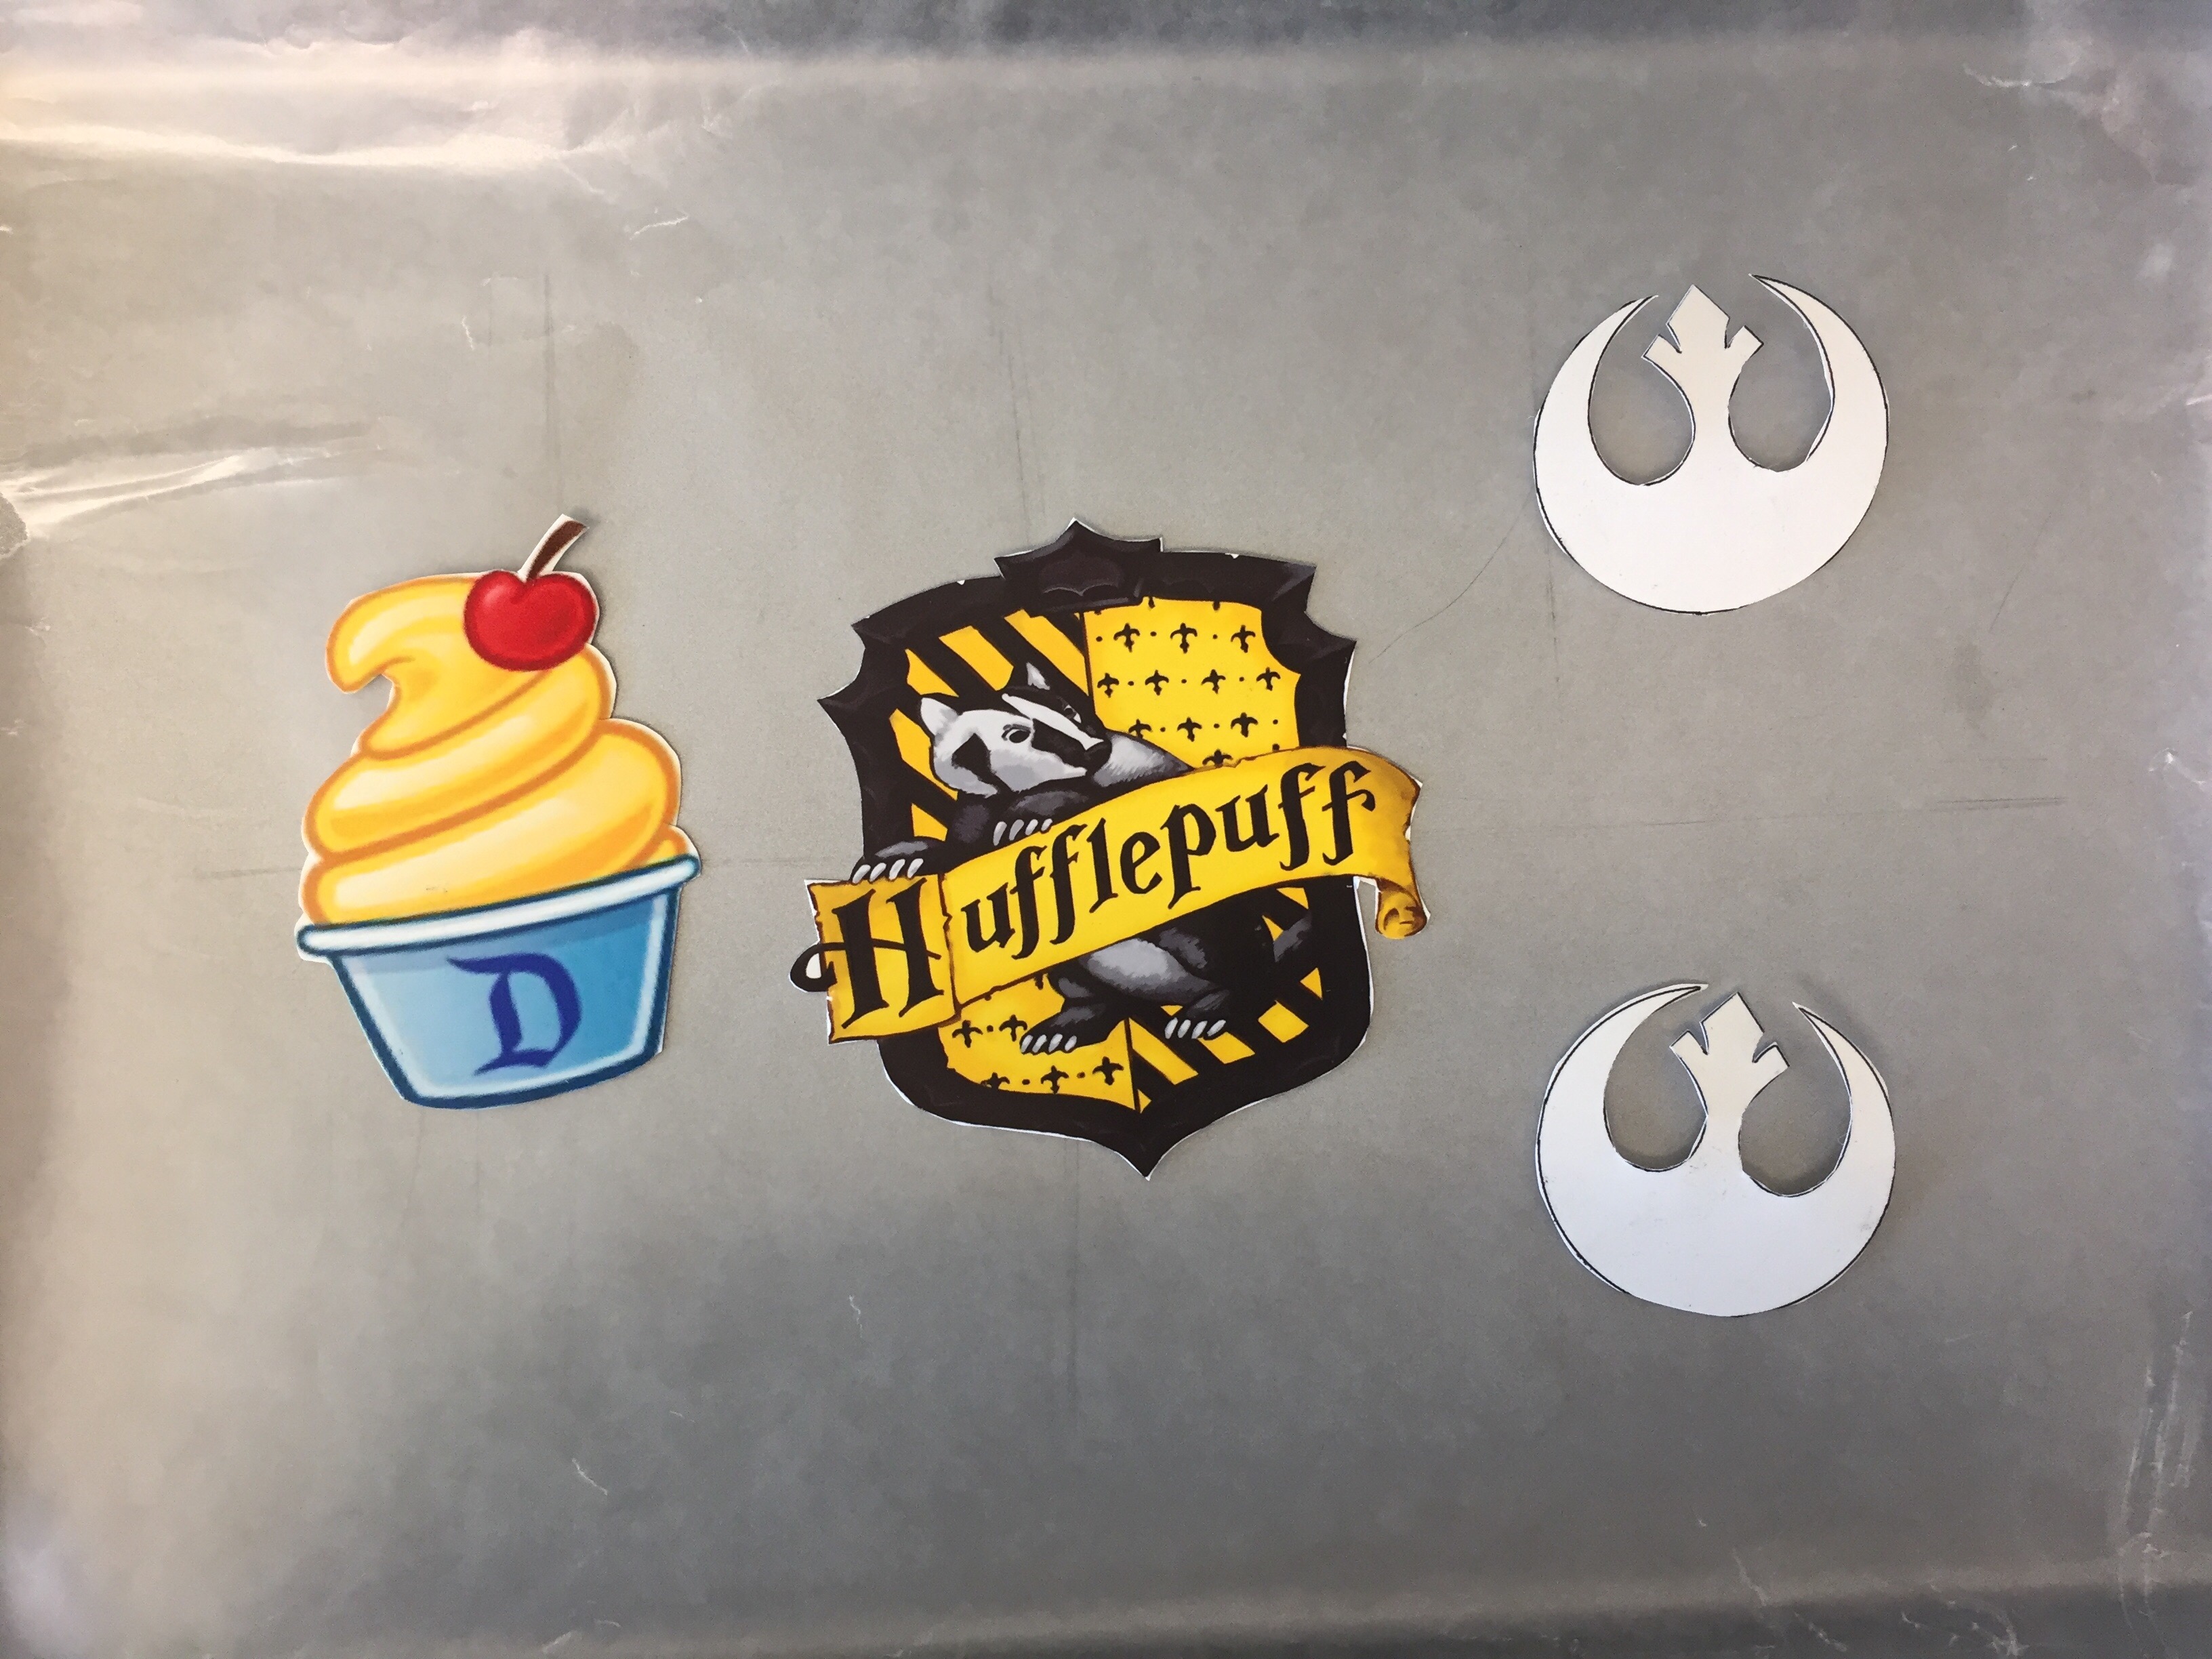
Once the Shrinky Dinks are done baking and have cooled, use the E6000 glue to attach the pins to the back of the shapes. For the full color pieces, this is the final step.
For the outlined pieces (like the Rebel Alliance symbol), use the nail polish to paint the pieces, Make sure to do thin coats and use a top coat to seal the color when the polish is dry.
There are so many possibilities with these pins! In addition to my adorable Disney food pins, I made some super cute Star Wars themed pins, and made my own Hufflepuff badge.
I can’t to wear all of my new pins out and about and I am excited to come up with more ideas for new designs! What other kinds of pins should I make?
Here are some supplies I used to make this project (affiliate links):
Well, my ear-making friends, it has been almost one whole year since I made my first fabric covered pair of Minnie ears. Despite the fact that fabric ears are a complete pain in the ass to put together, I cannot seem to stop making them, for the very simple reason that I have a problem. My name is Falon, and I am addicted to crafting Minnie ears. And with all the millions of fabrics out there in the world, there are just too. many. options. And I can’t stop! The good news is that through my addiction, I have been able to nail down my fabric covered ears making process, and while it is still a pain in the ass, it is much more manageable now that I know what I’m doing. So I figured it was time to share an in depth tutorial with you. This is going to be a long one, but I wanted to really lay out my process step by step. Buckle in folks and get ready for some serious crafting.
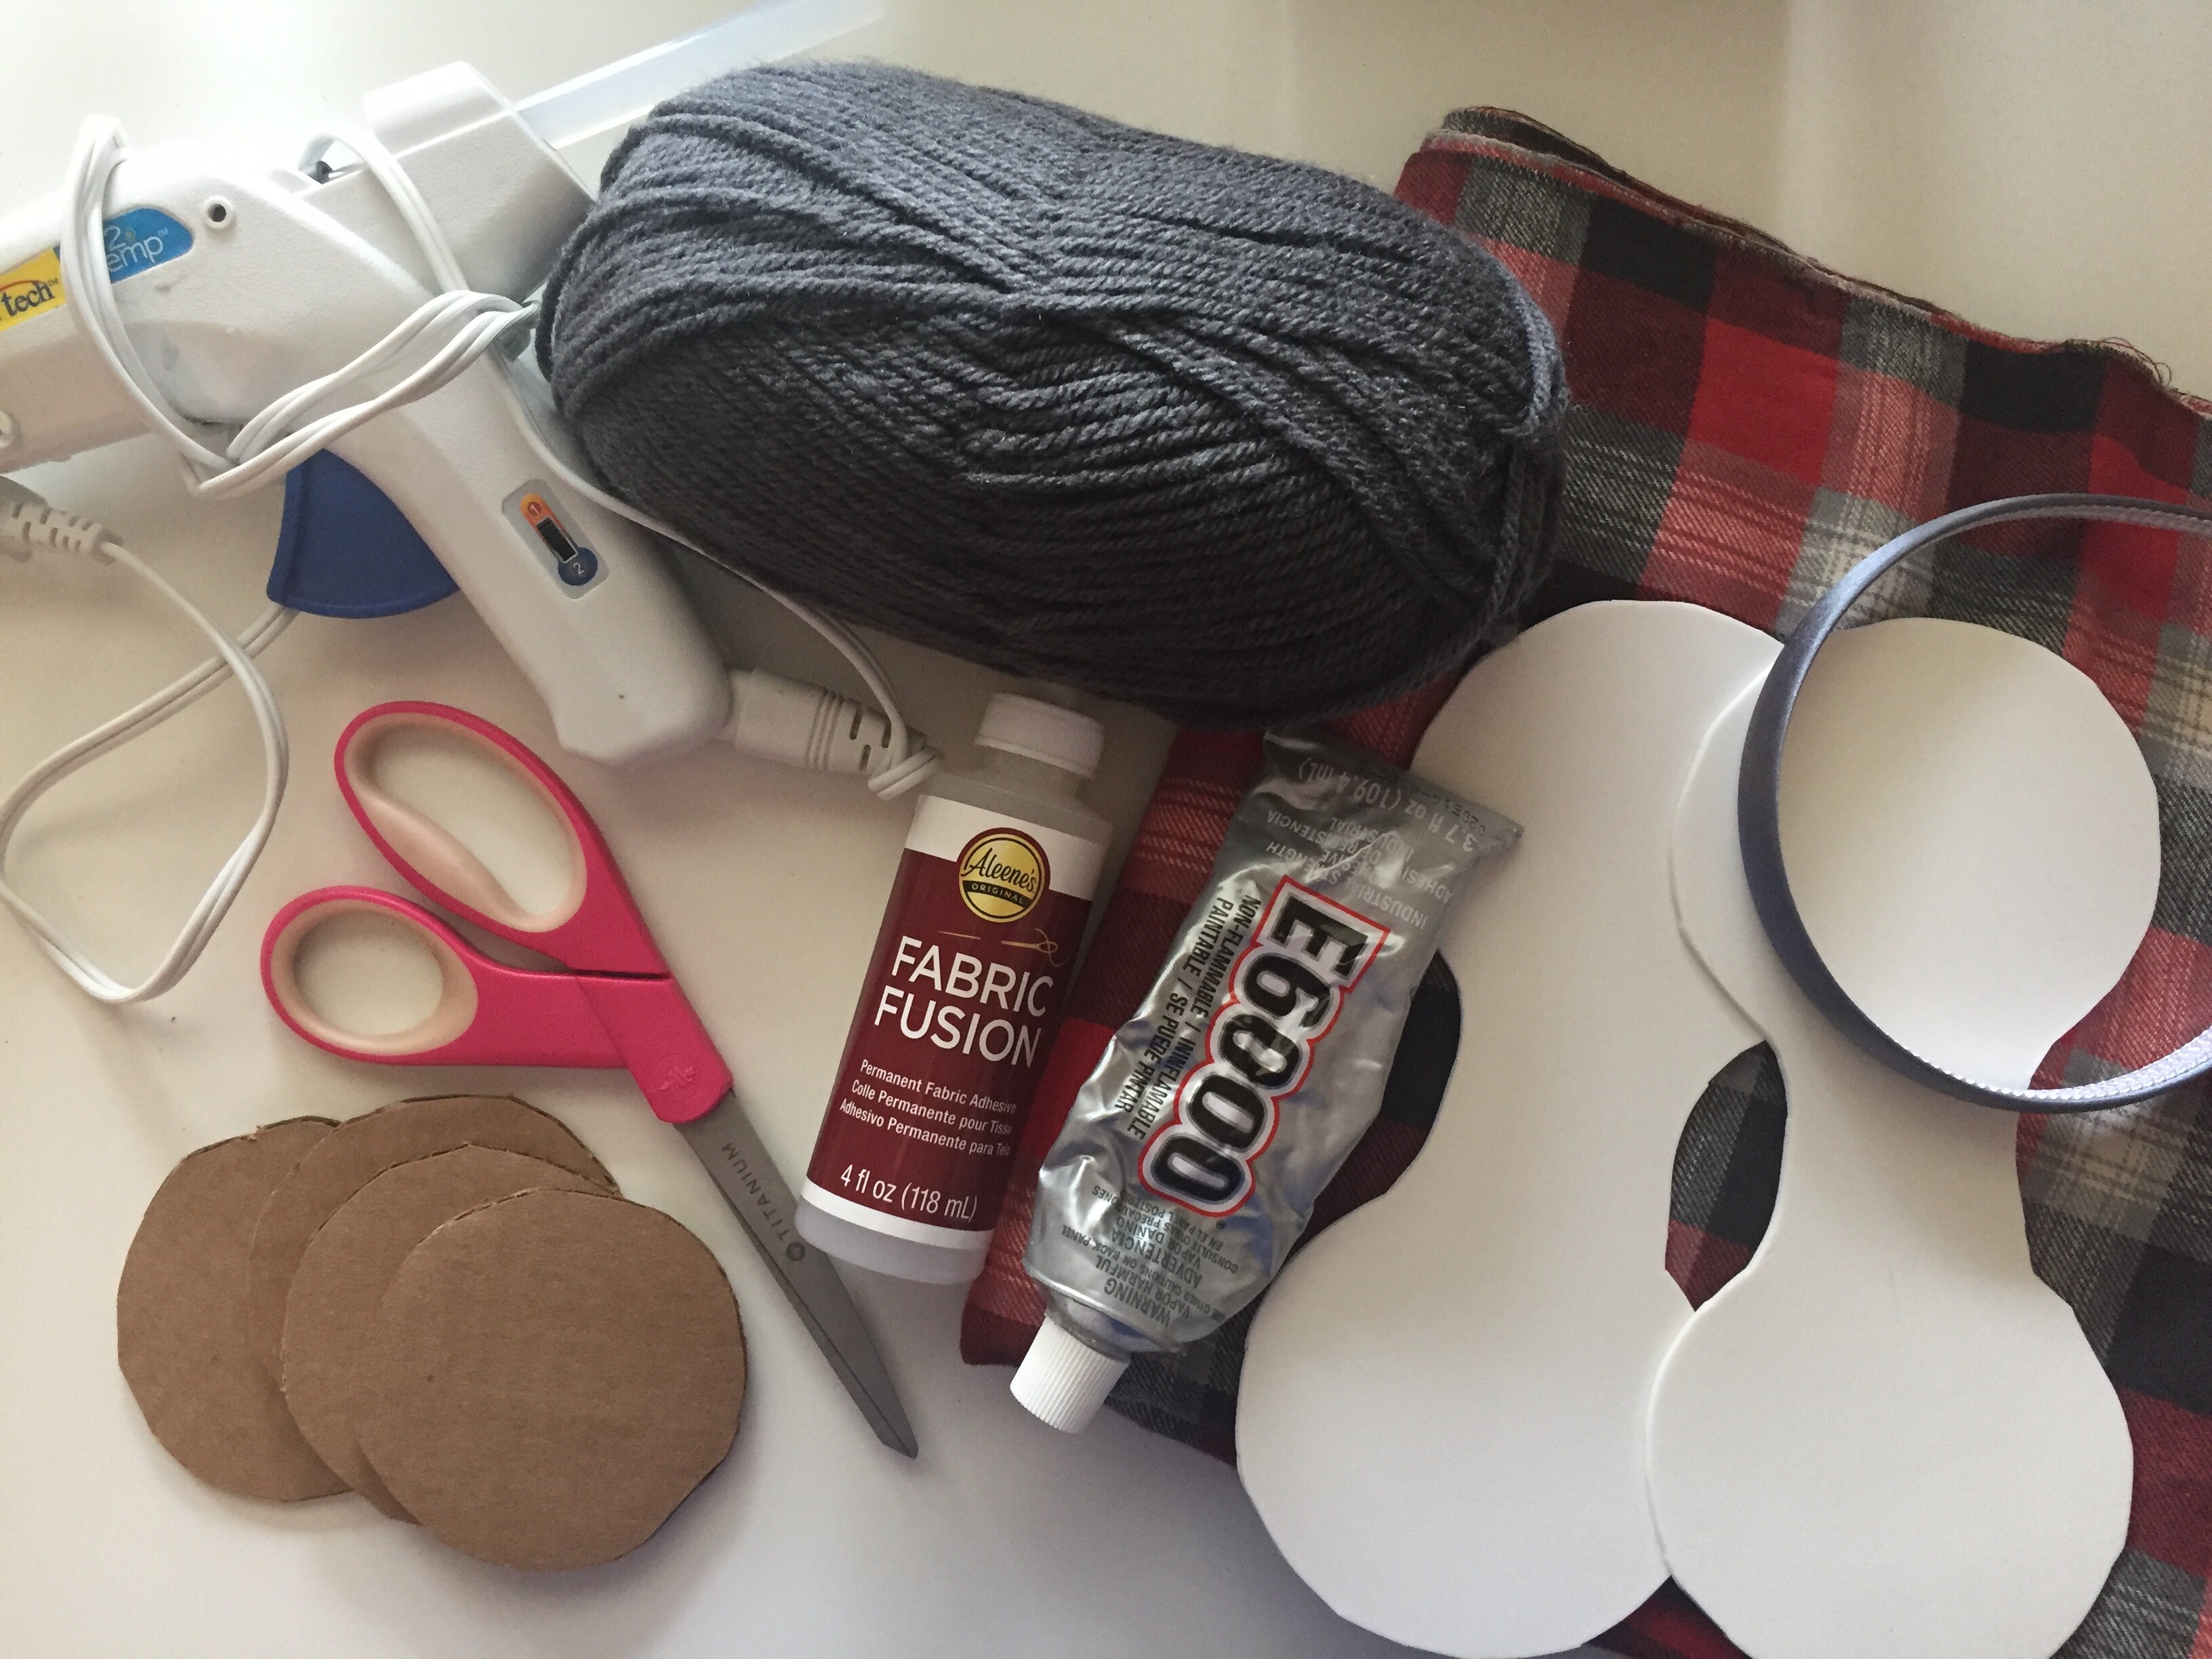
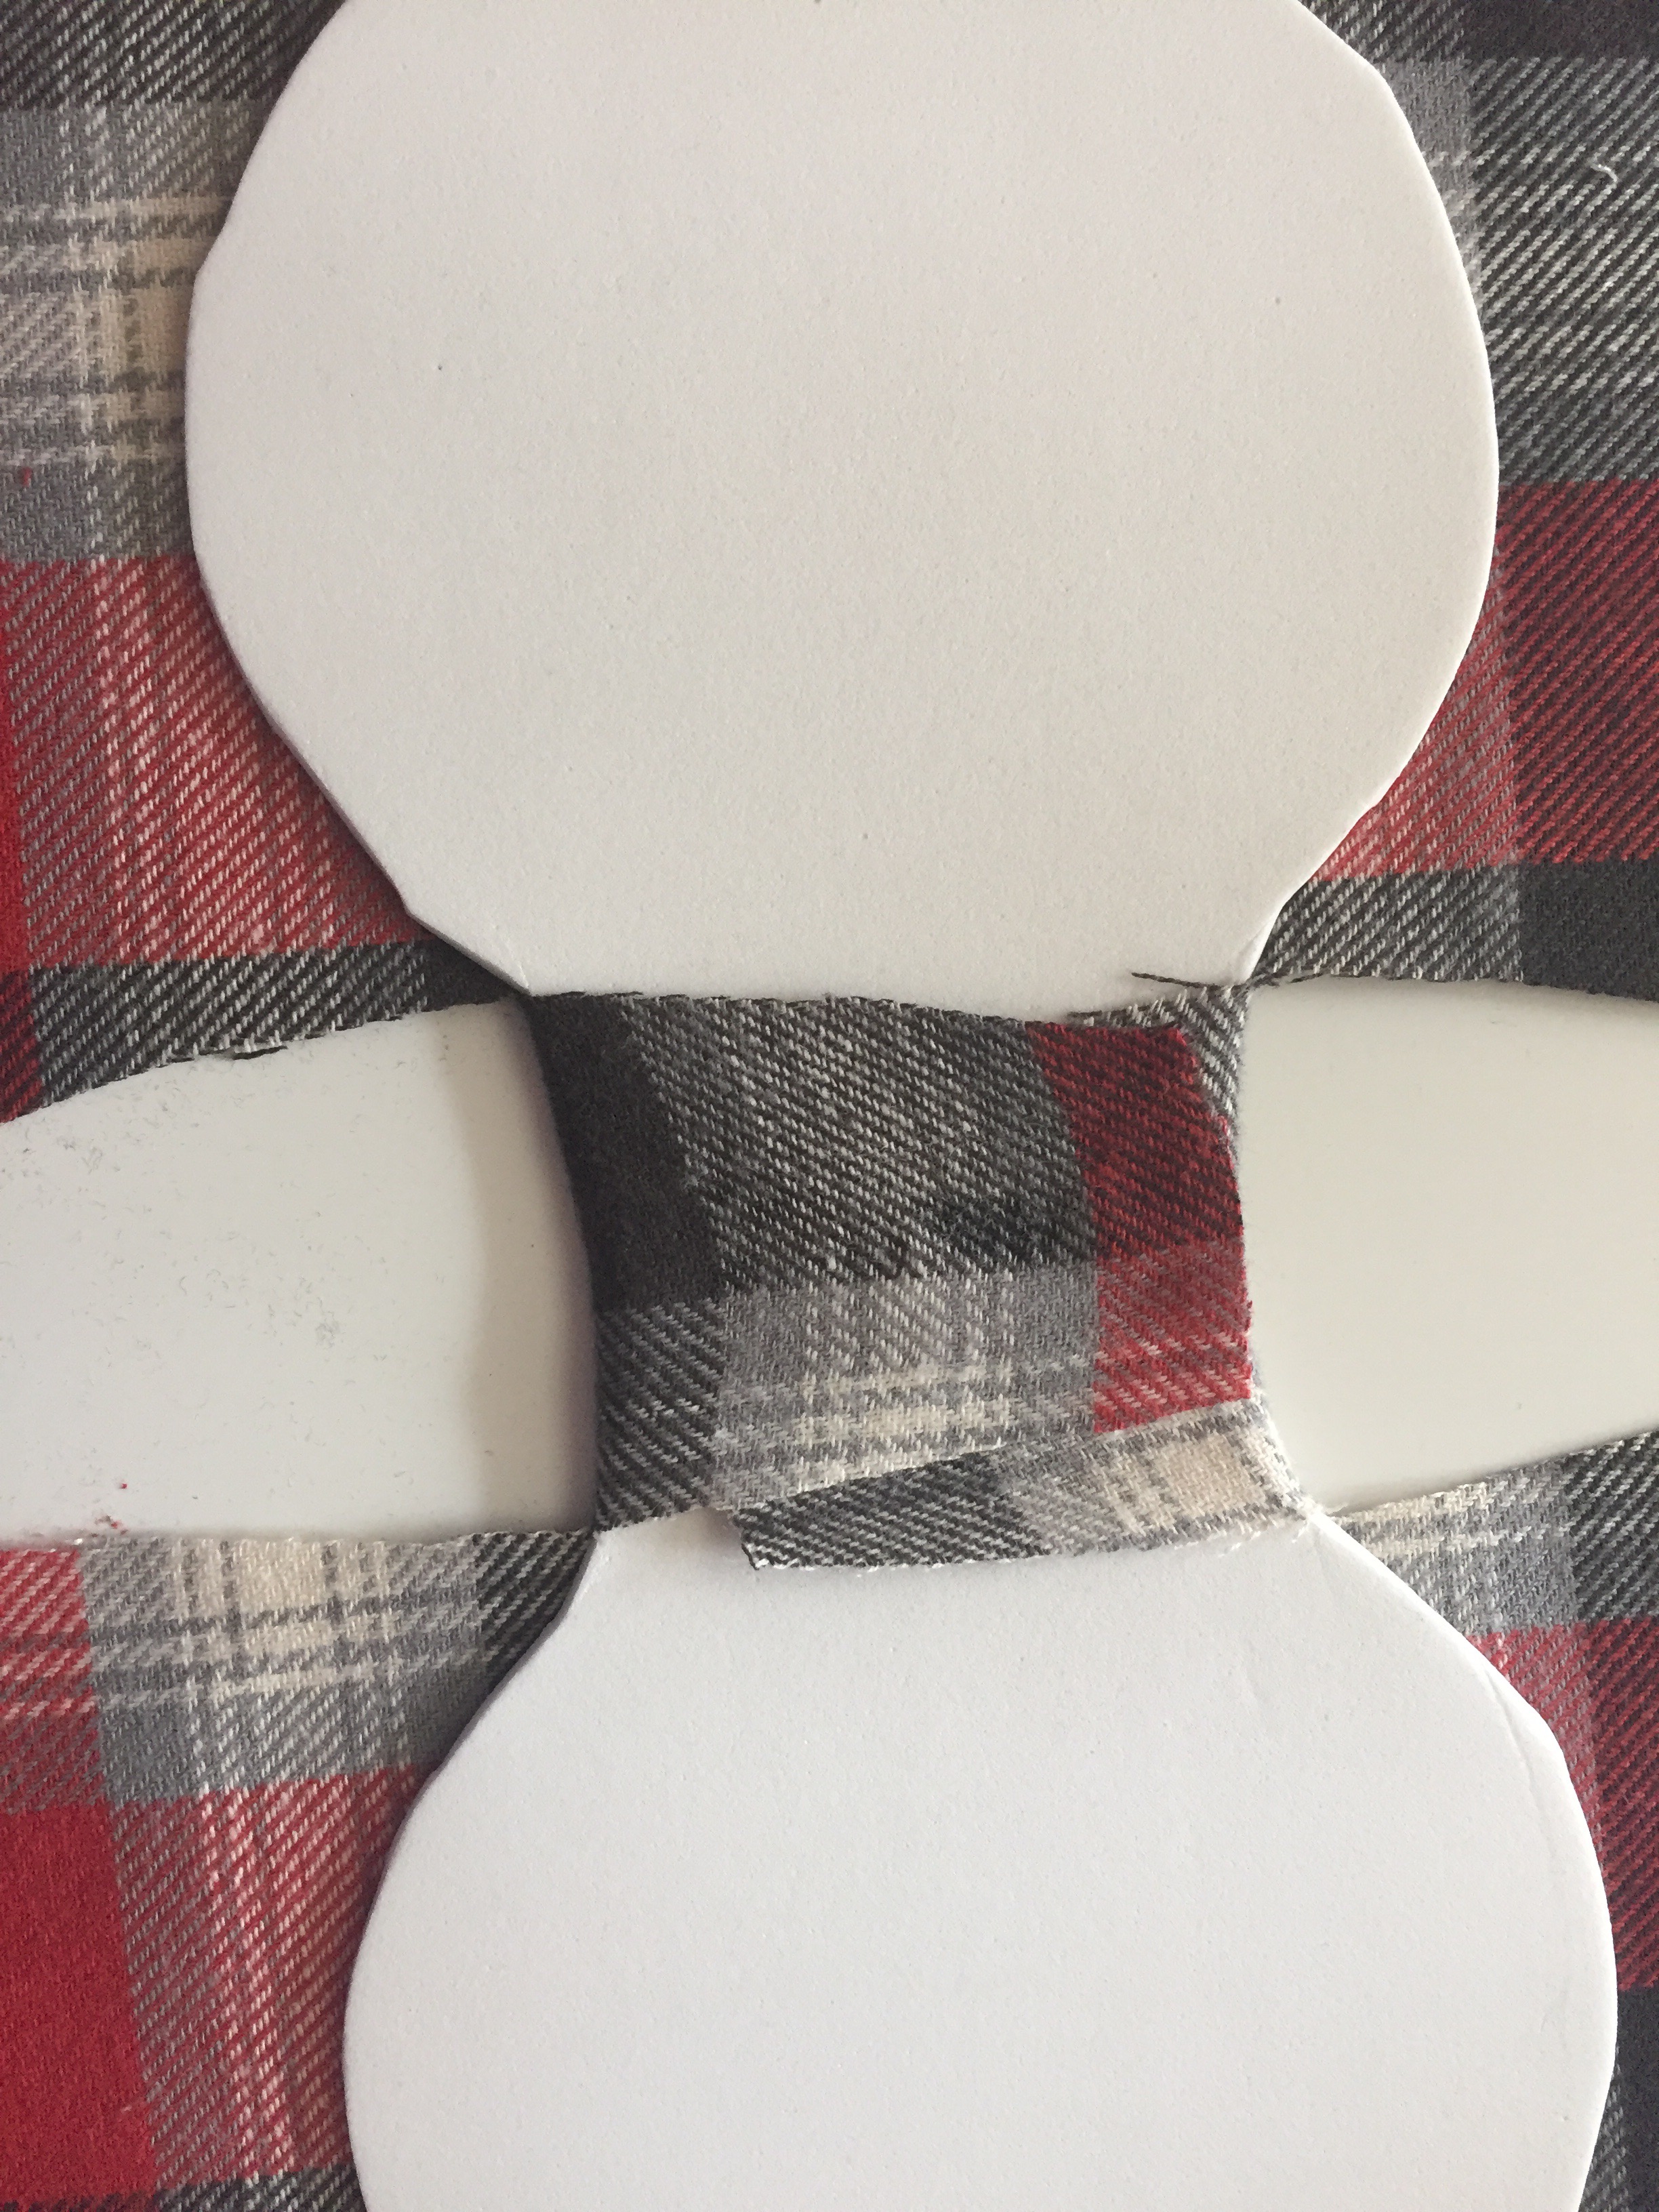
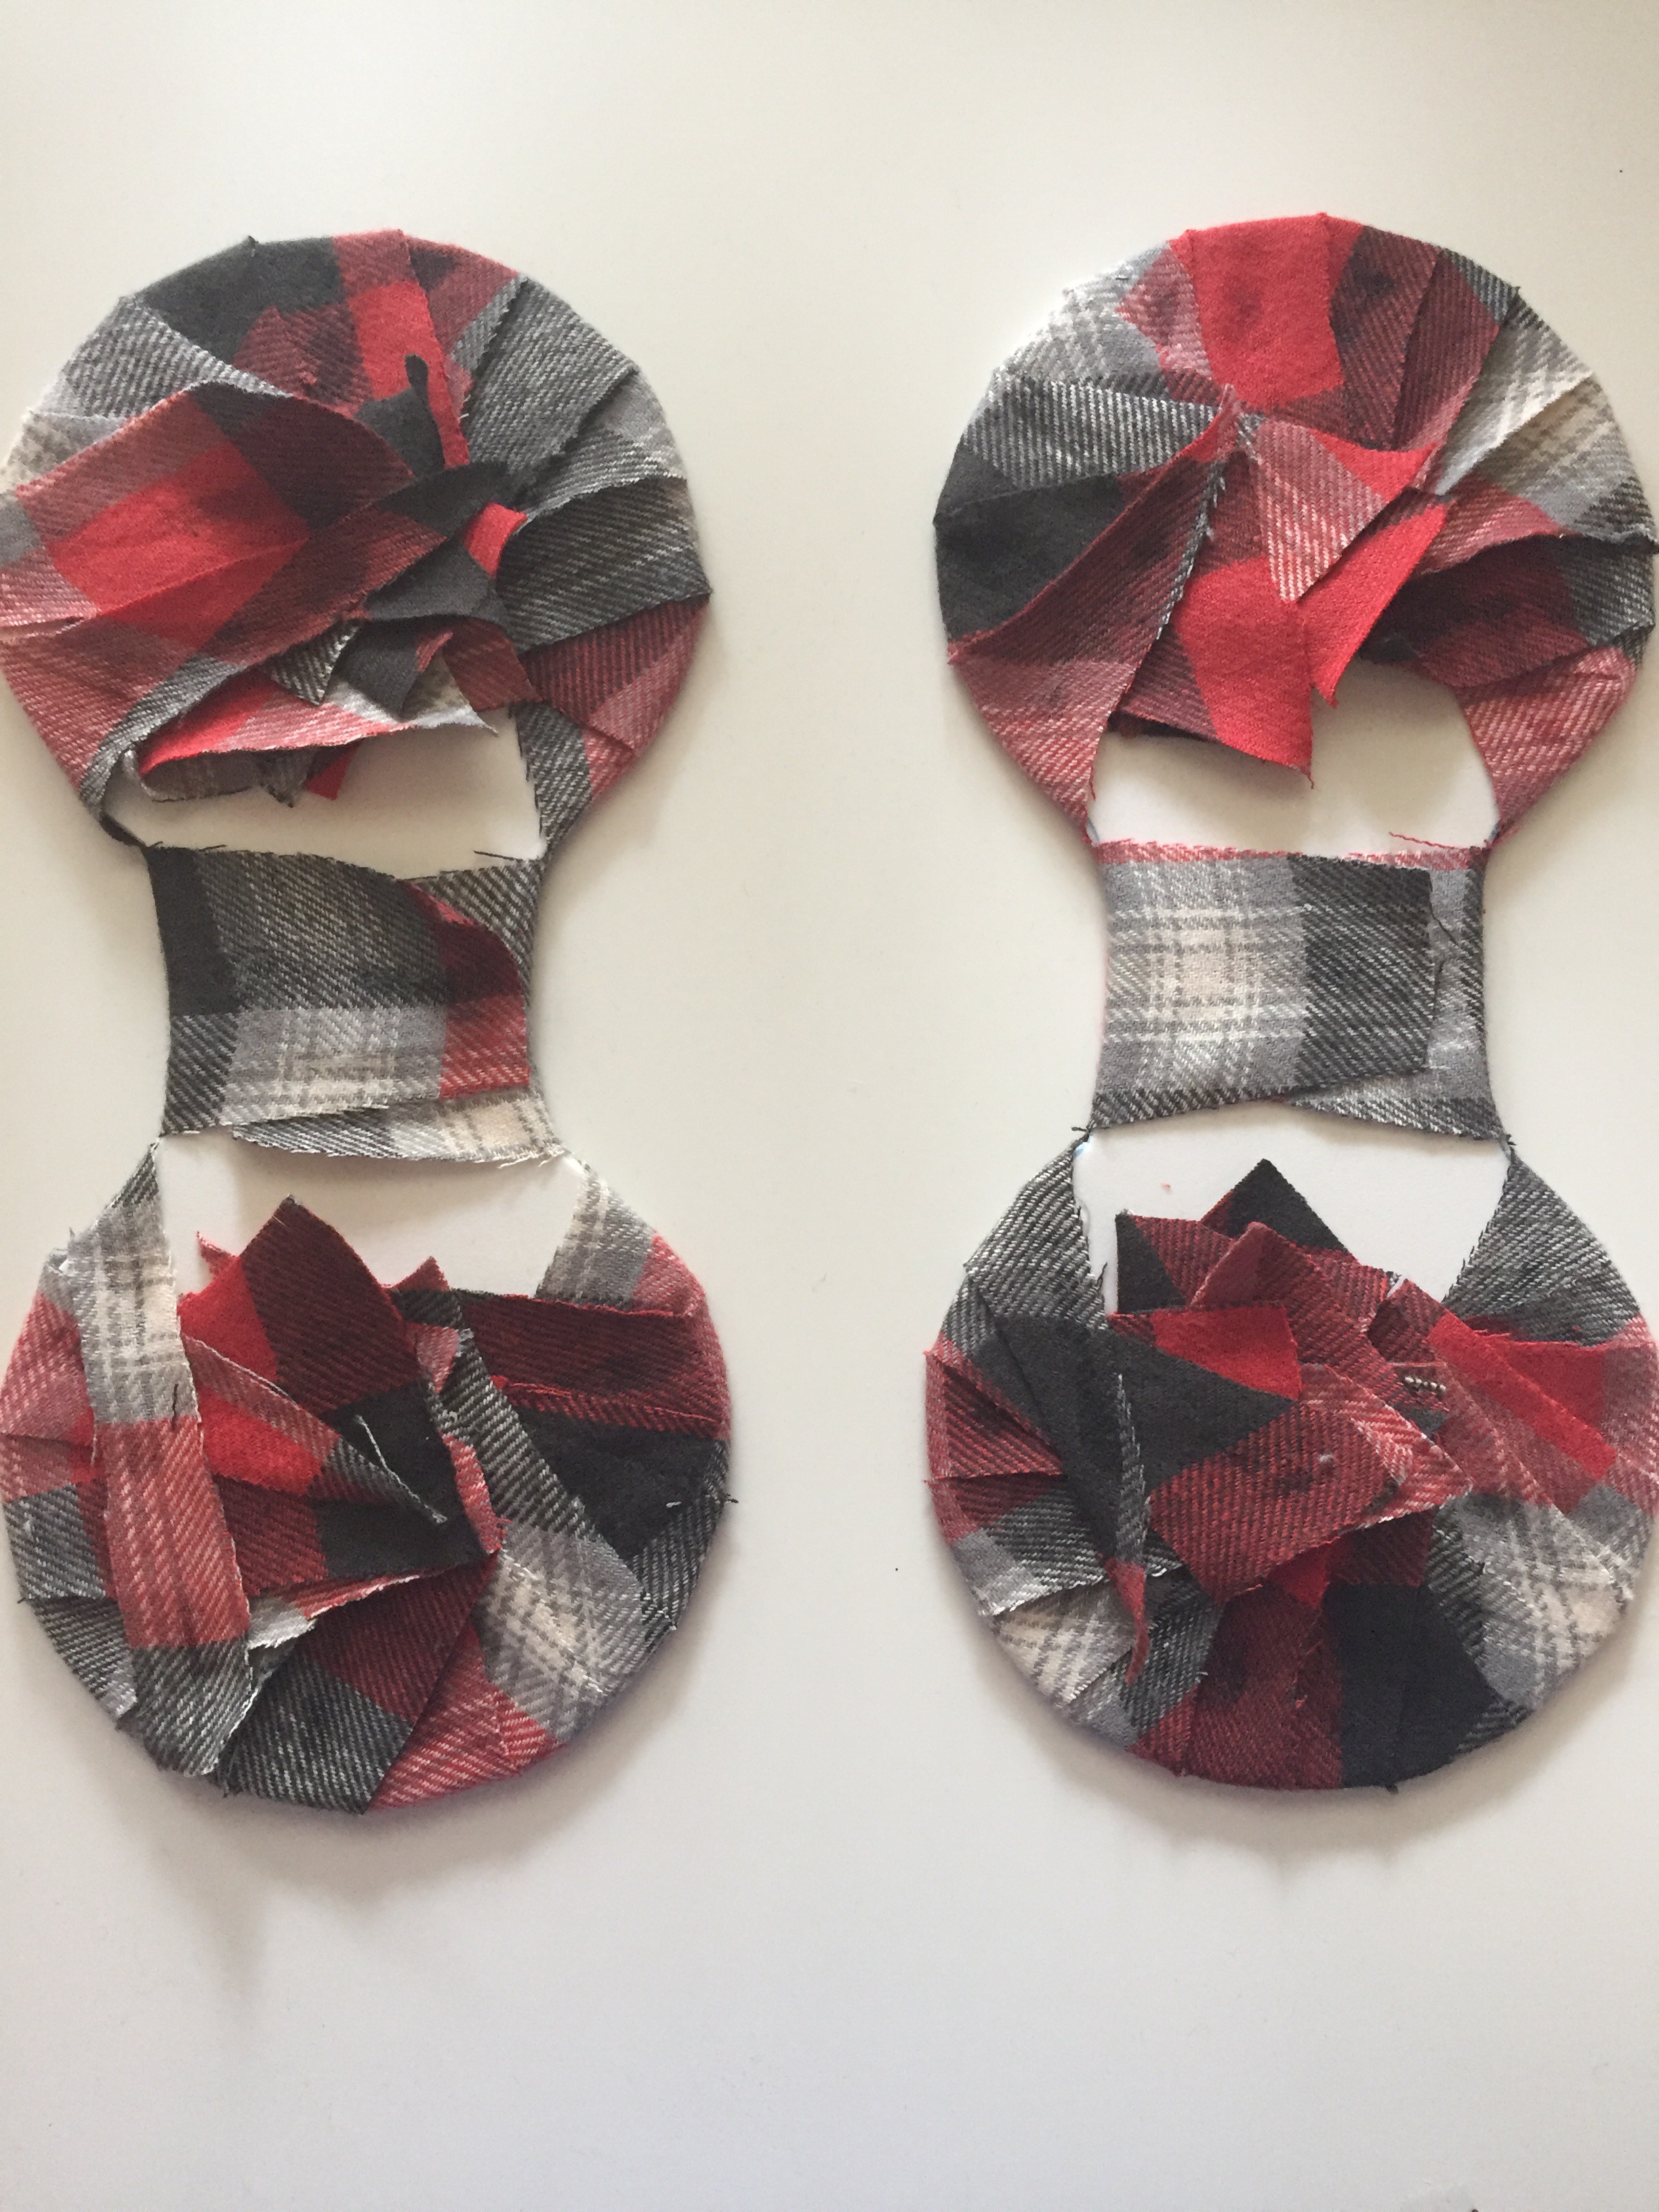
First, let’s gather our supplies: fabric of your choice, a headband, foam cut out in the ear shape (I use this template found here), a hot glue gun, E6000 glue, cardboard circles, good scissors, fabric glue, and yarn (yarn is specific to these particular ears, but whatever fabric you use, you will want some kind of trim).
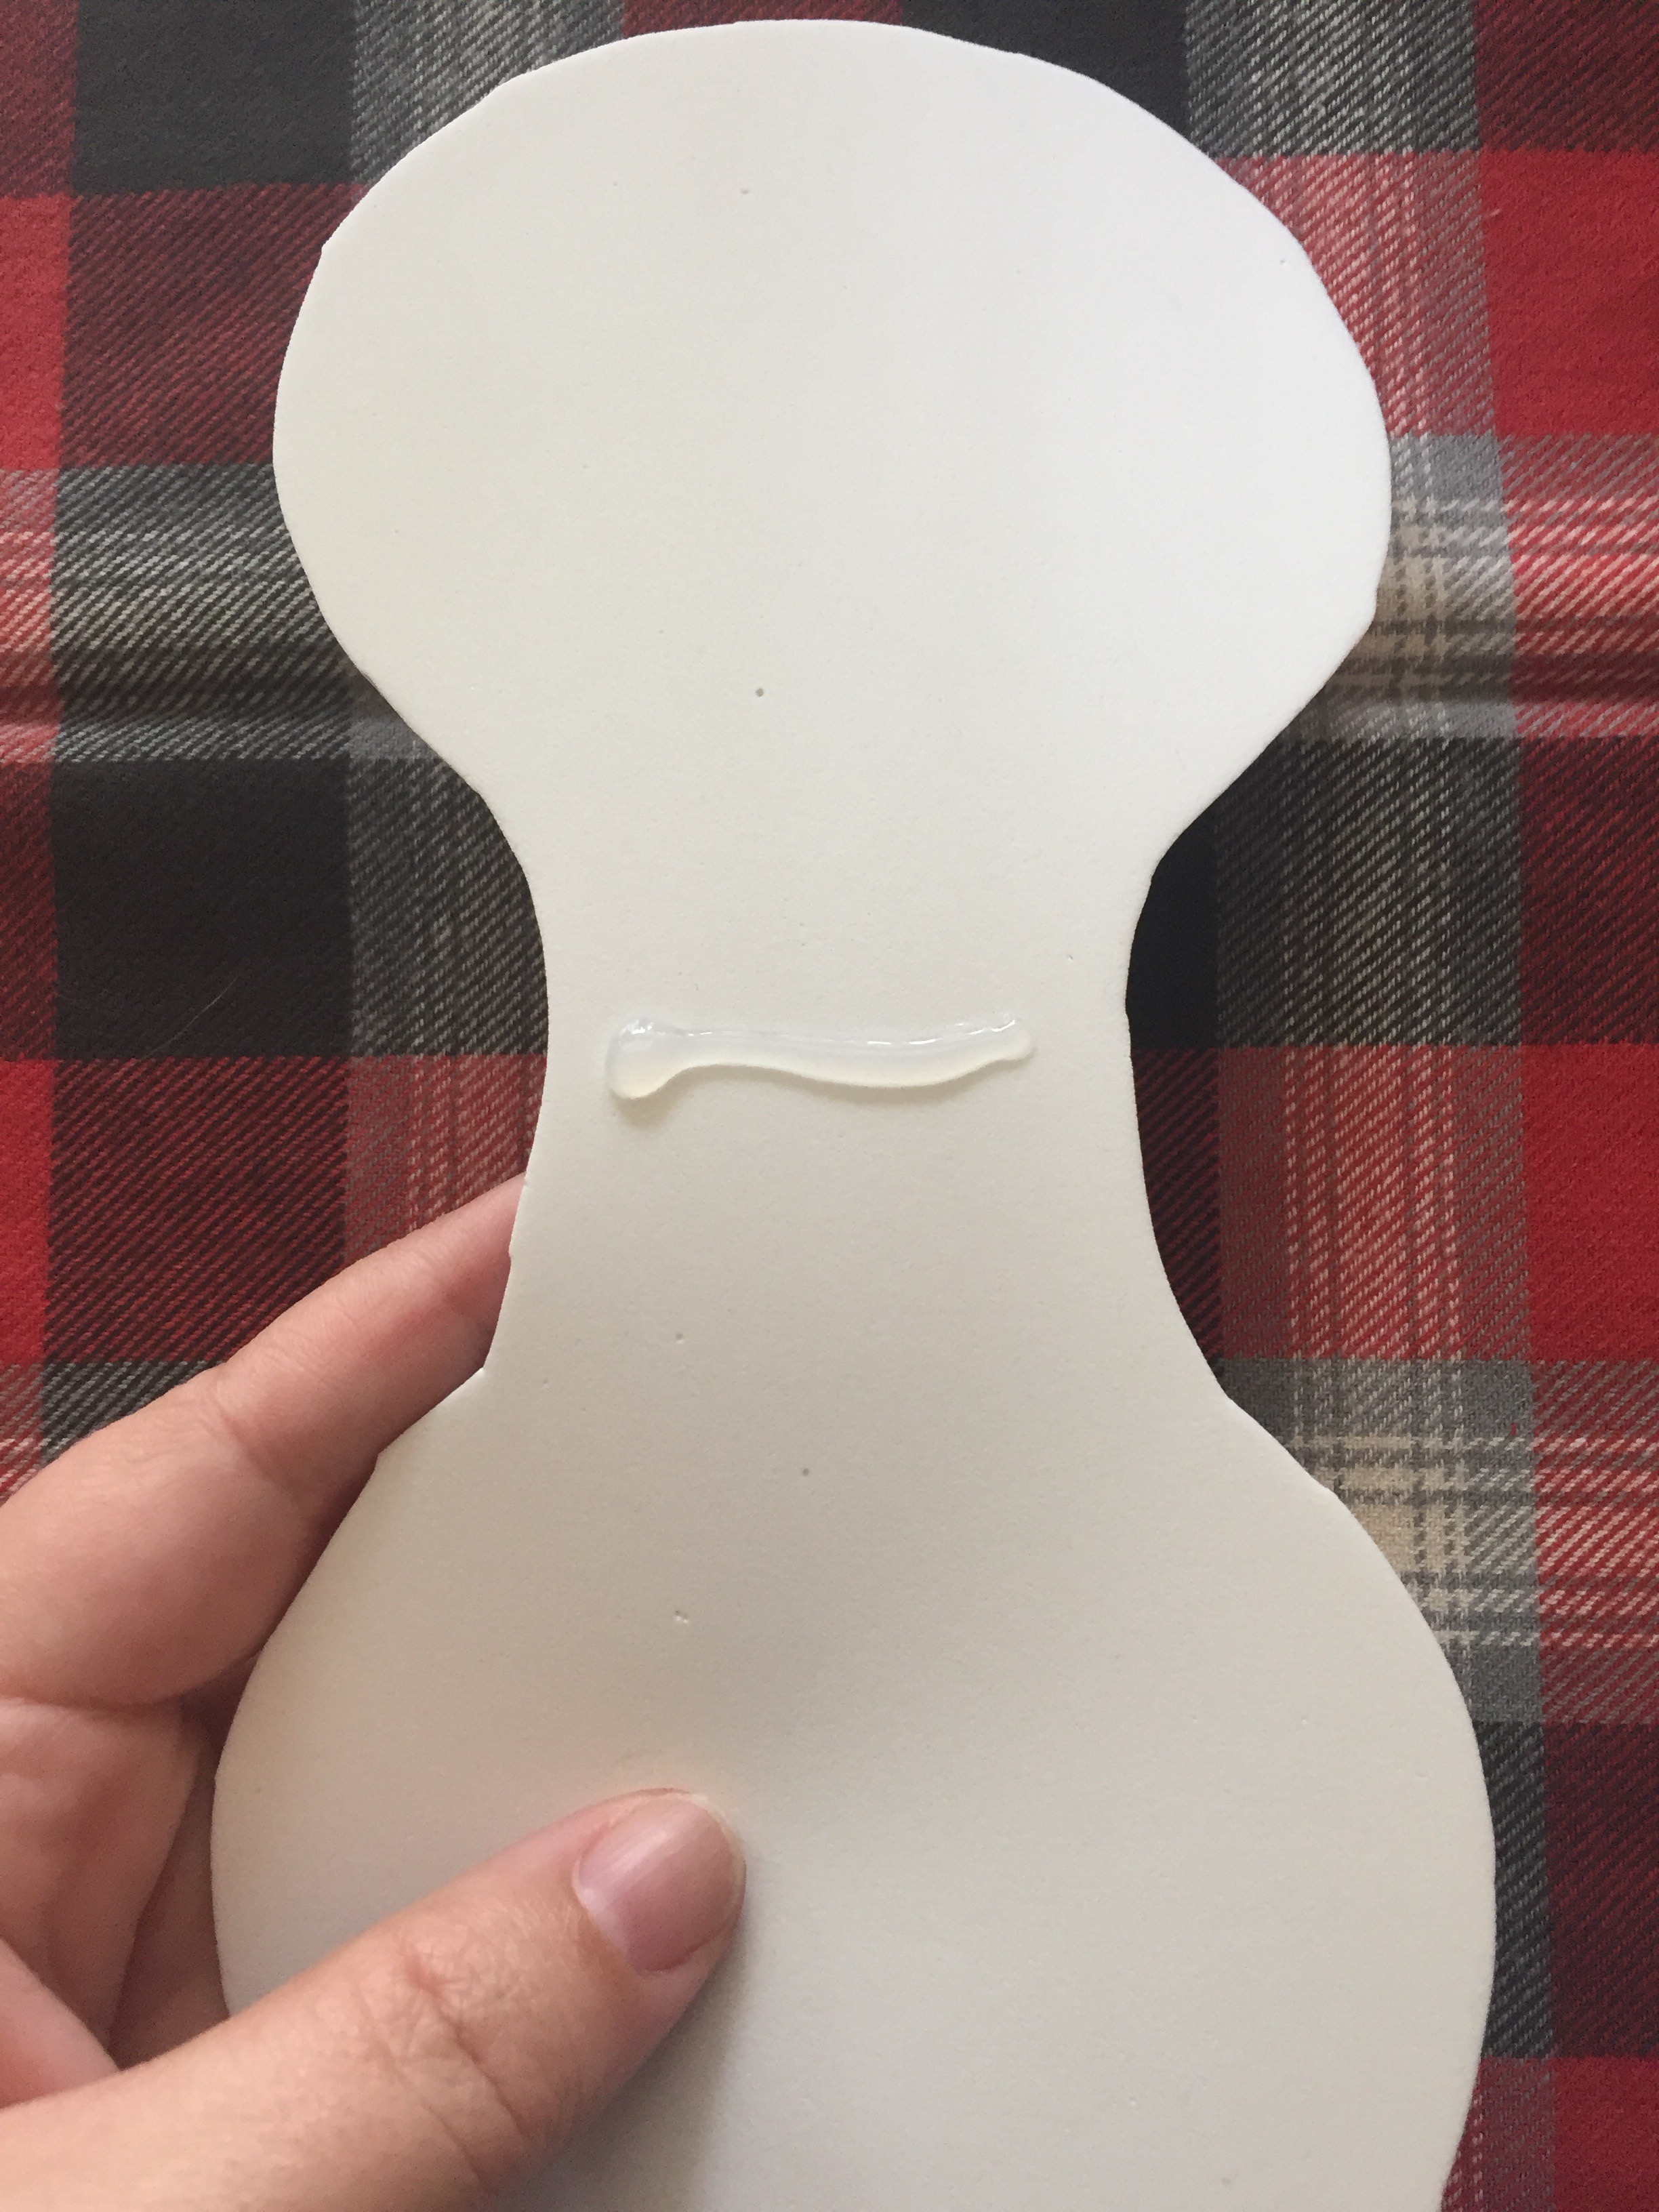
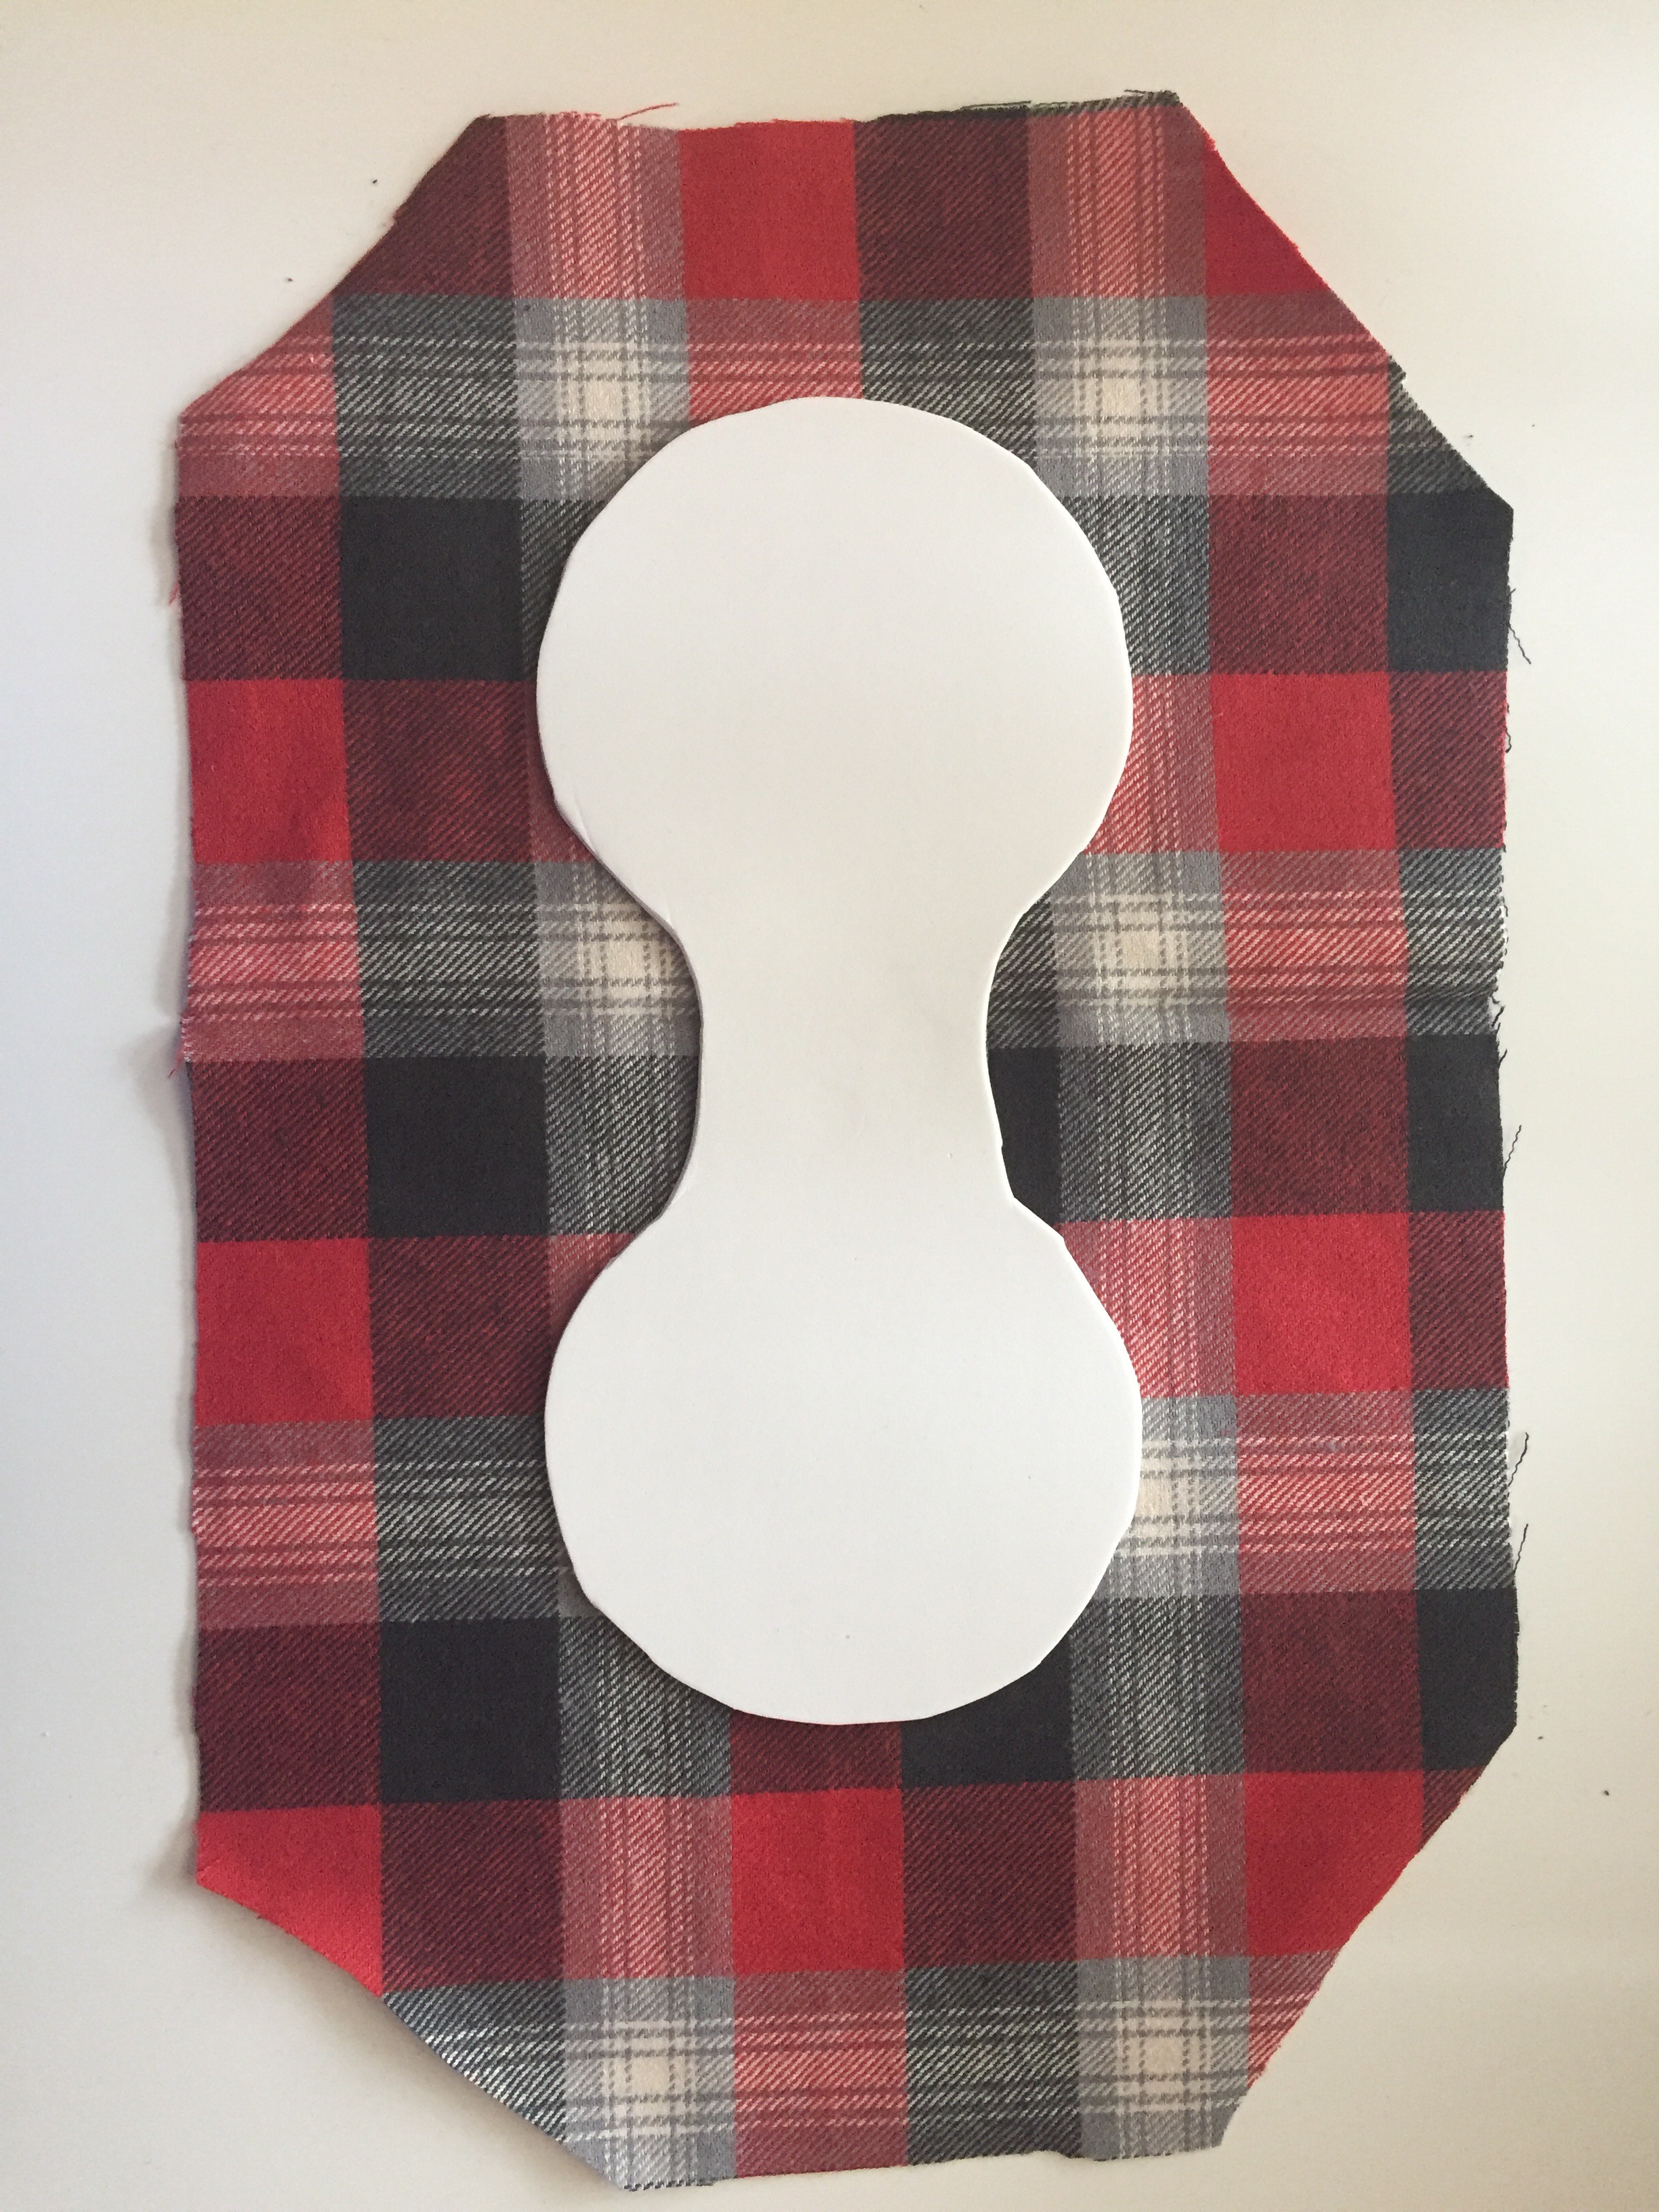
Lay out your fabric wrong side up. Place a thin line of fabric glue along the middle of the ear shape.
Glue the ear to your fabric and let it dry. Then it is helpful to trim down your fabric around the ear. I have found that cutting the corners at a diagonal makes the rest of the gluing process easier.
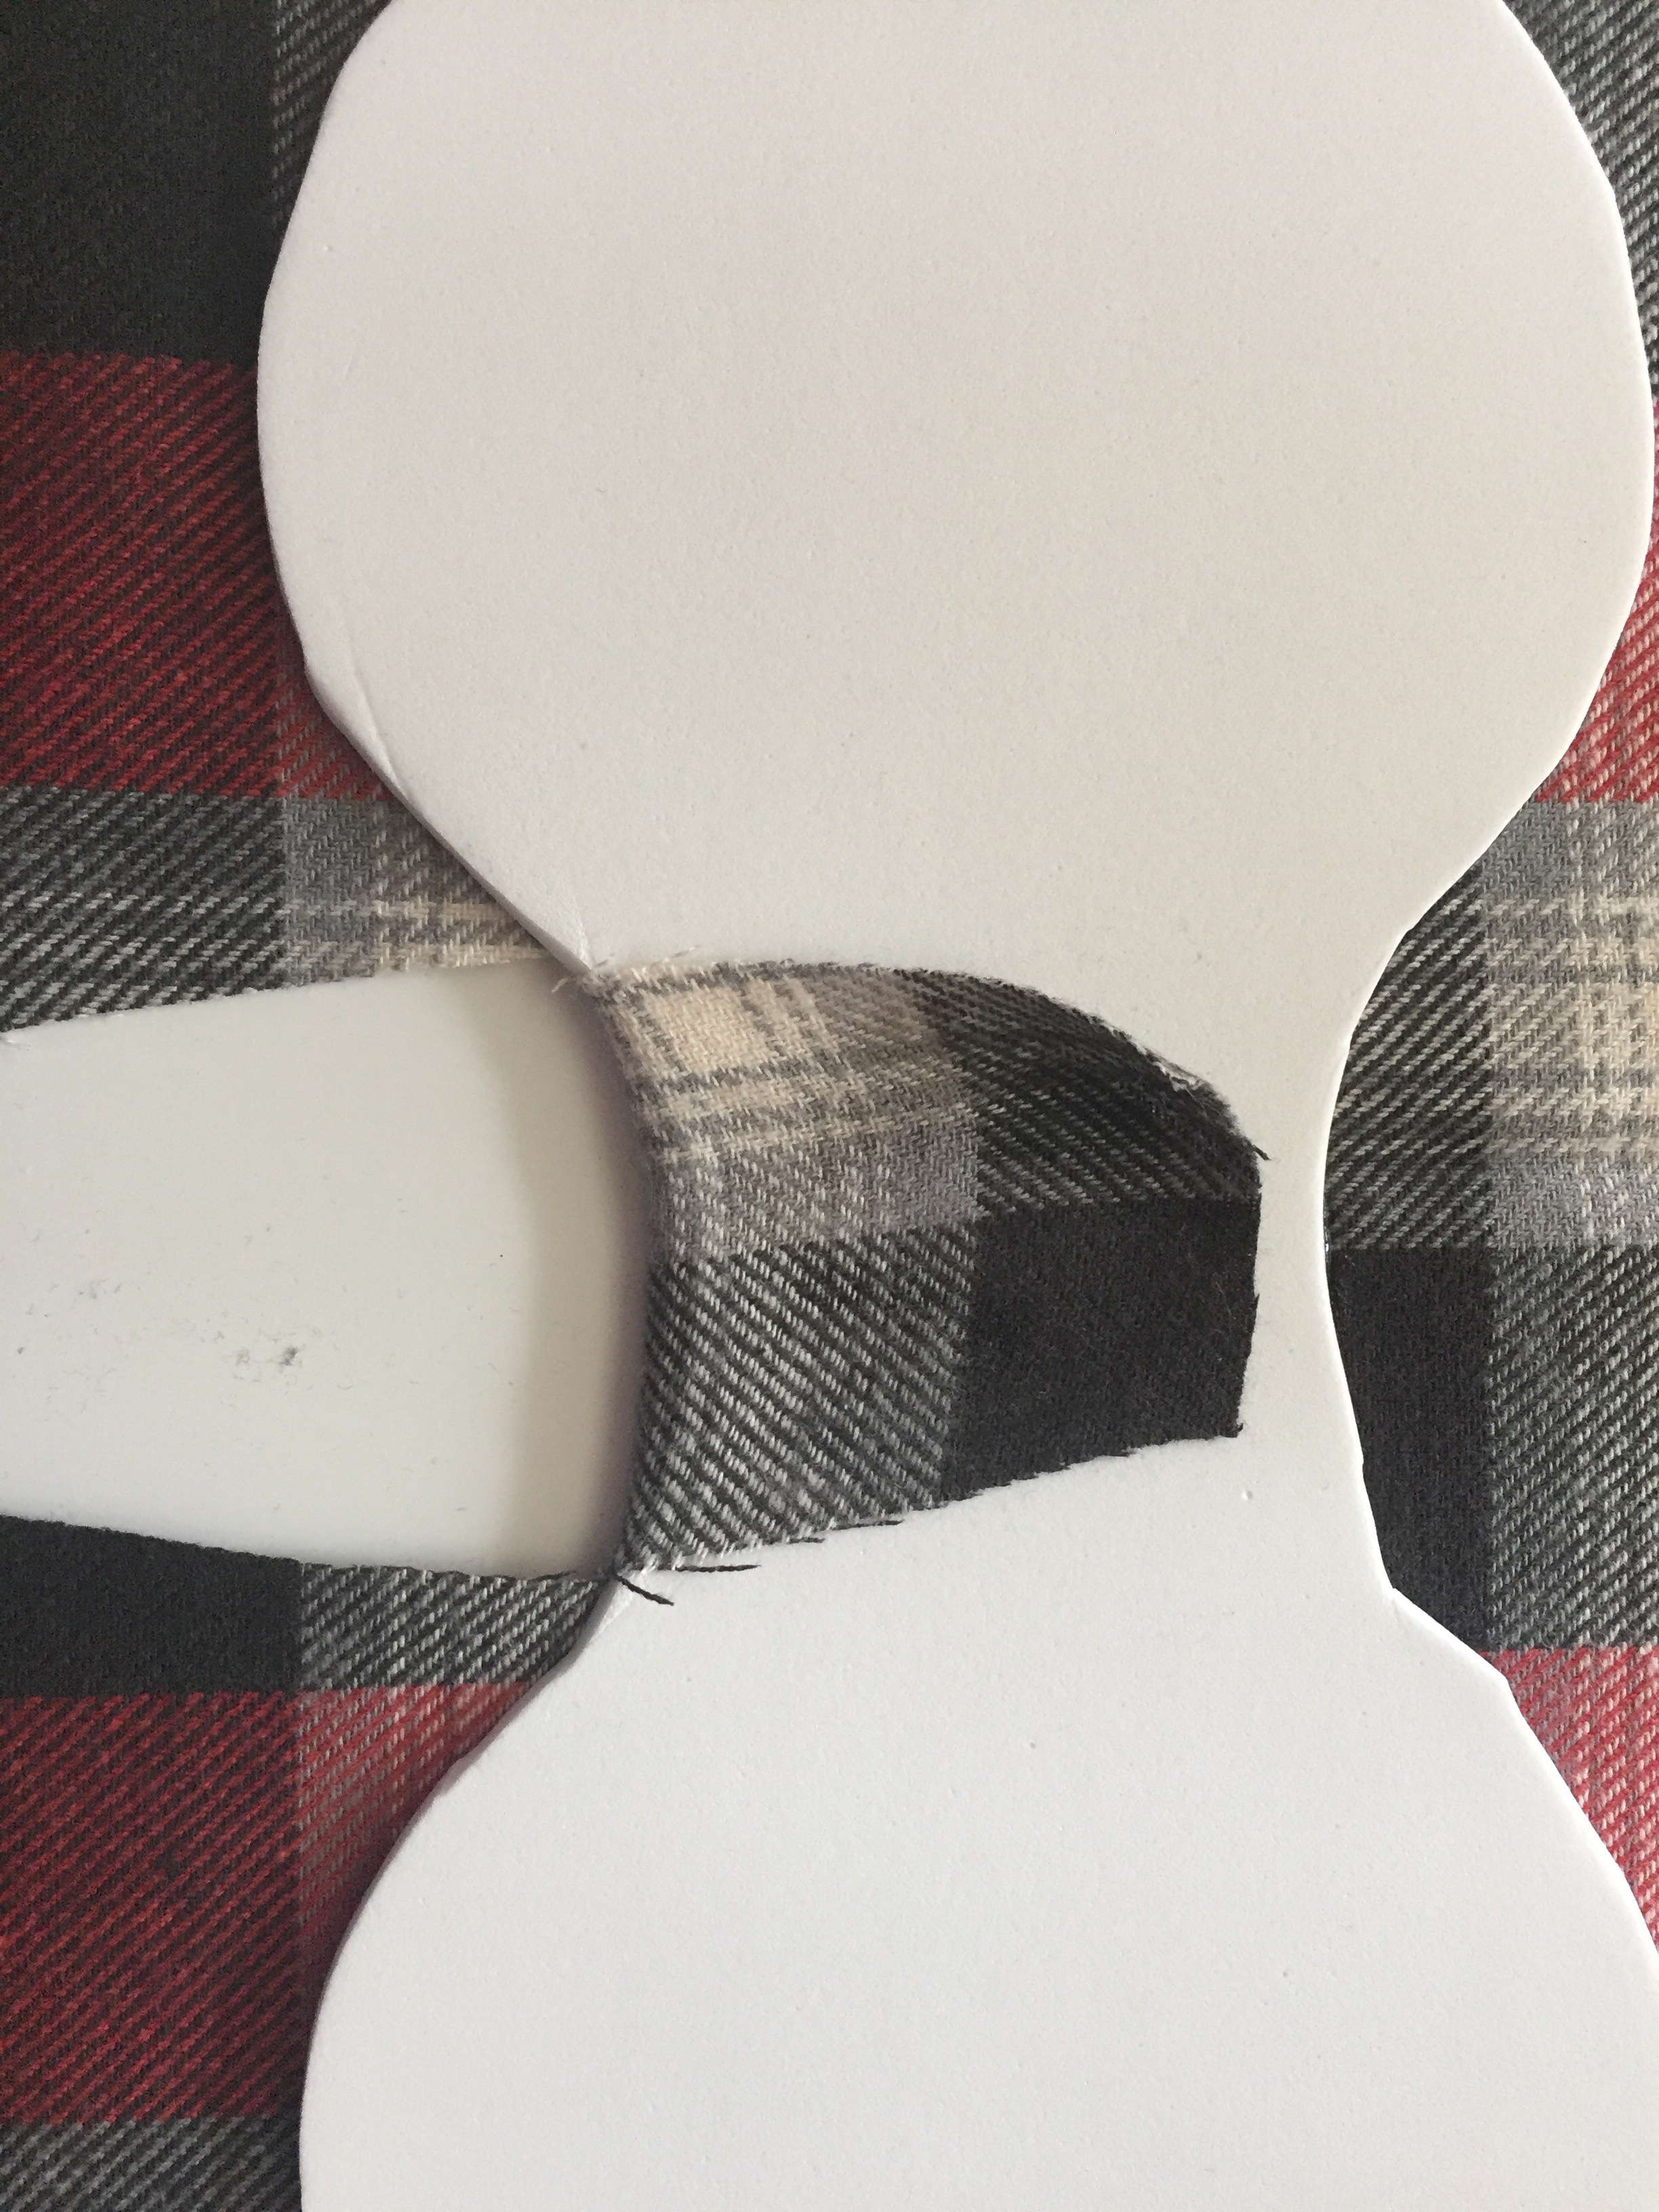
Now we are going to begin covering the ear template with the fabric. Start with the middle section. Cut in toward the center of the ear template and glue the strip of fabric to the foam using the fabric glue.
Repeat on the other side.
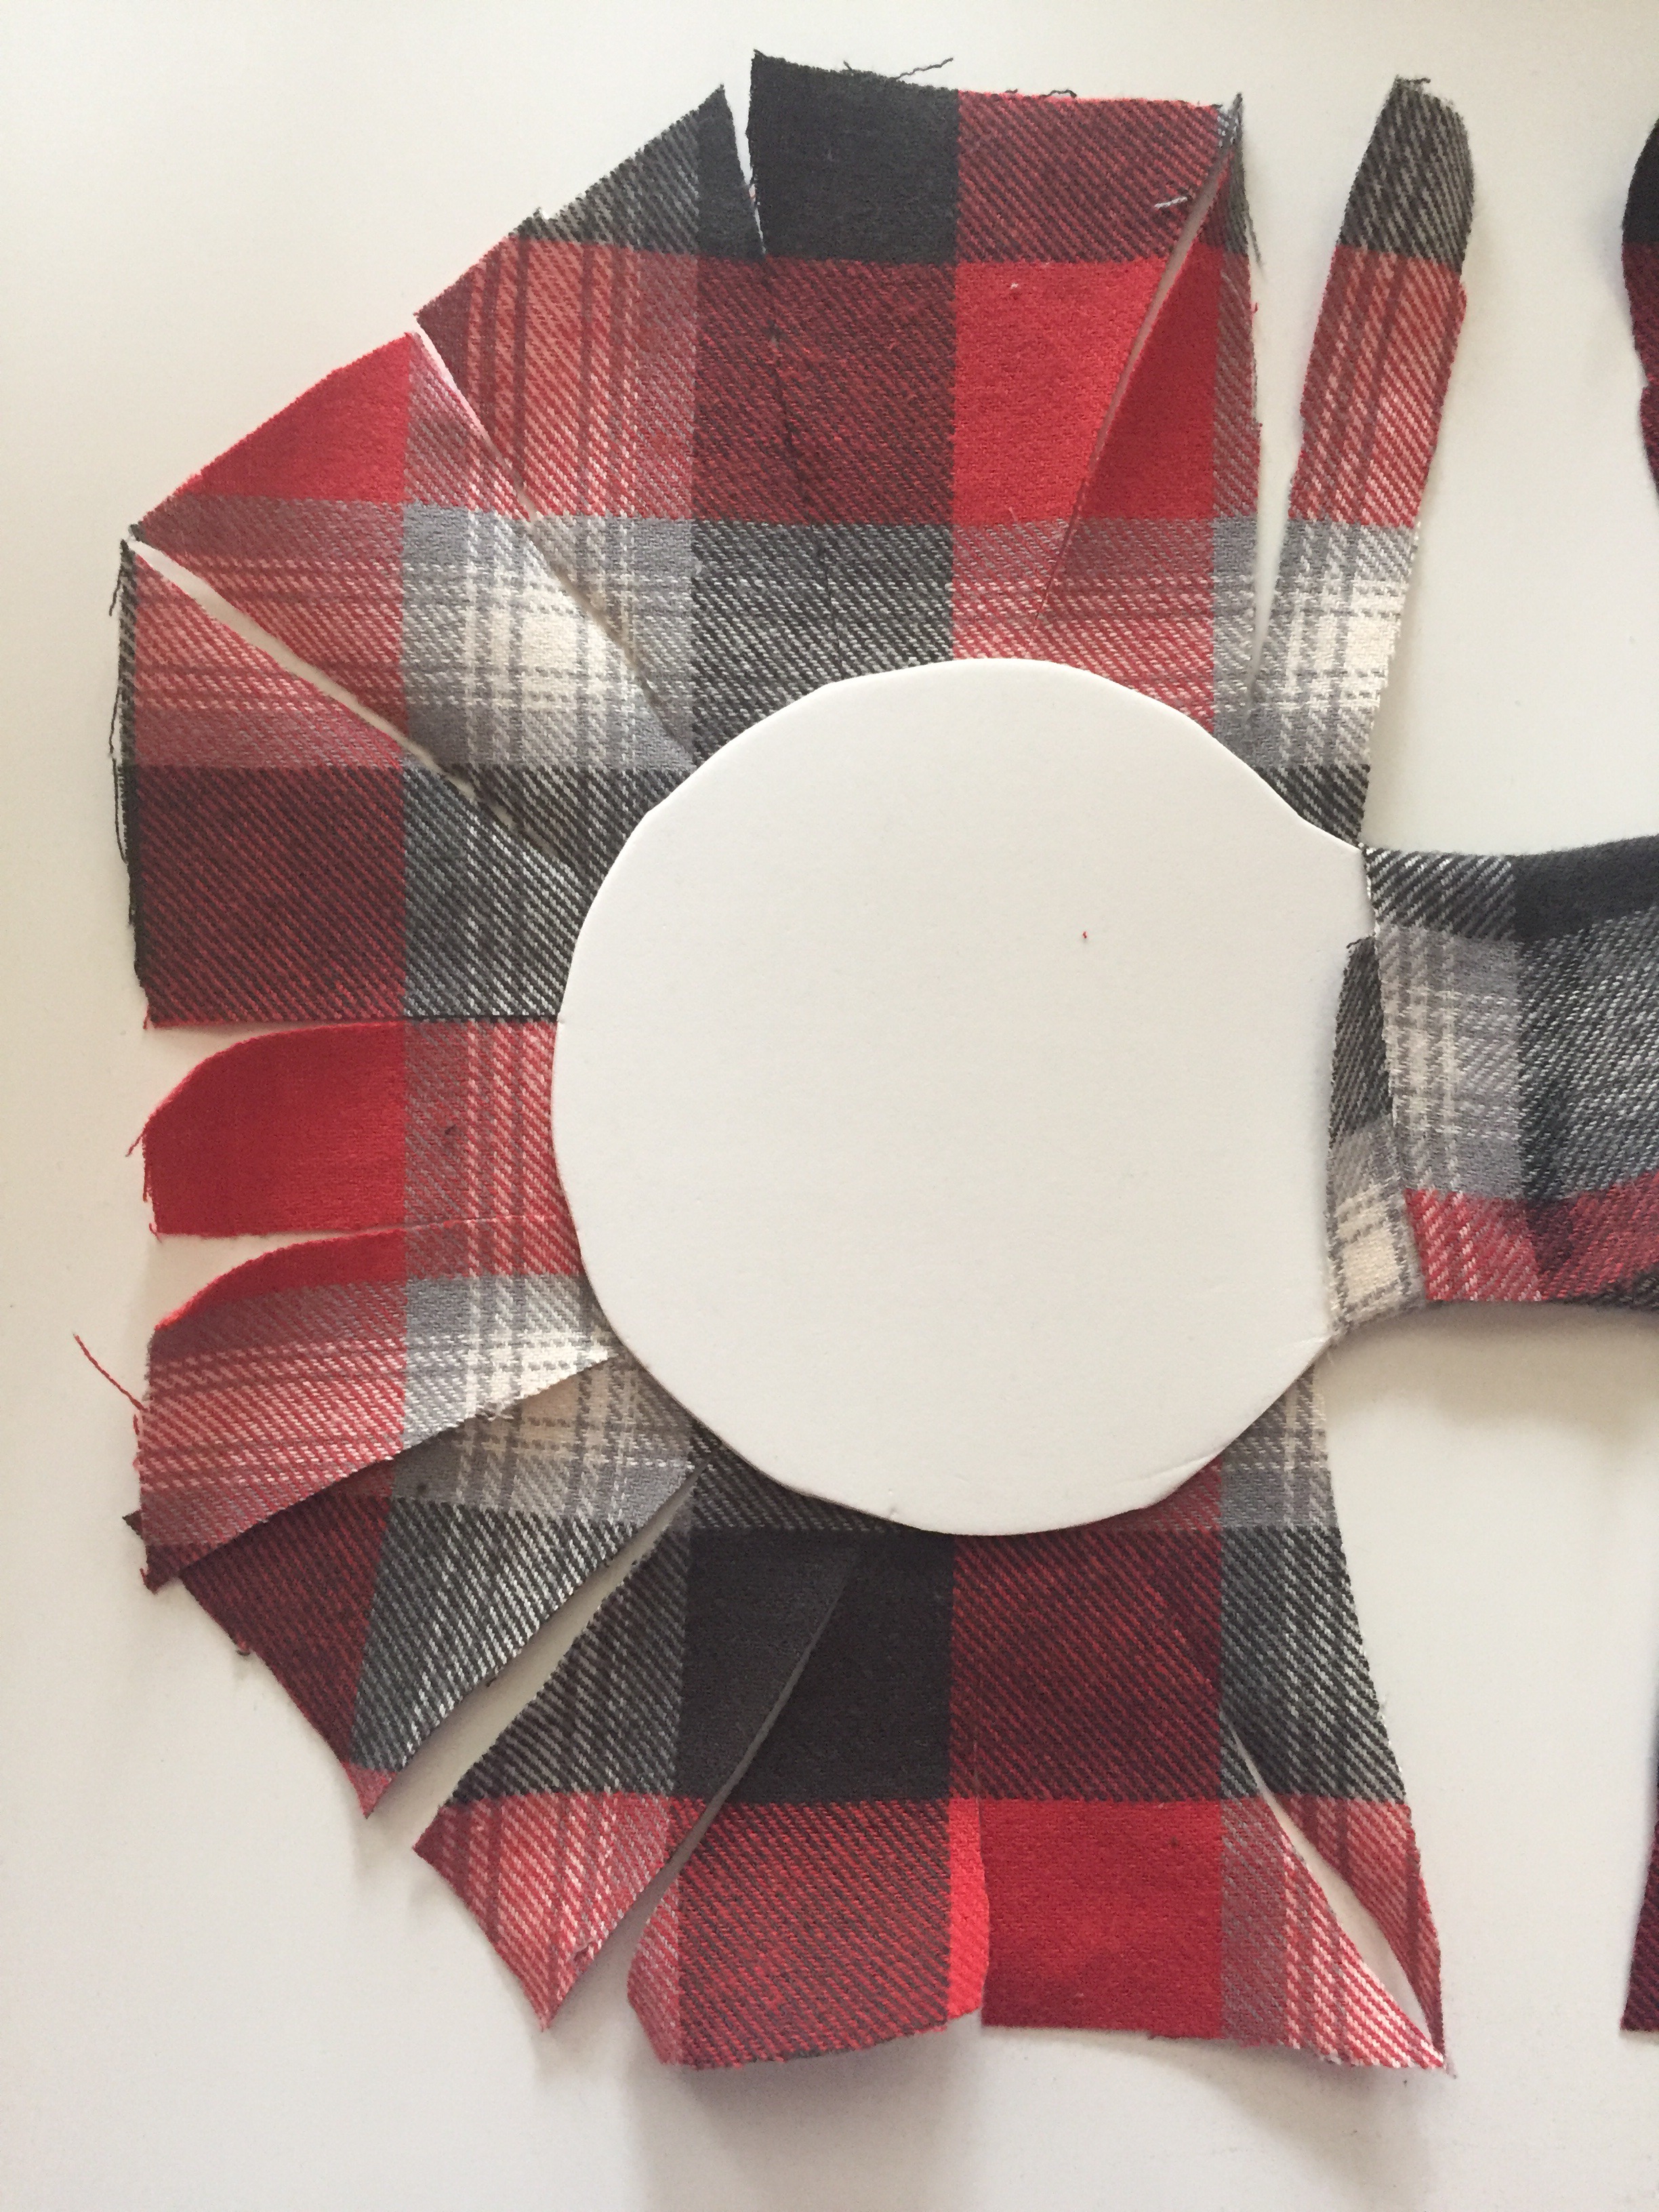
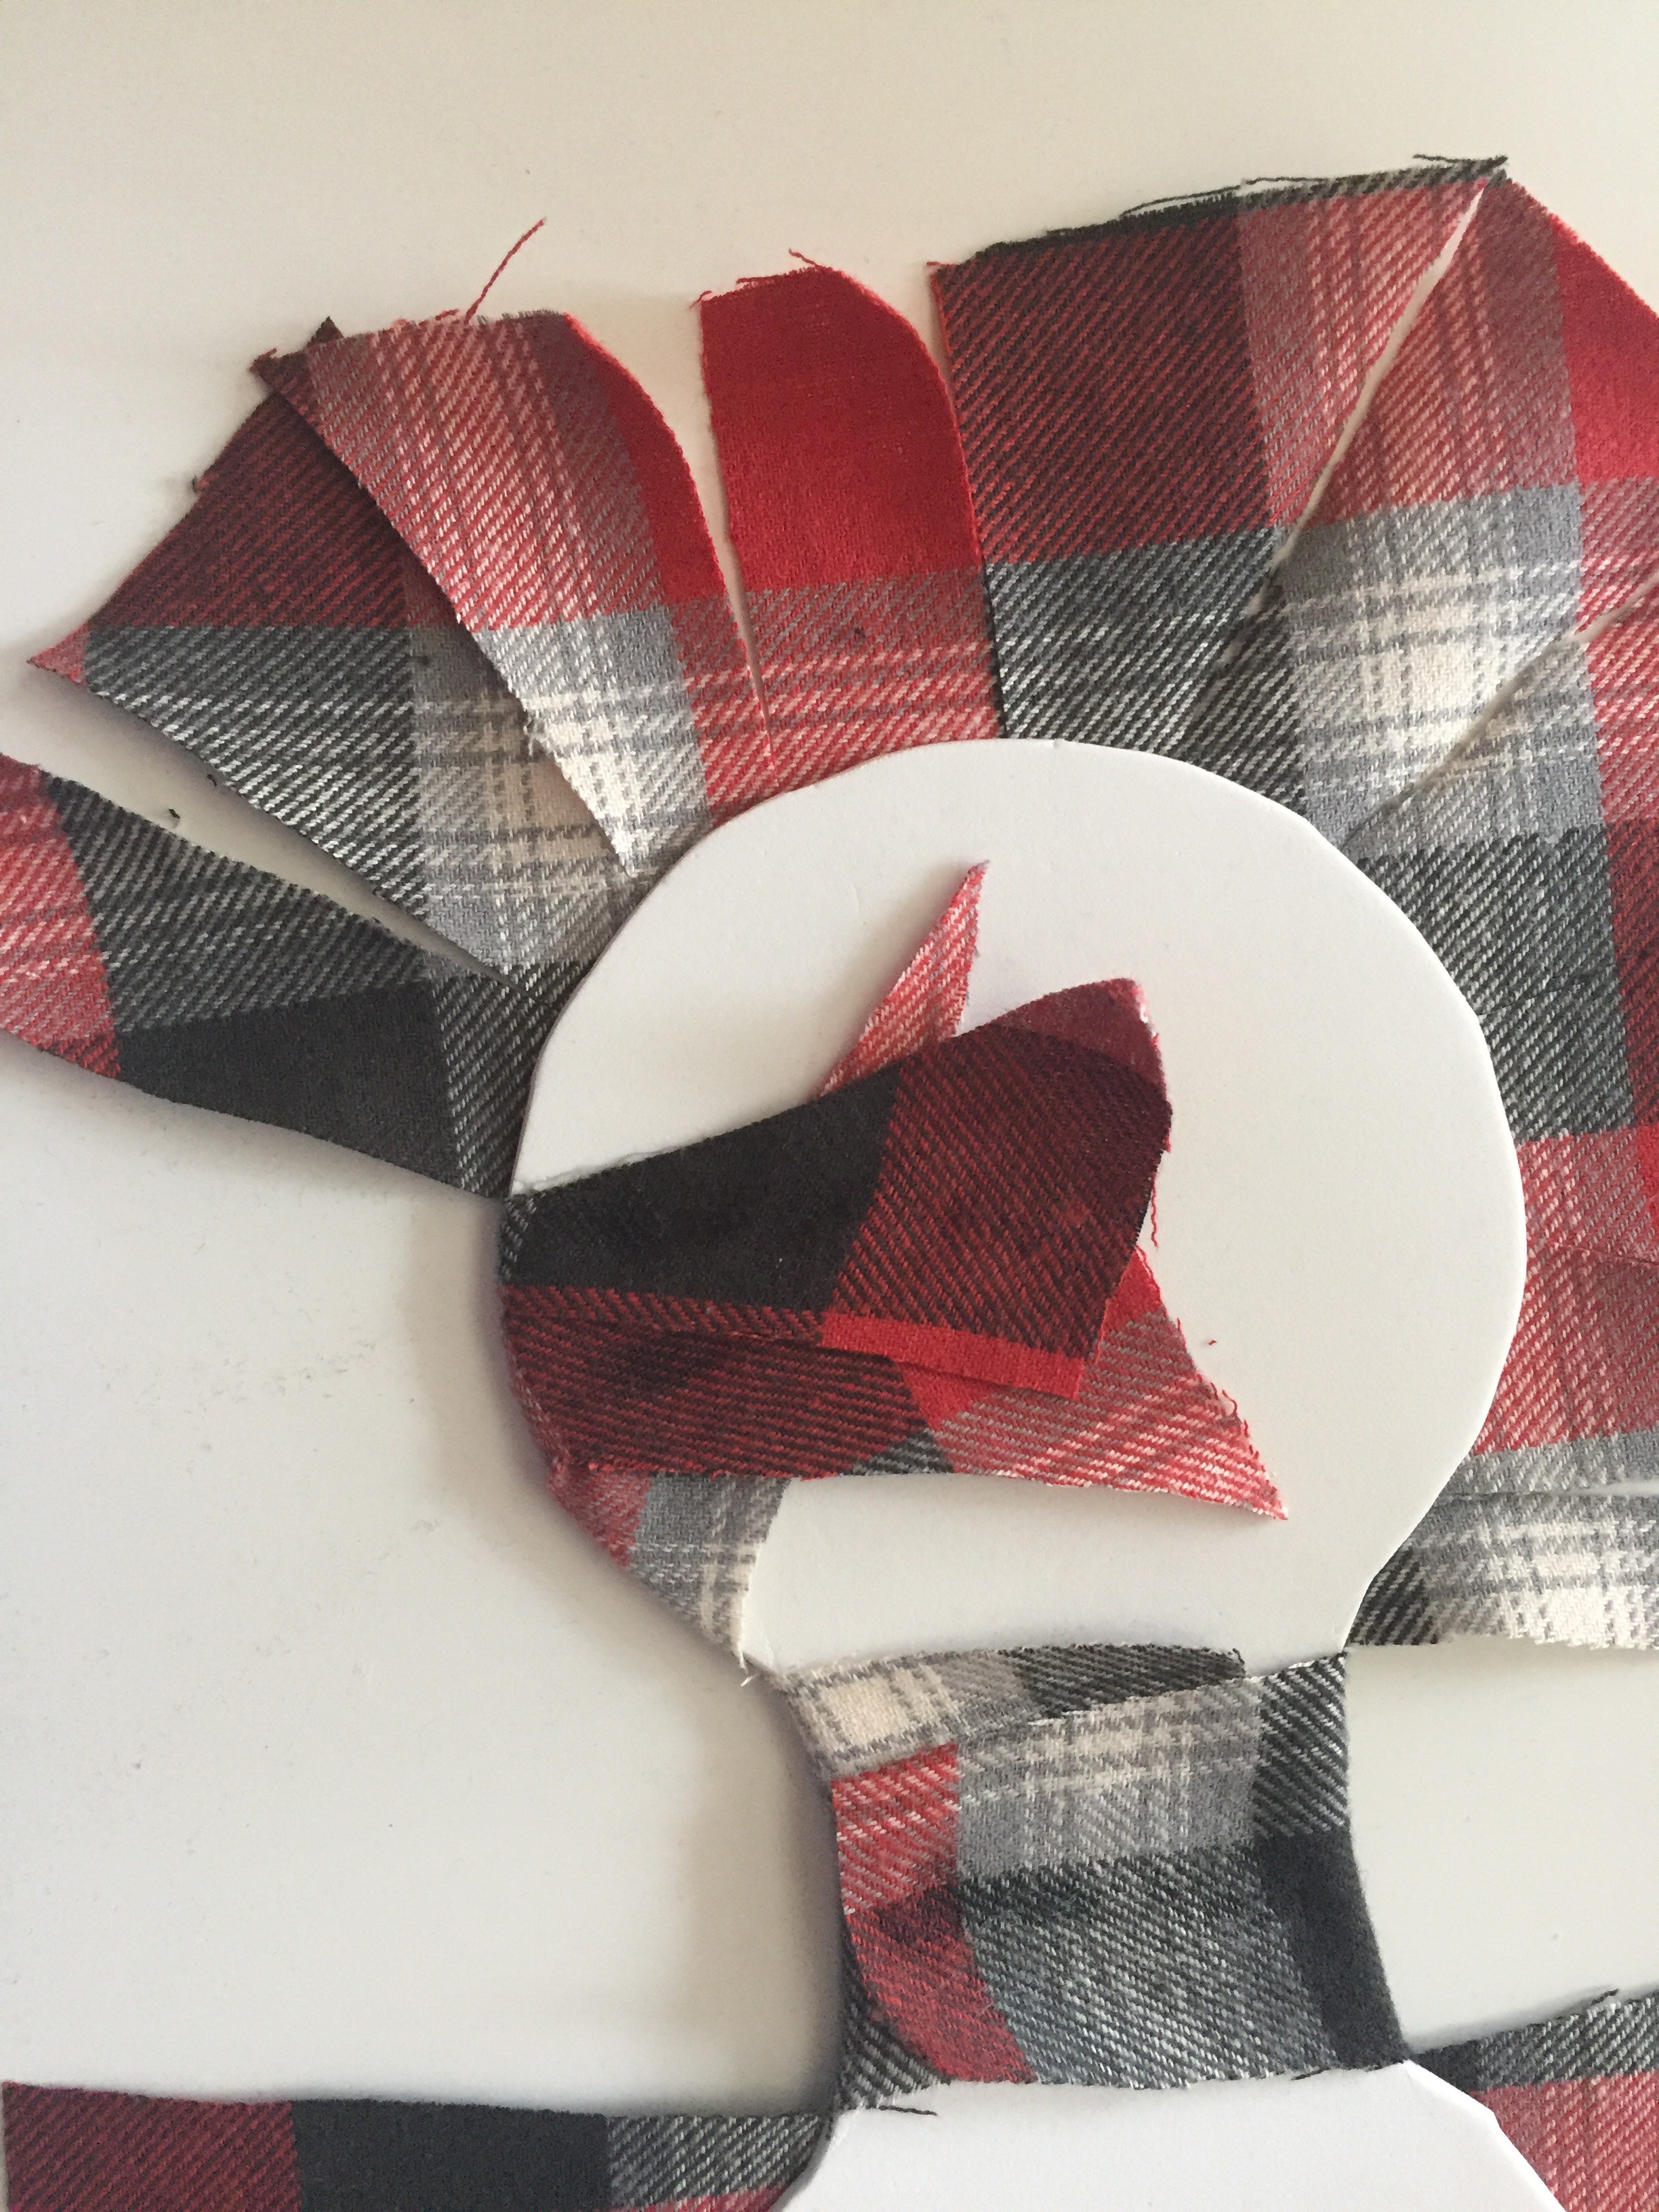
Then comes the tedious part. In order to glue the fabric around the round part of the ears, you need to cut the fabric into thin strips.
Then use the fabric glue to attach each individual strip to the foam. This takes a while when you are first working with fabric ears, but now I get through this stage pretty quickly. A little practice, and you will become a pro.
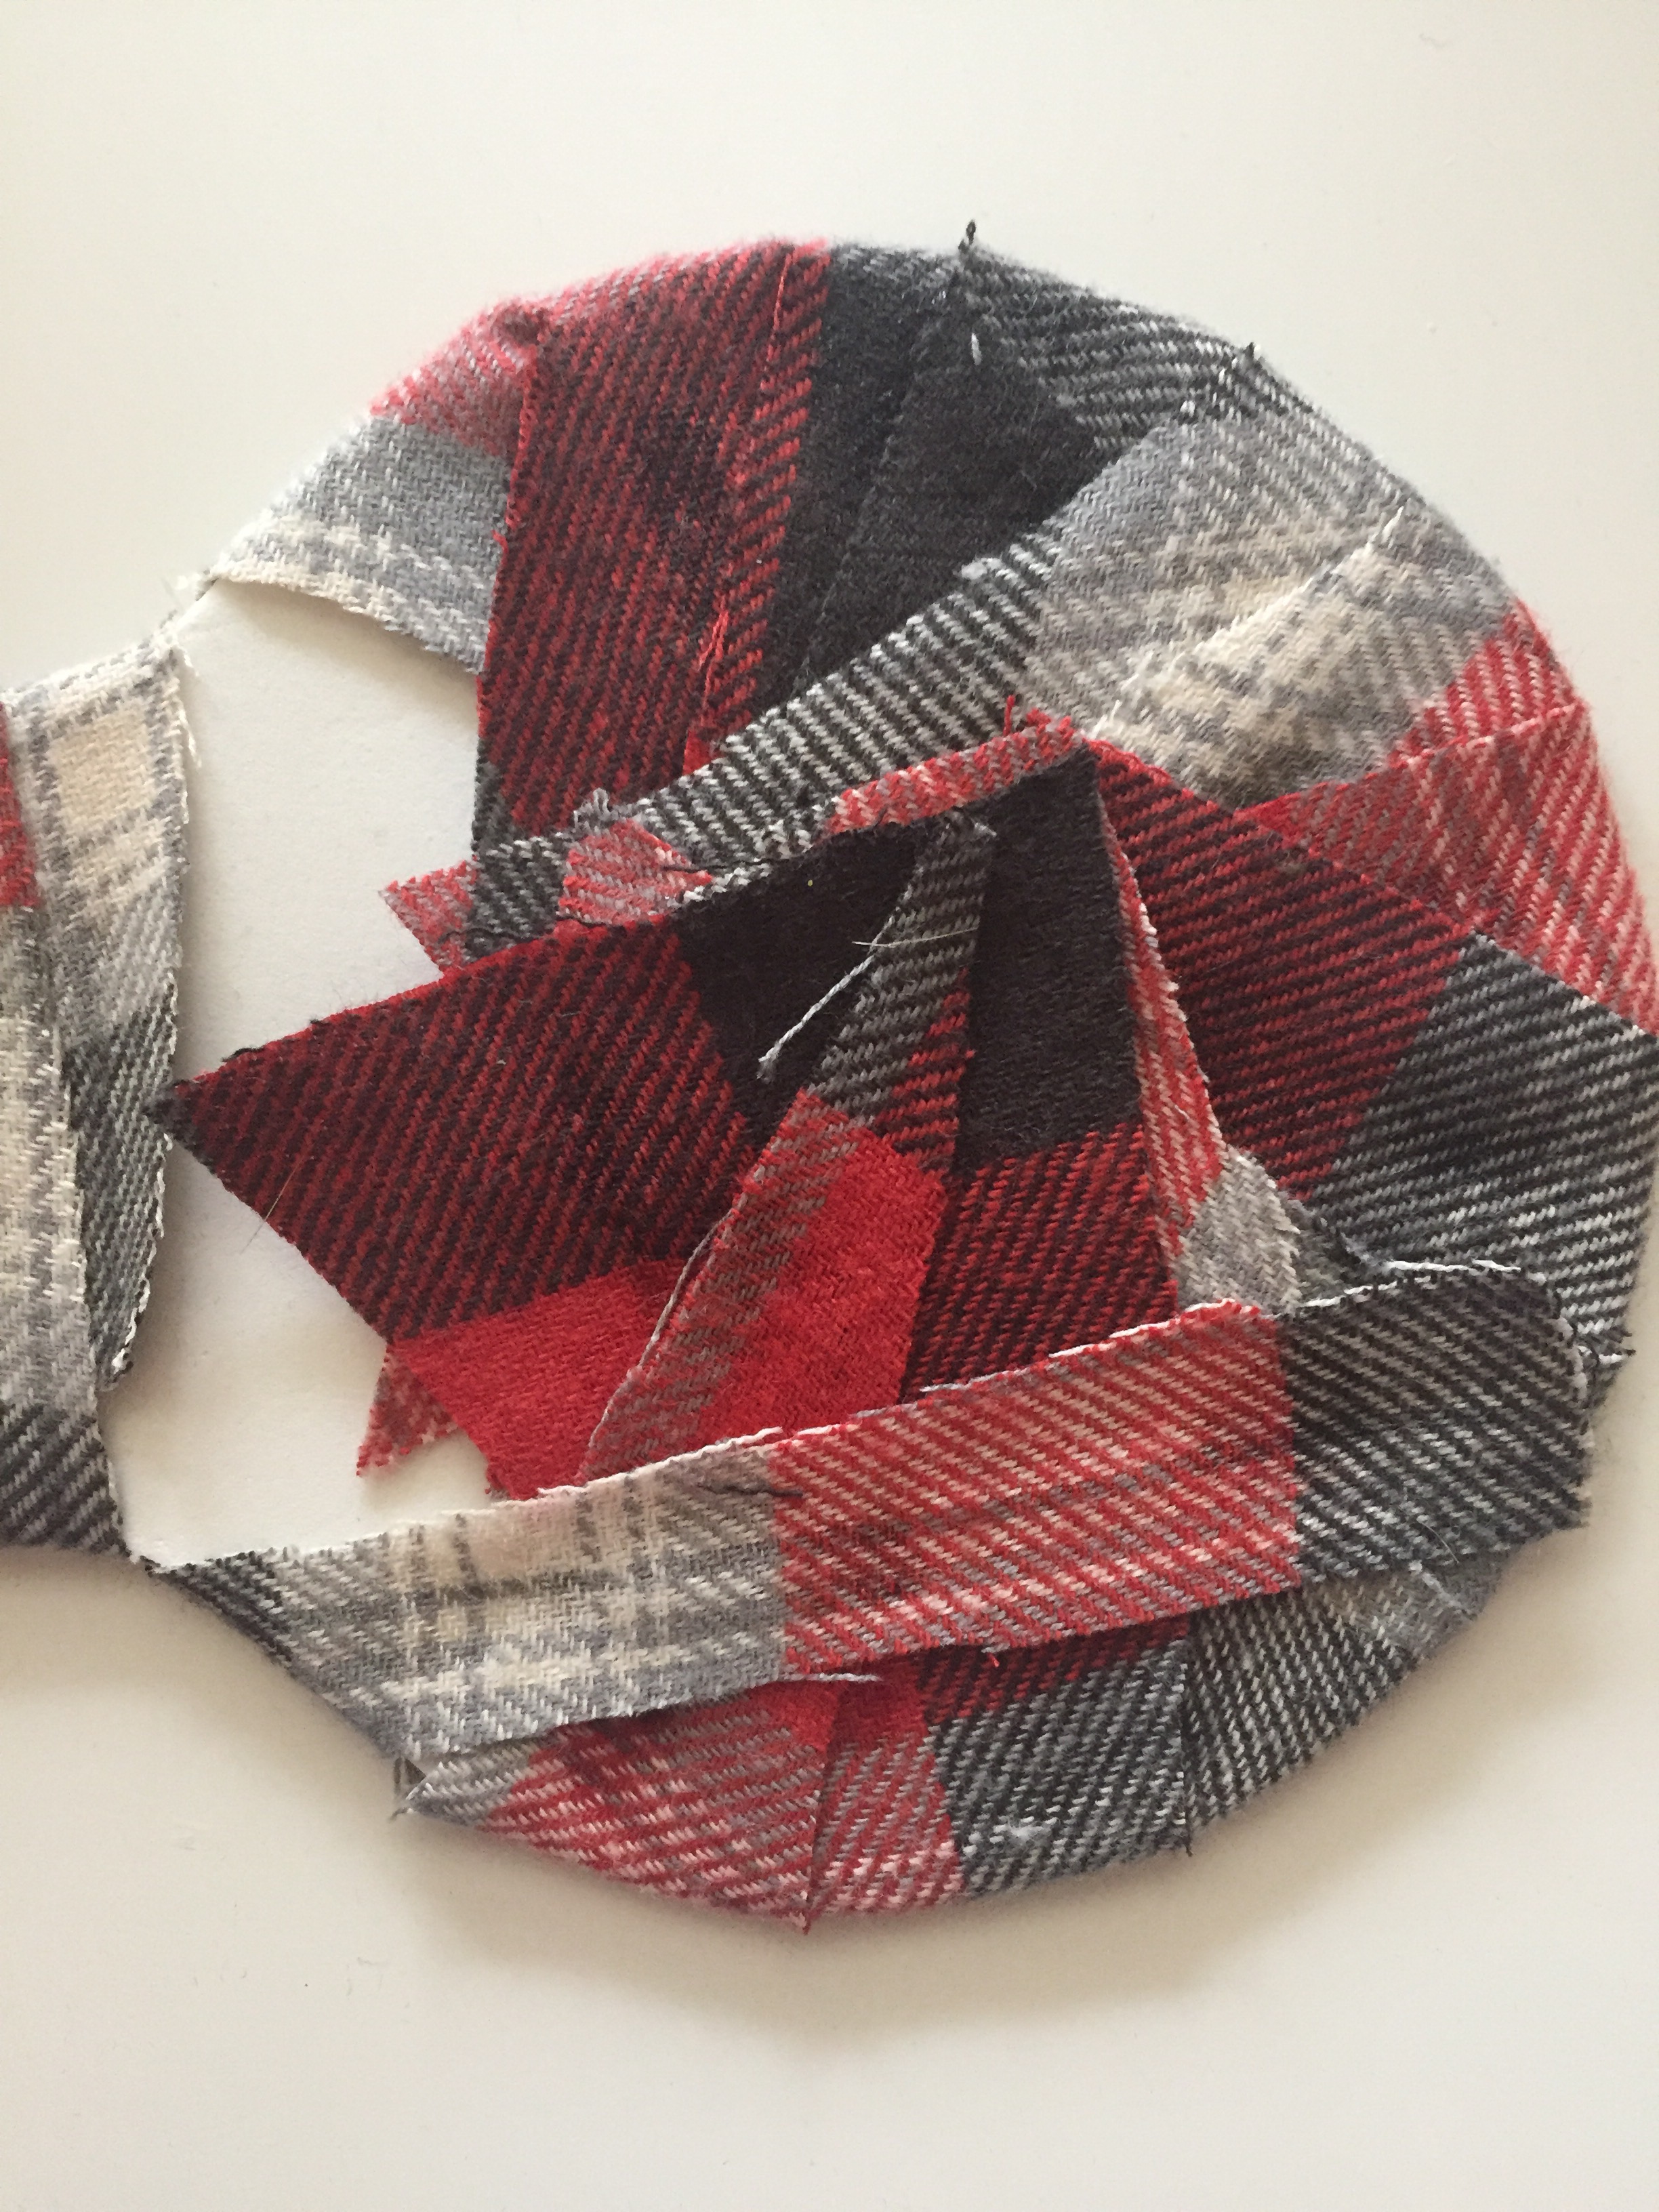
This is what the back of the ear should look like when you are finished gluing.
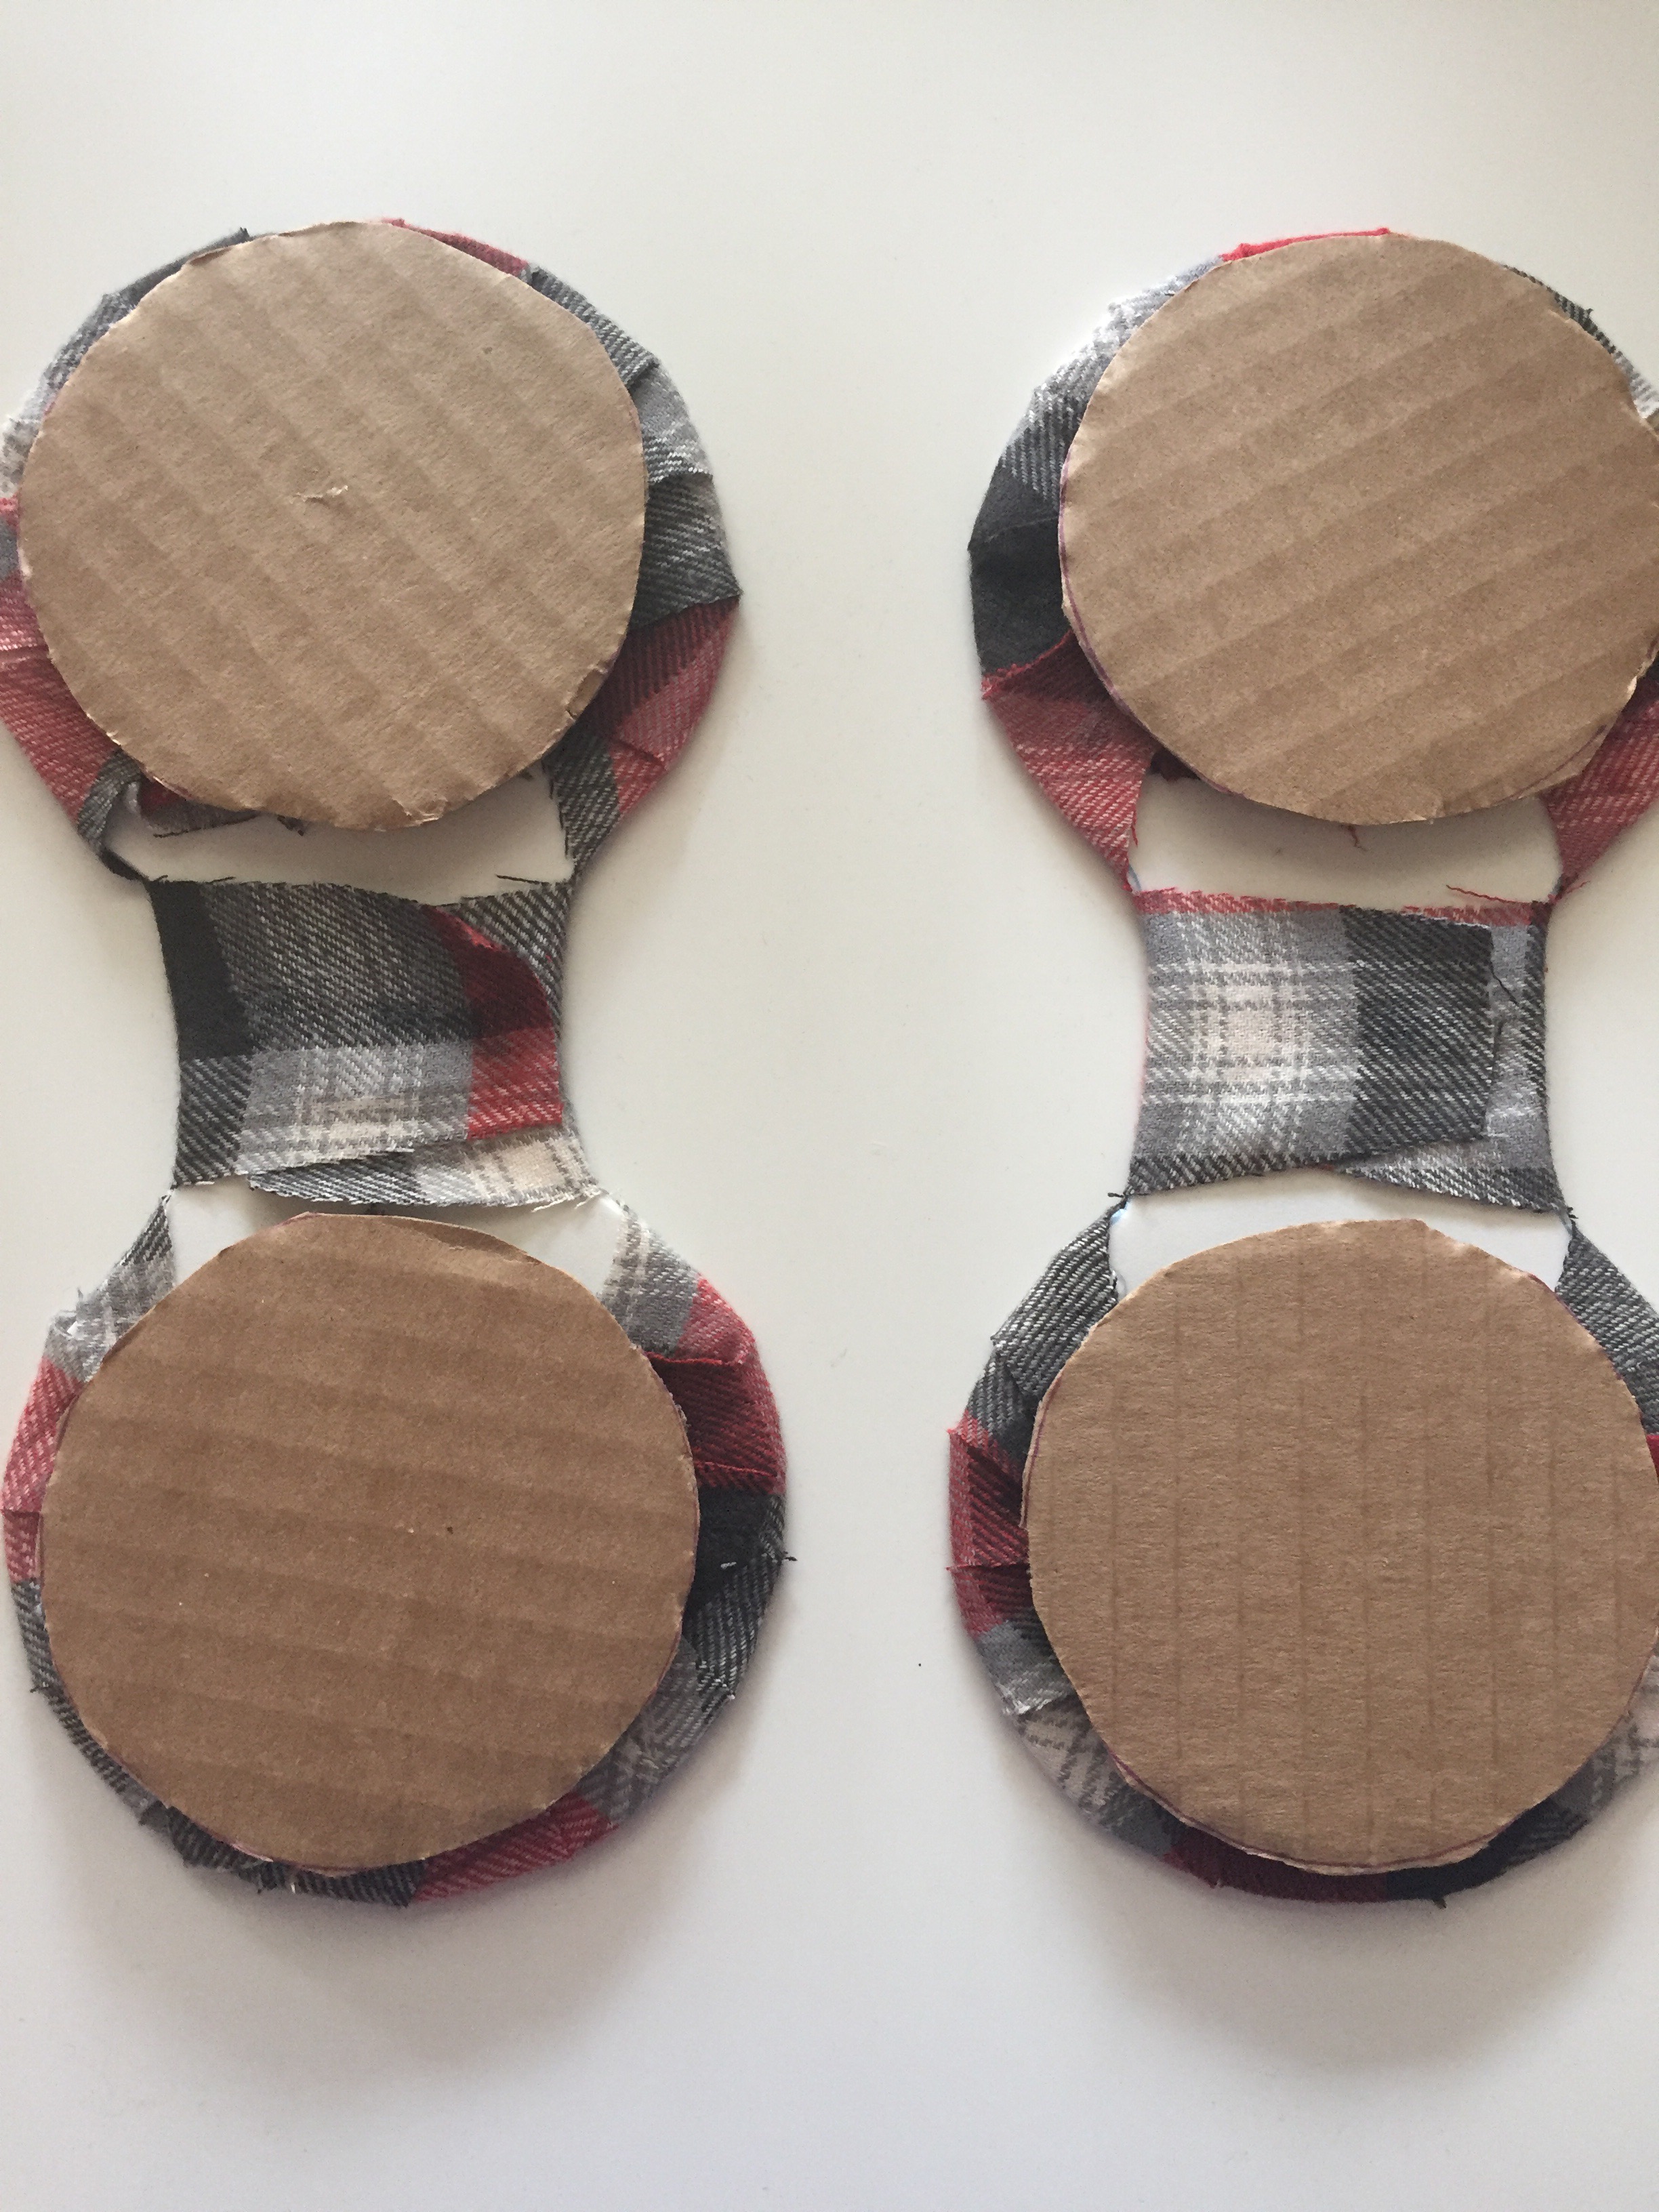
Repeat this process until you have two foam ear templates completely covered with your fabric.
Then use the E6000 glue to attach one cardboard circle to each ear part. This does a couple of things. One, it gives the ears more weight so they are sturdier. Two, it helps really seal in all the fabric strips and make sure they stay put. Then (this is important) LET THE EARS DRY OVERNIGHT. Trust me, the remaining steps will be much simpler if your ears are completely dry.
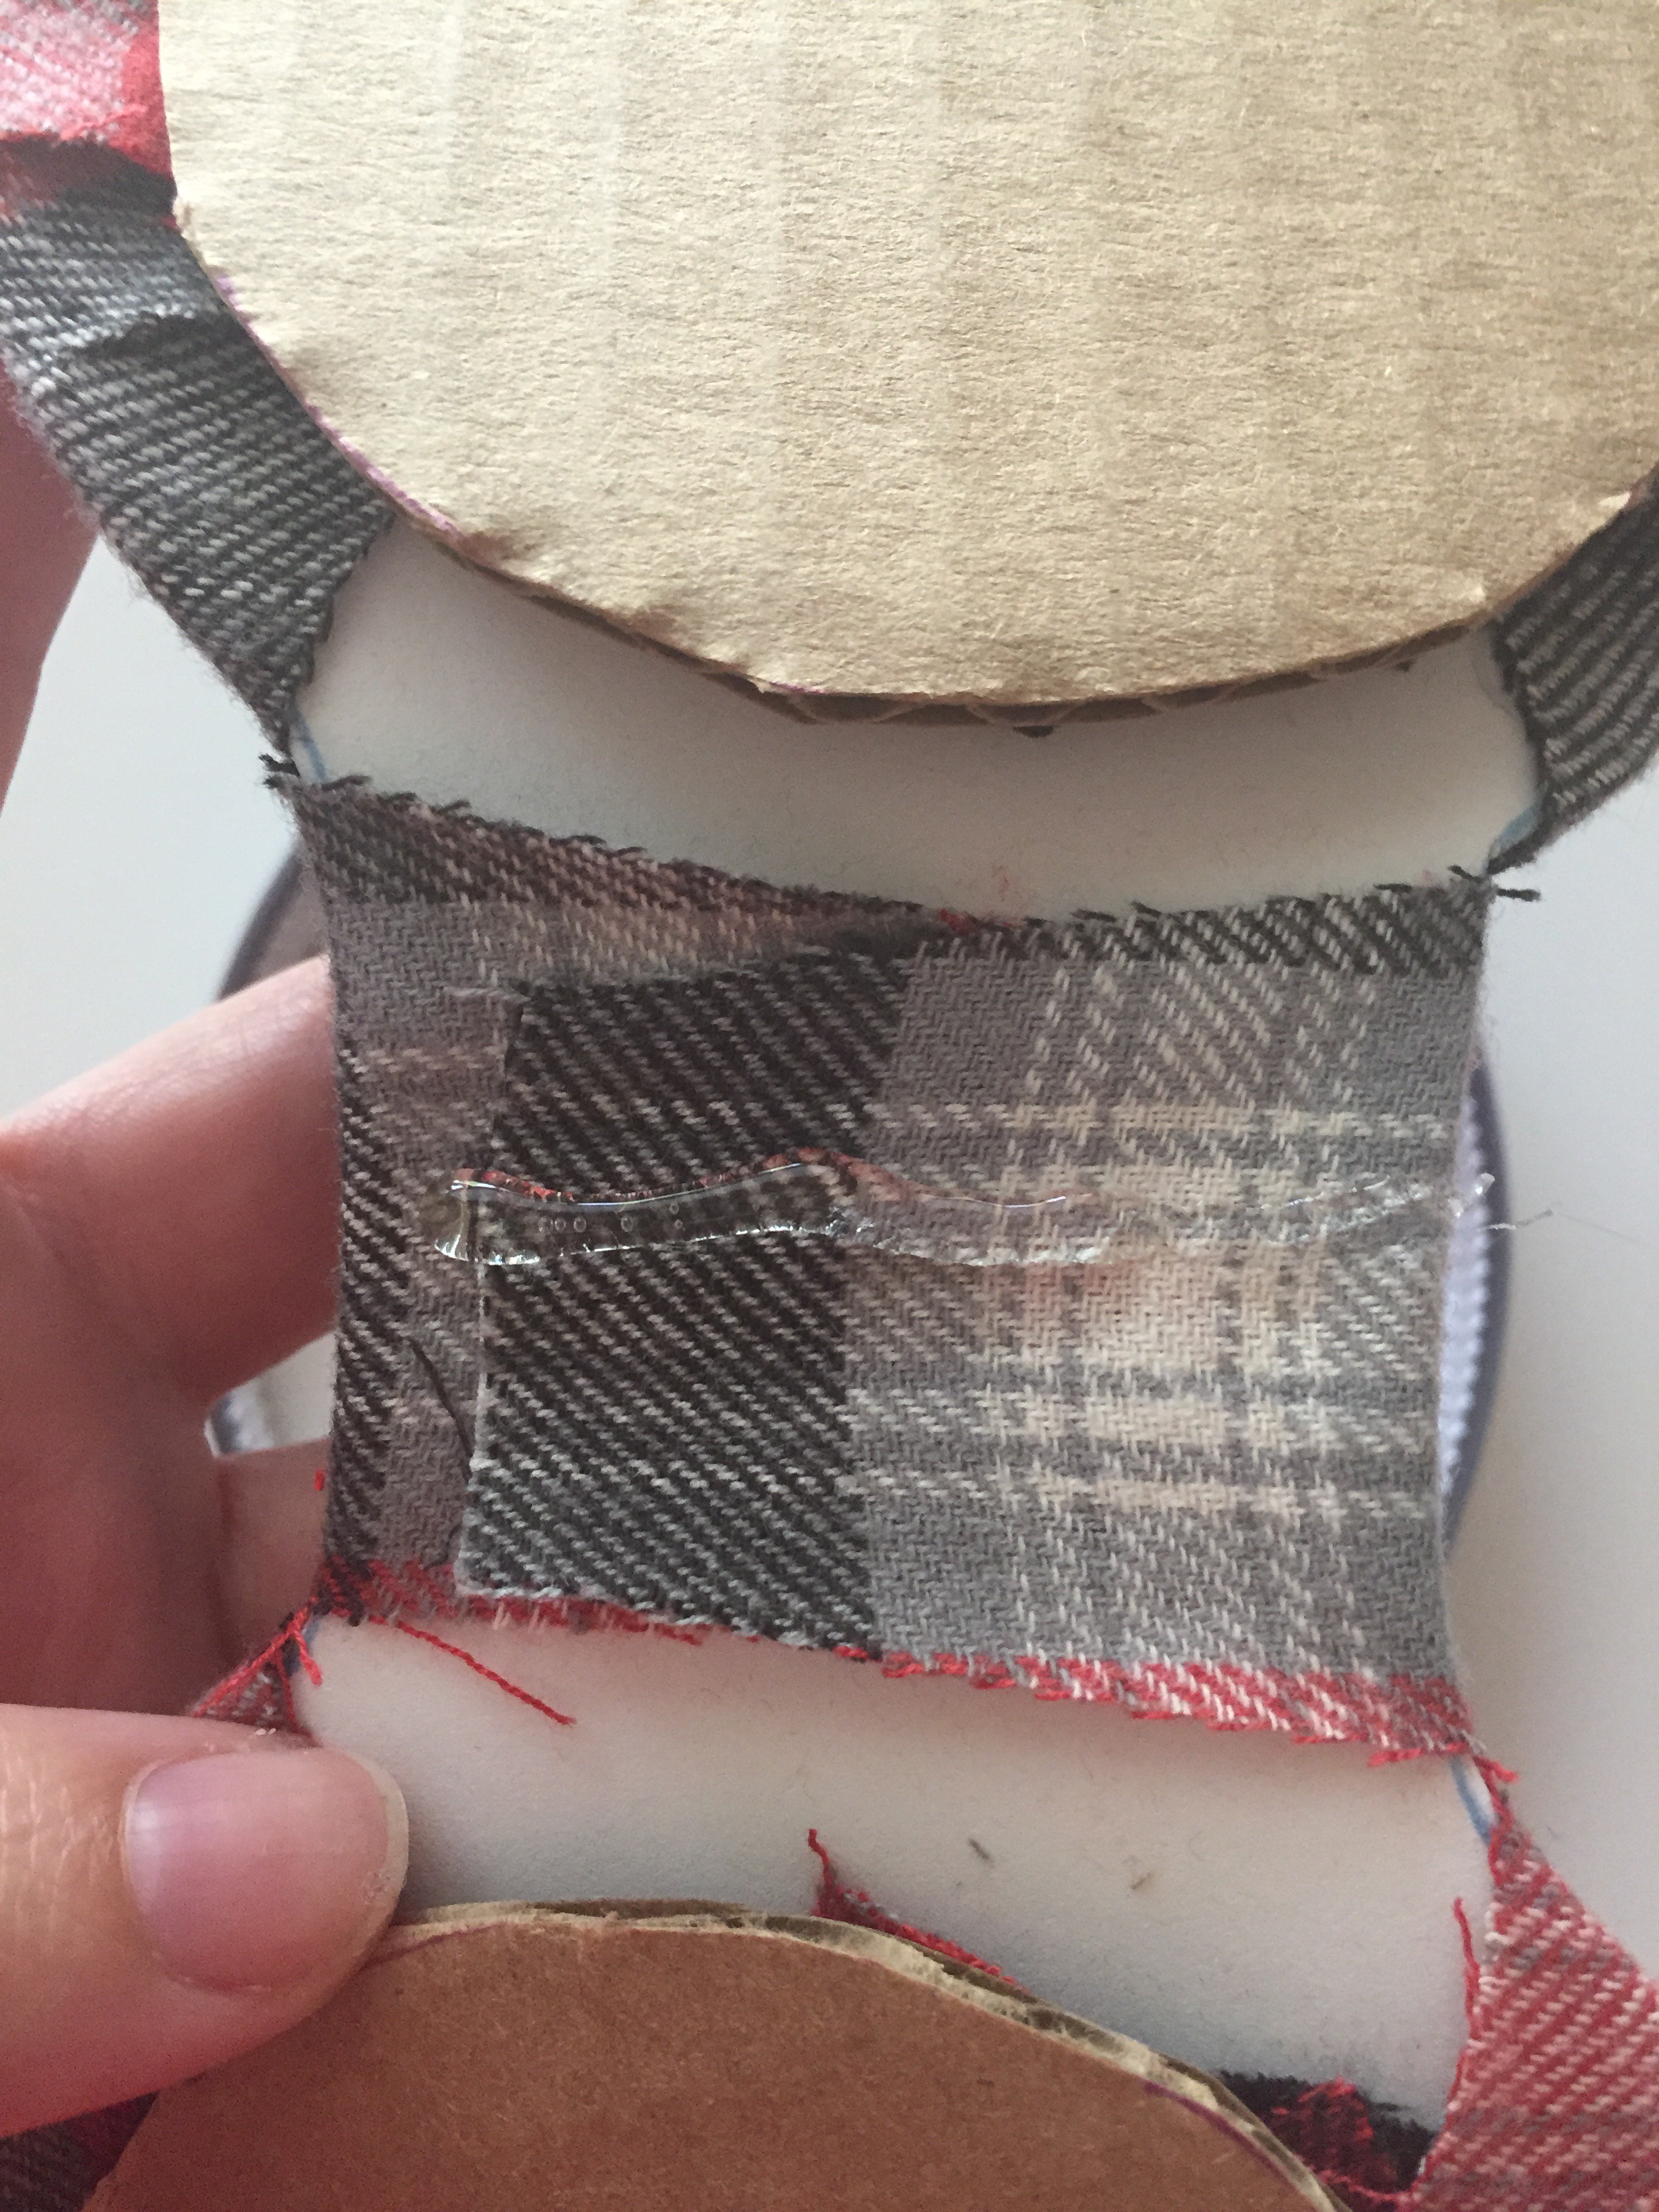
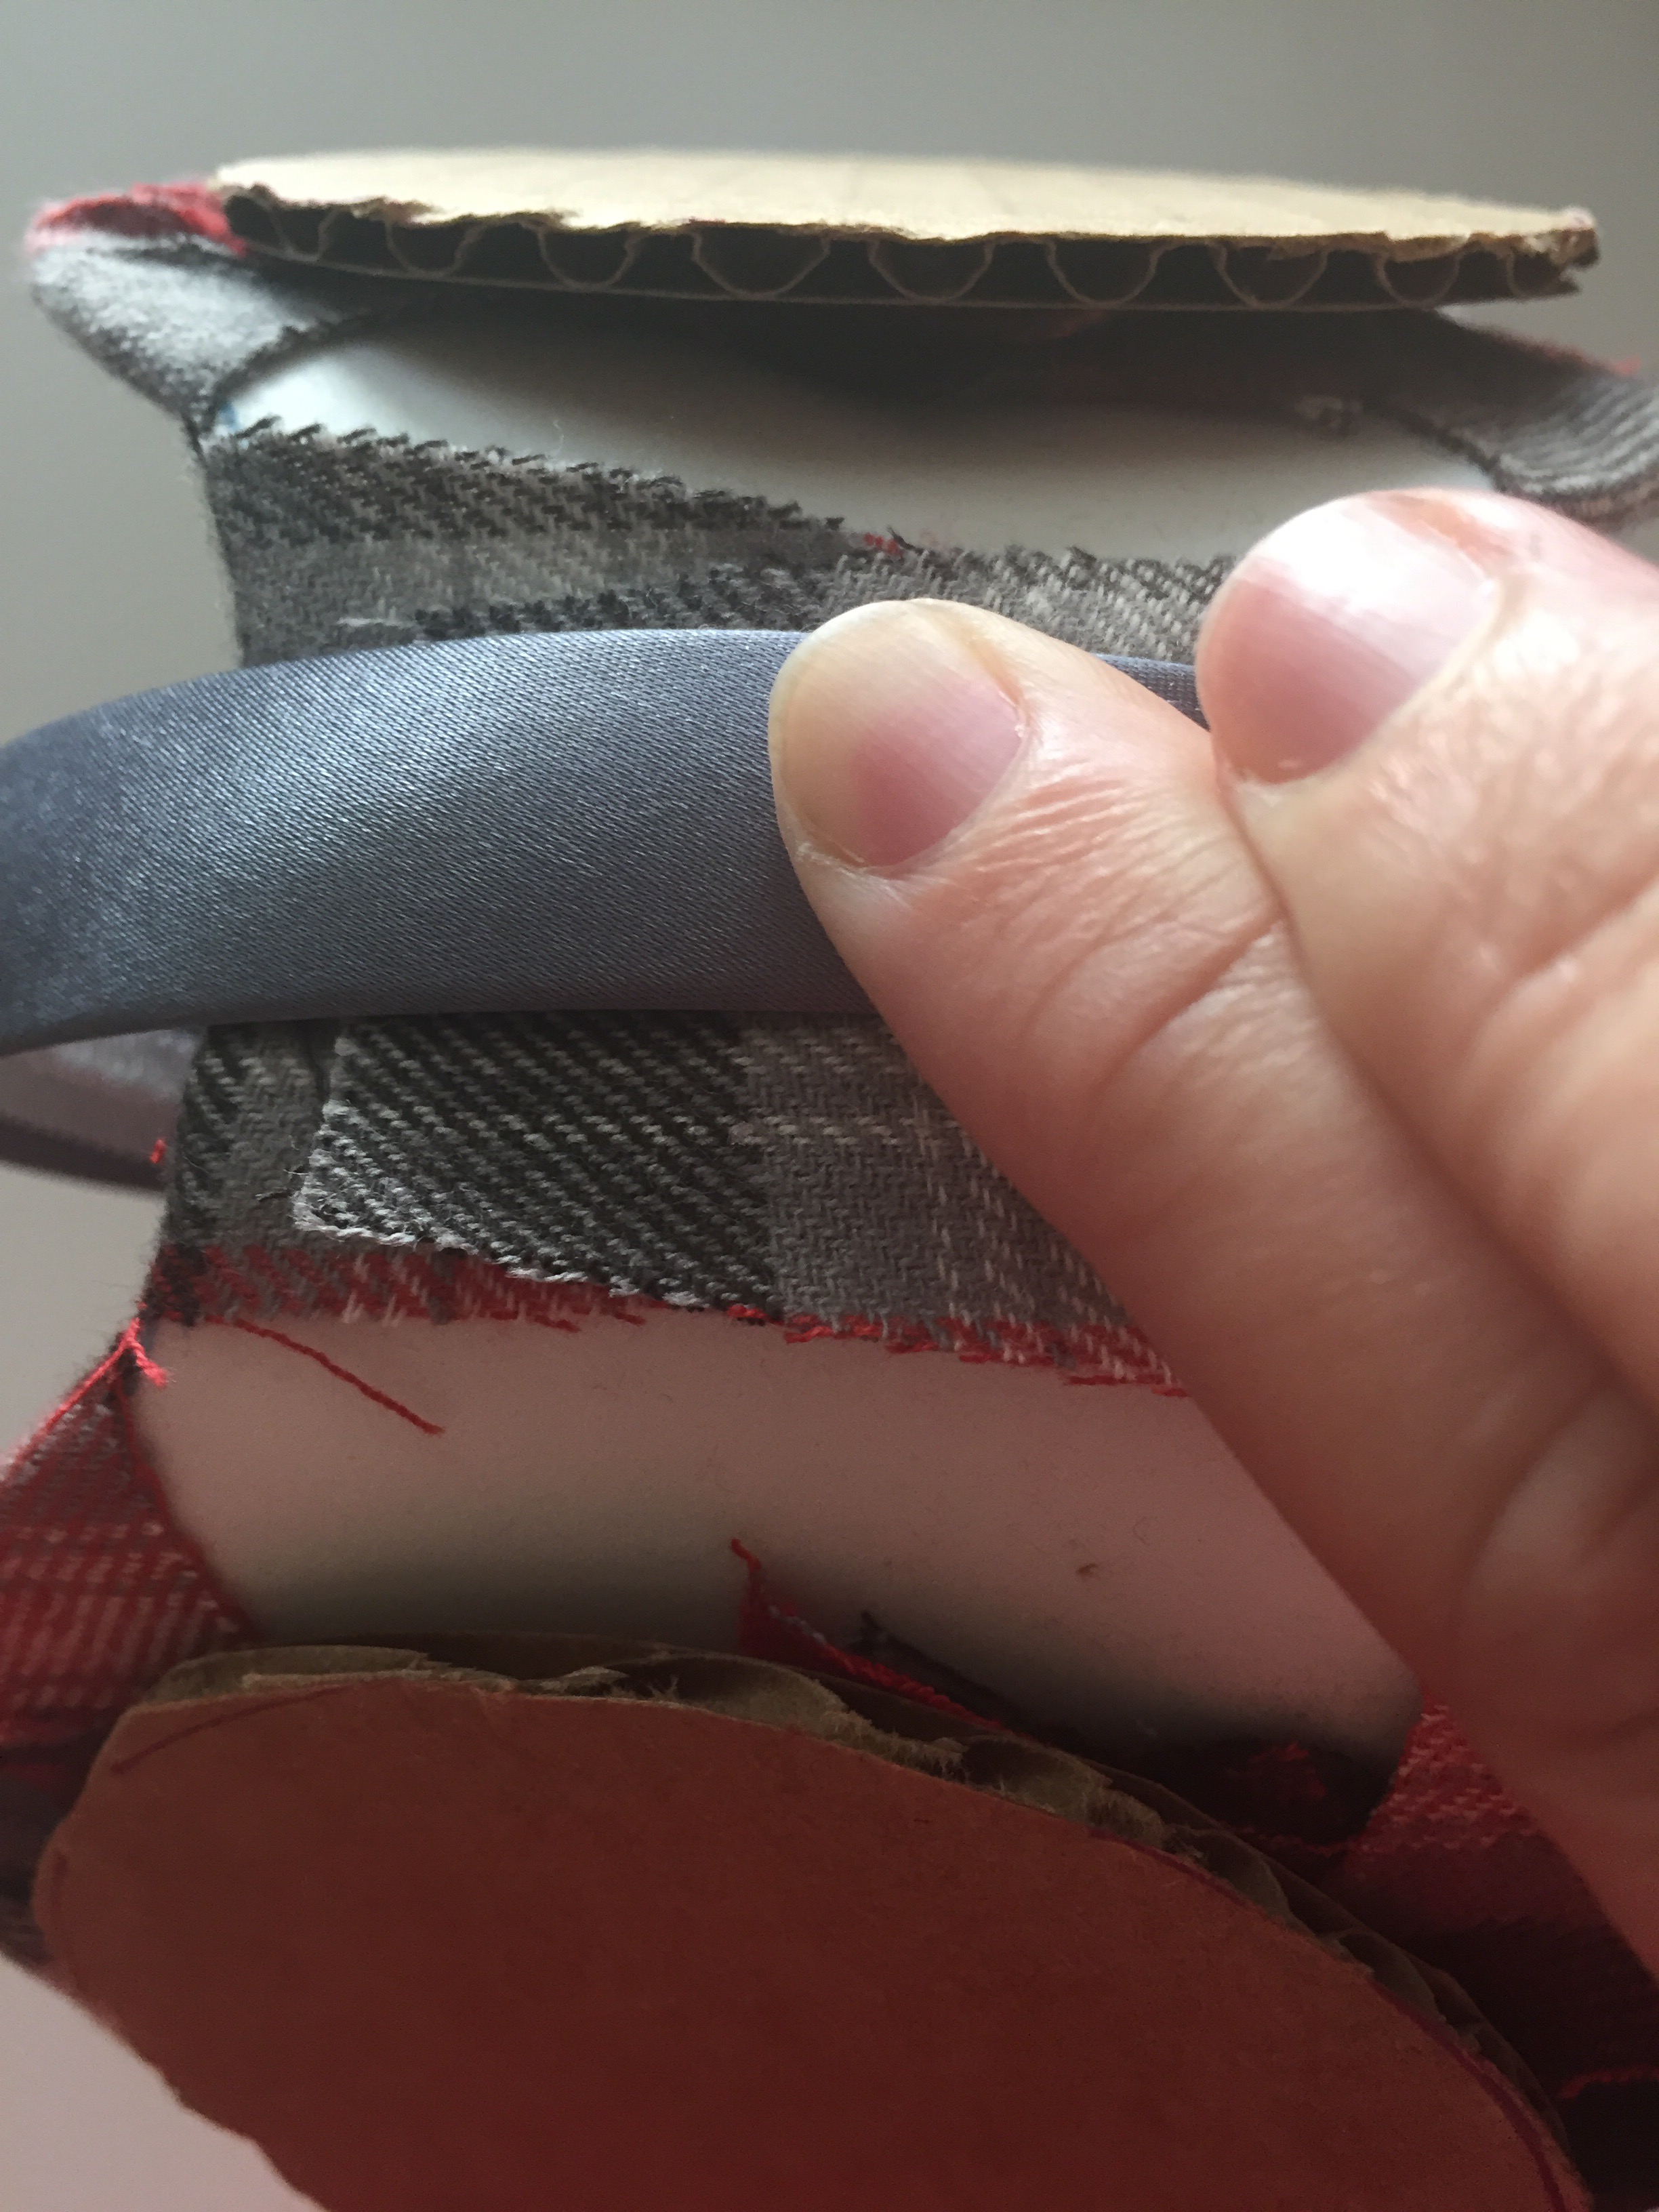
Now comes my least favorite part of the process, attaching the ears to the headband. If you are not good with a hot glue gun, you might want to wear some gloves because I am a glue gun pro and I still manage to burn myself pretty much every time I make a pair of ears. I also recommend completing these next steps while you have some trashy TV on in the background because there is quite a bit of gluing, and then holding until the glue hardens. It’s good to have a distraction during the drying time! Okay, so first you are going to glue the middle section of the ear to the underside of the headband. It’s helpful to mark the ear placement on your headband first (I use a pair of park ears to measure).
Once the ear is secured to the under part of the headband, lay one side of the ear template on a flat surface. Cover that side of the ear with hot glue, then bring the other side down to the glue and attach.
This is what the ears will look like after being attached to the bottom of the headband, and then glued together.
Now comes the God awful part. In order to complete the ears, you need to close up the gaps around the edges. The easiest way to do this is in small sections. I squirt a short line of hot glue into the edge of the ear and then pinch the ear together until the glue dries. Then I move to the next section of the ear and repeat the process. I probably do this four or five times with each ear. The main goal is to not see any of the cardboard by the time you are done.
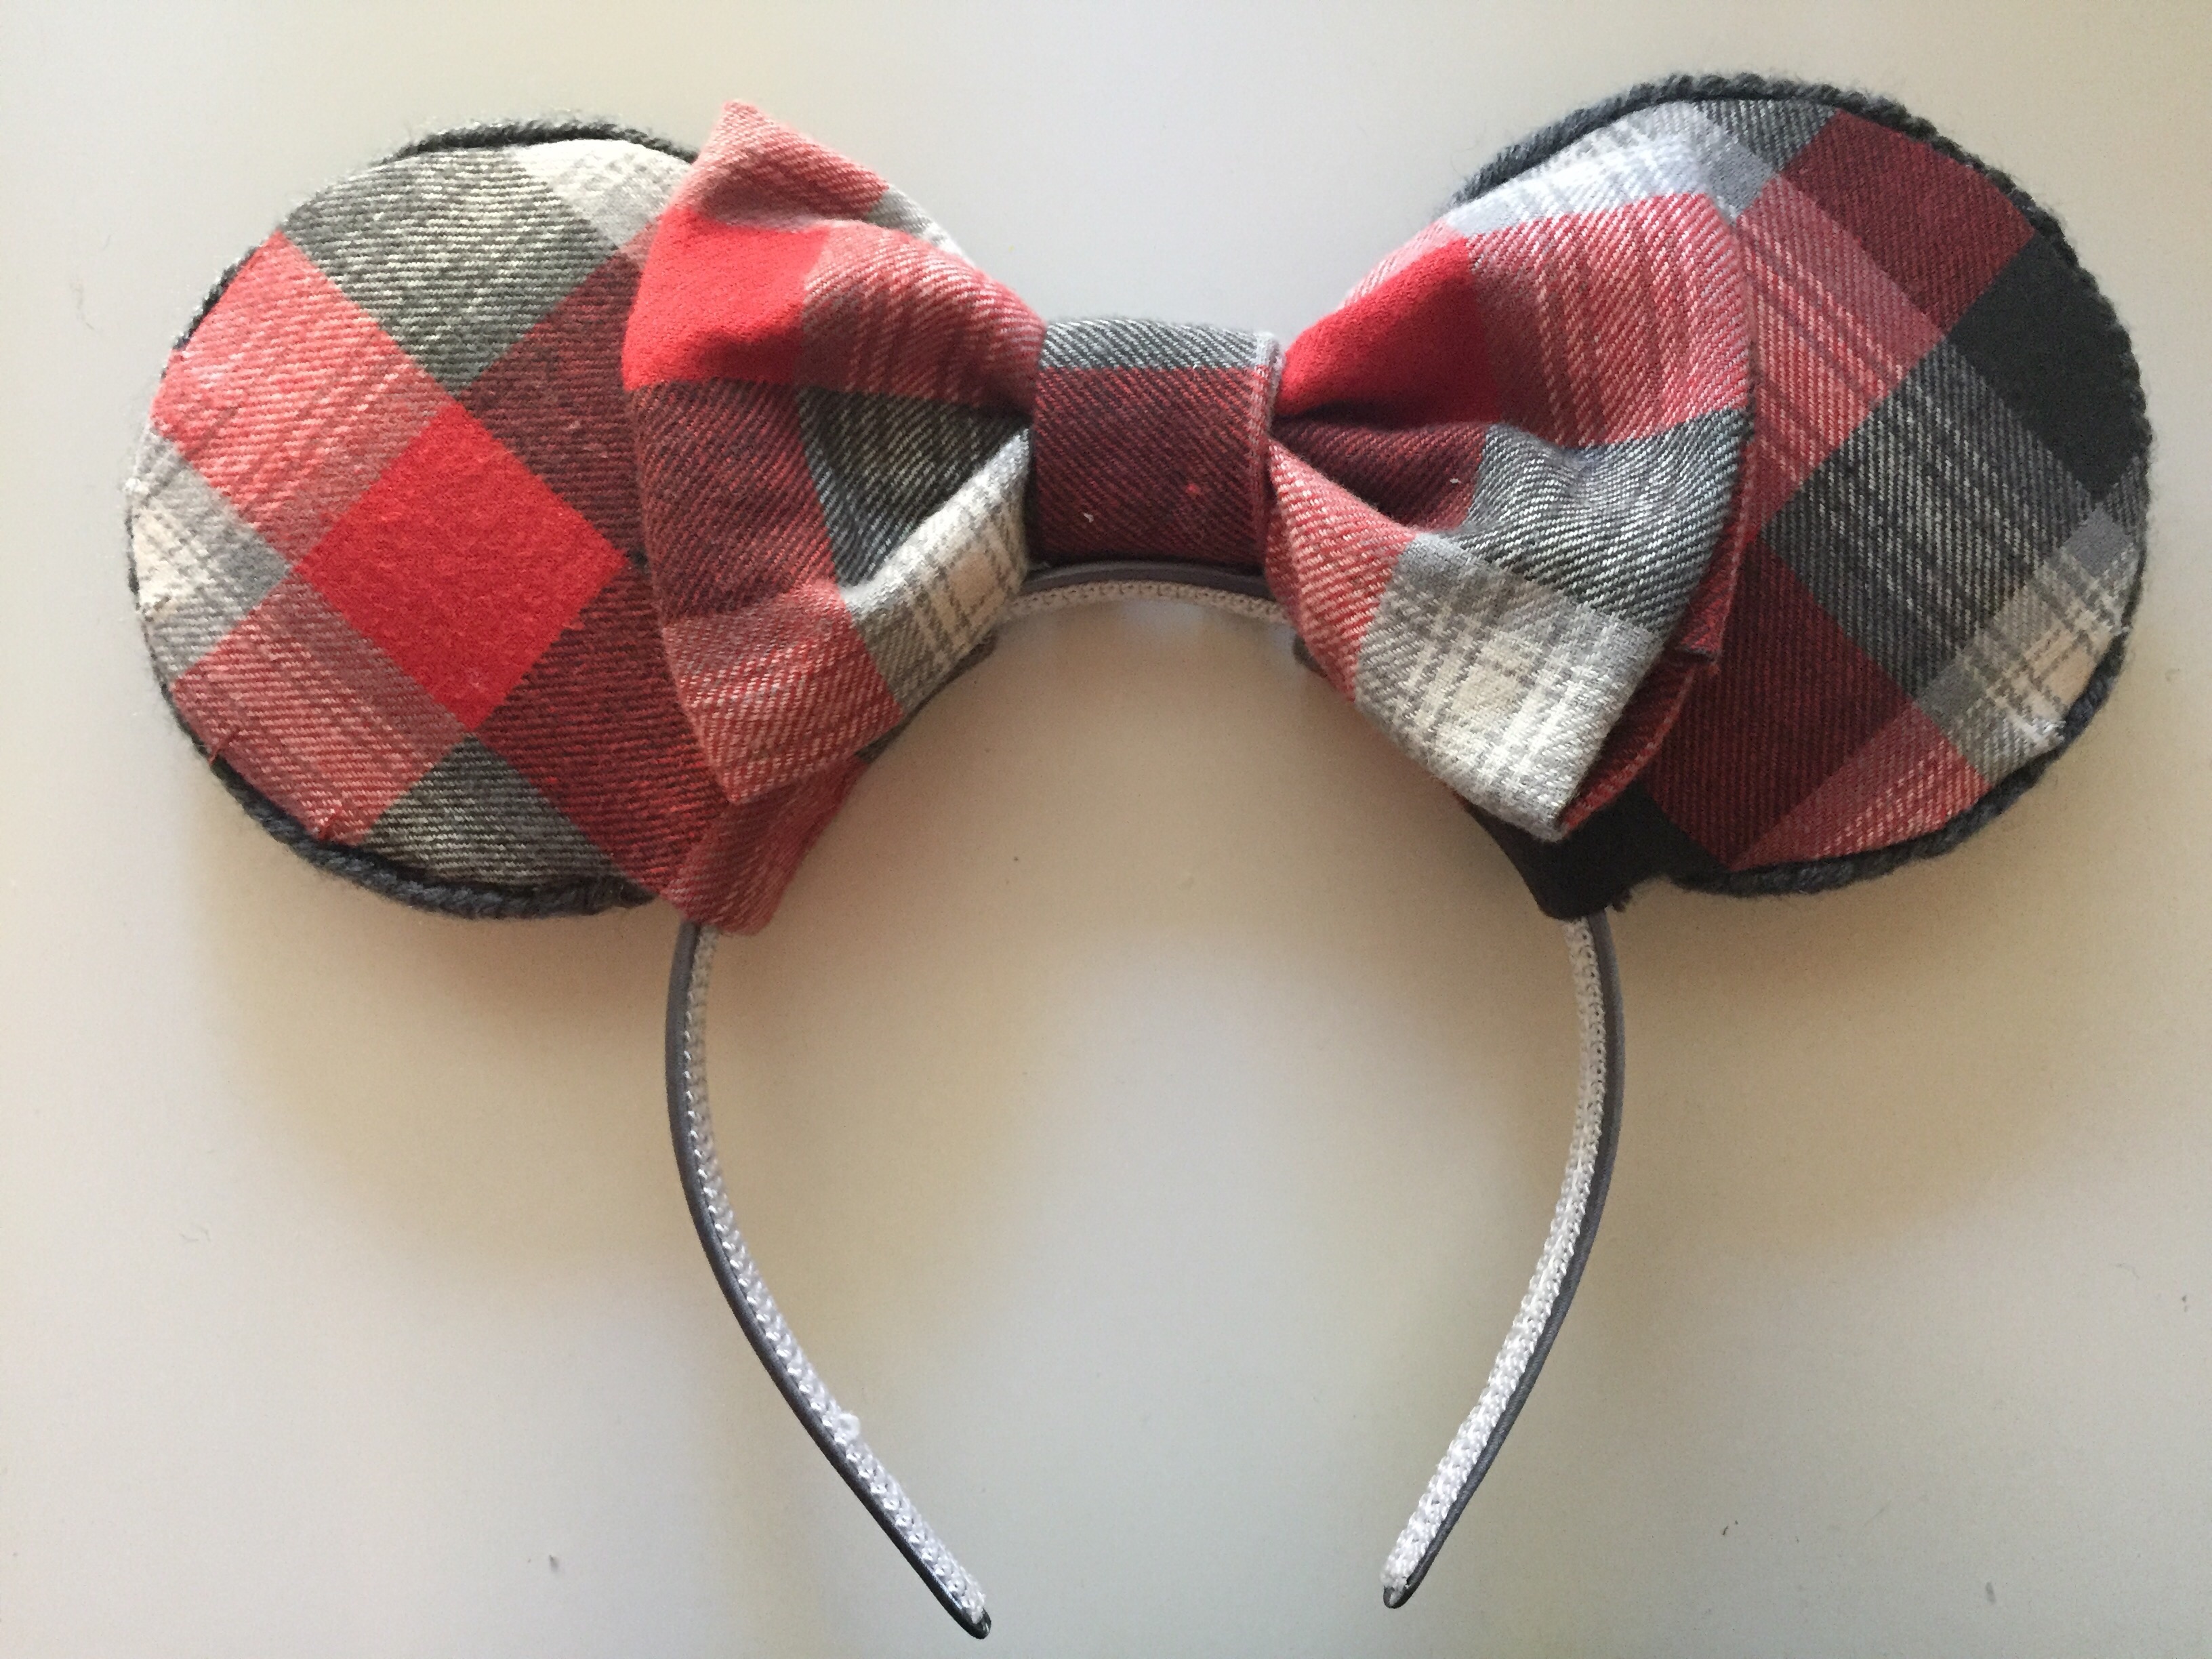
Once the ears have been pinched together and the glue has dried, it is time to attach the trim. Trim is necessary mainly to hide the yuckiness of all the glue, but it also adds a little something extra. For these ears, I braided some yarn to make my own trim, but I typically use rhinestones on a roll that can be found at Michaels or JoAnn. I used fabric glue to attach the trim to the ears.
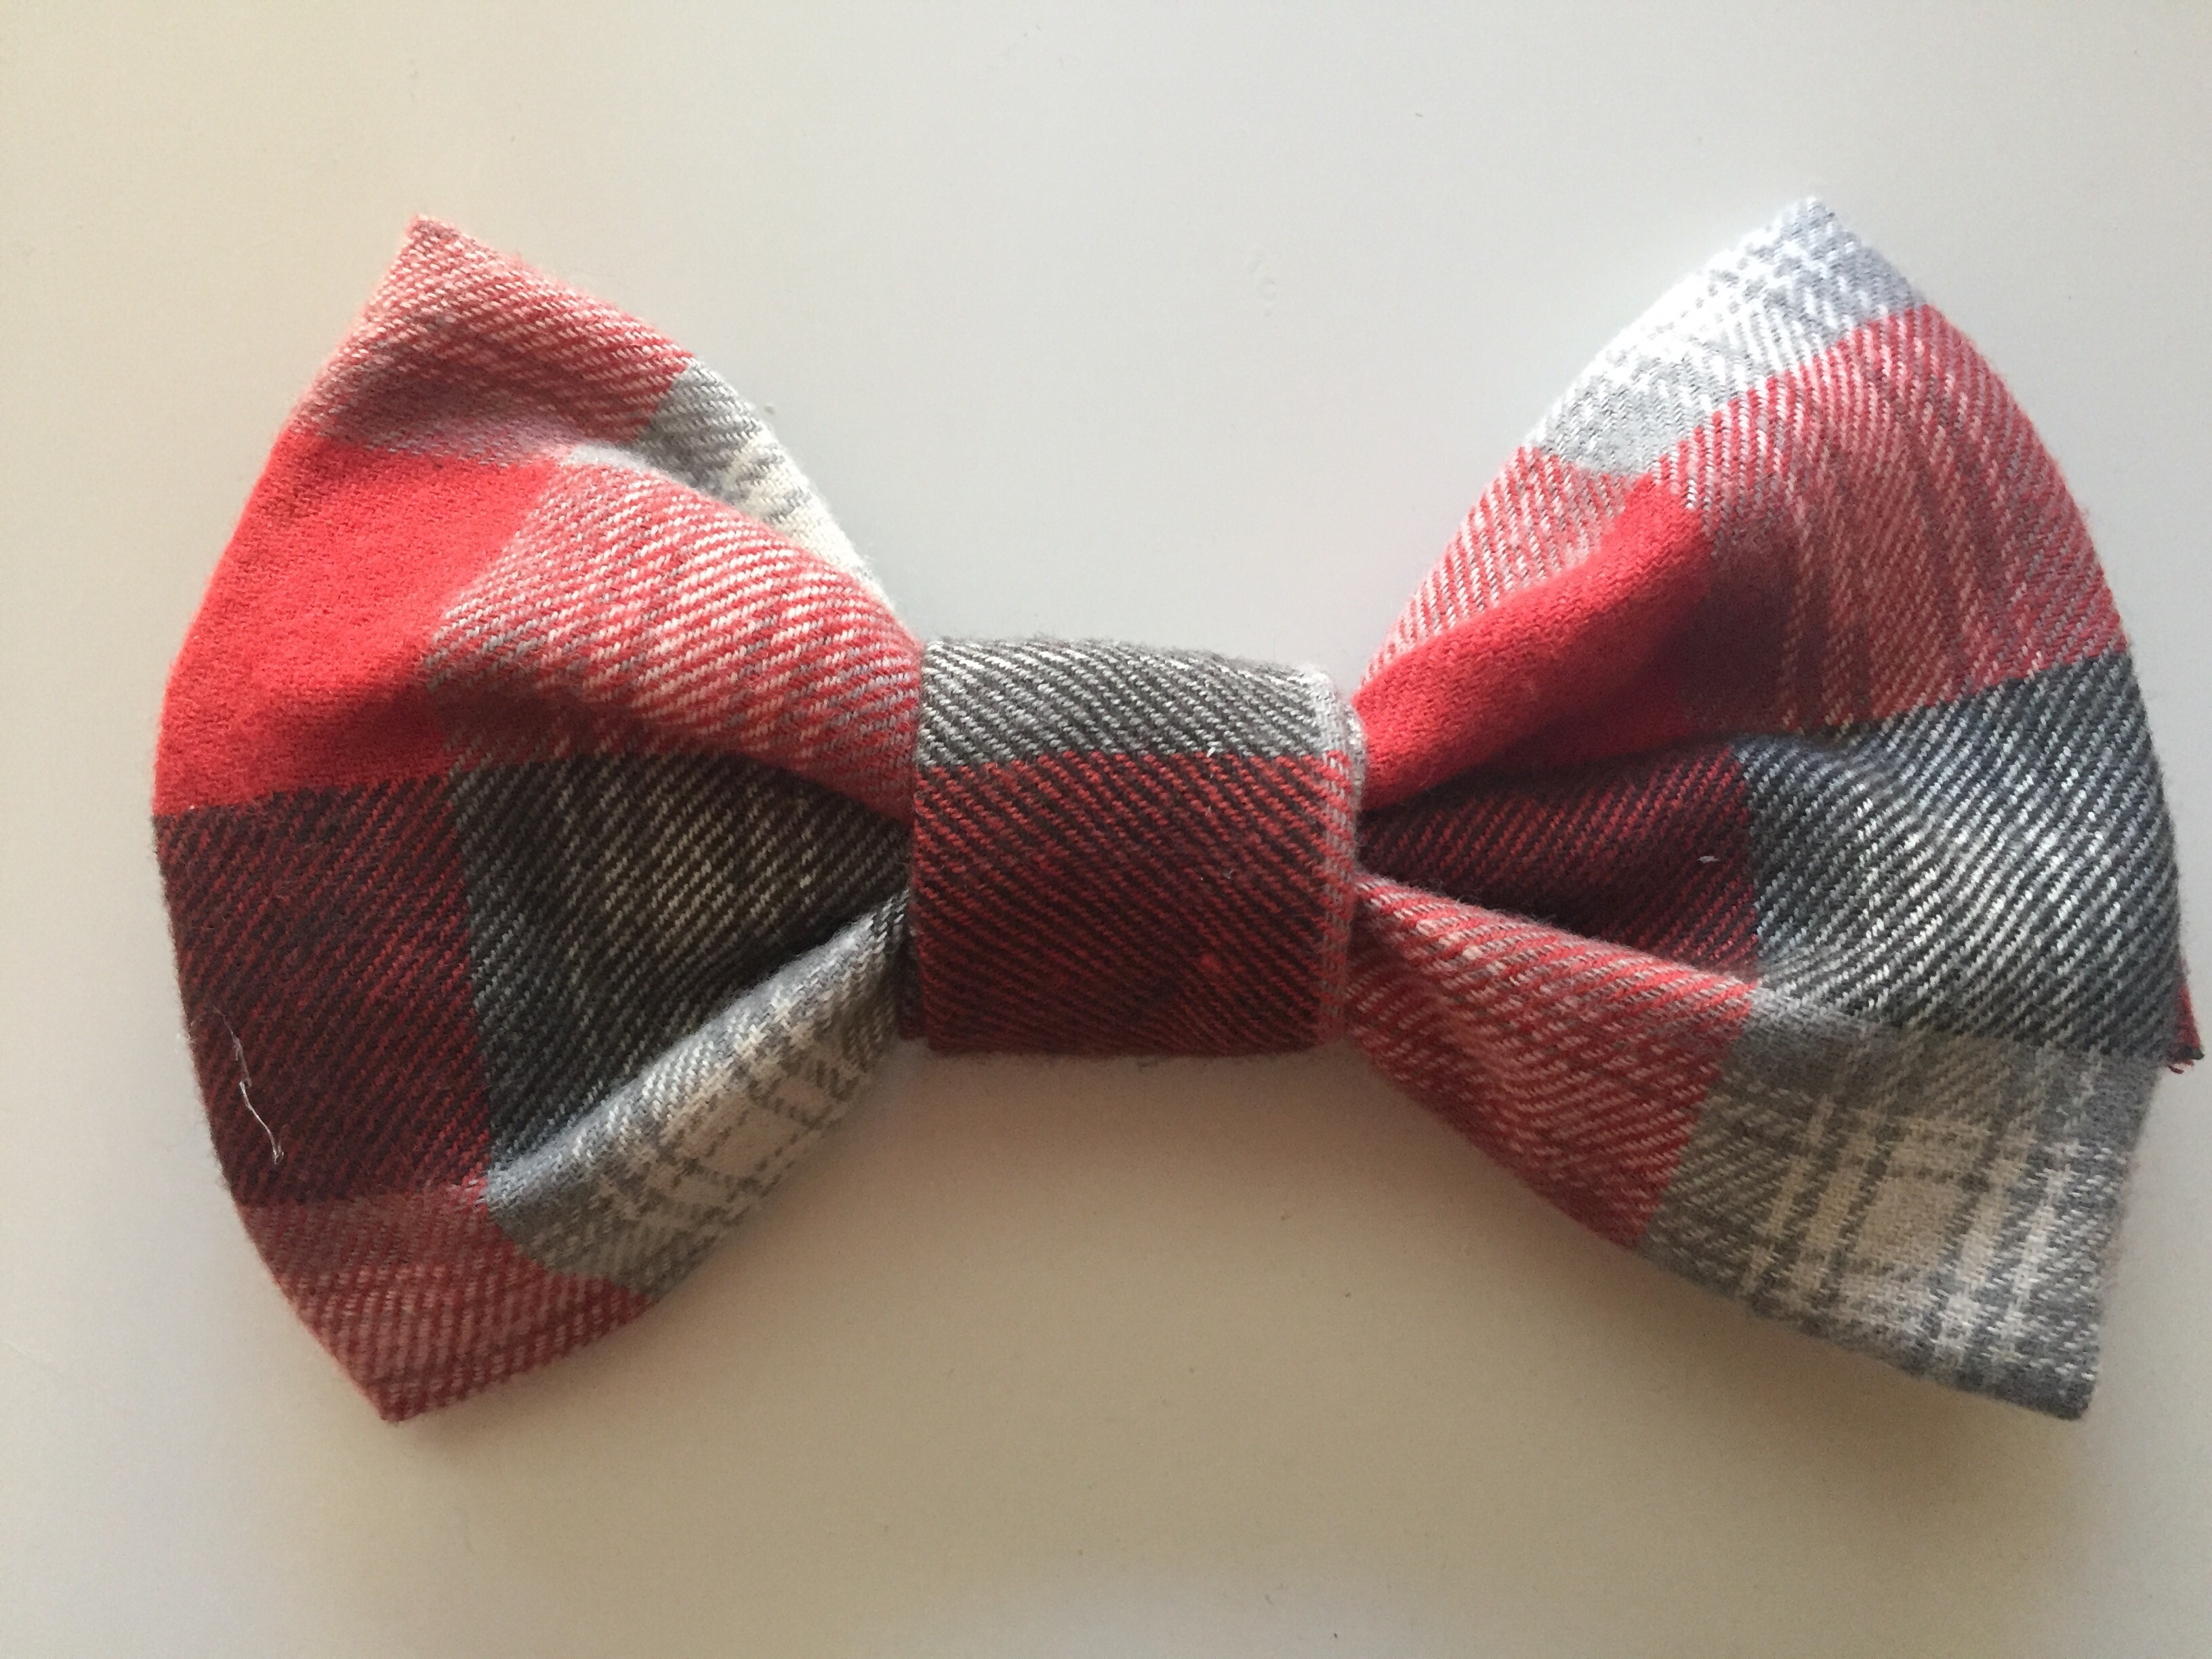
Now it is time to make the bow! I have done several different version of bows for ears, but I really like how this one came out, and it was easy. First, cut out a small rectangle of your fabric. Glue the edges (as if you were sewing a seam) so there is no fraying.
Take a garbage bag twist tie or piece of string and cinch in the center of the rectangle to create the bow shape.
Use a smaller strip of the same fabric to cover the tie. I hot glued this piece on and it dried super fast.
The final step is to attach your bow to your ears. Hot glue works best for this step too
I am so in love with how these ears came out! These were such a labor of love, but these are probably the best a pair of fabric ears have come out for me. As much as I loved making ears before, I think I am going to have even more of a problem now!
Please let me know if you have any questions about the tutorial, I am happy to (attempt to) help you with your own ears any way I can!
Hello lovelies and happy Monday! I don’t know about you, but I am still finding it hard to believe that it is November already. Not going to lie, I was a little tempted to skip the Thanksgiving festivities and go straight to Christmas, but I decided to wait a while and embrace the season of being thankful for at least a couple of weeks. So I put together this super easy DIY banner that is not only festive for fall, but also a nice visual reminder of how many things I have to be grateful for in my life. I love how it came together and I think I am going to make this a yearly tradition!
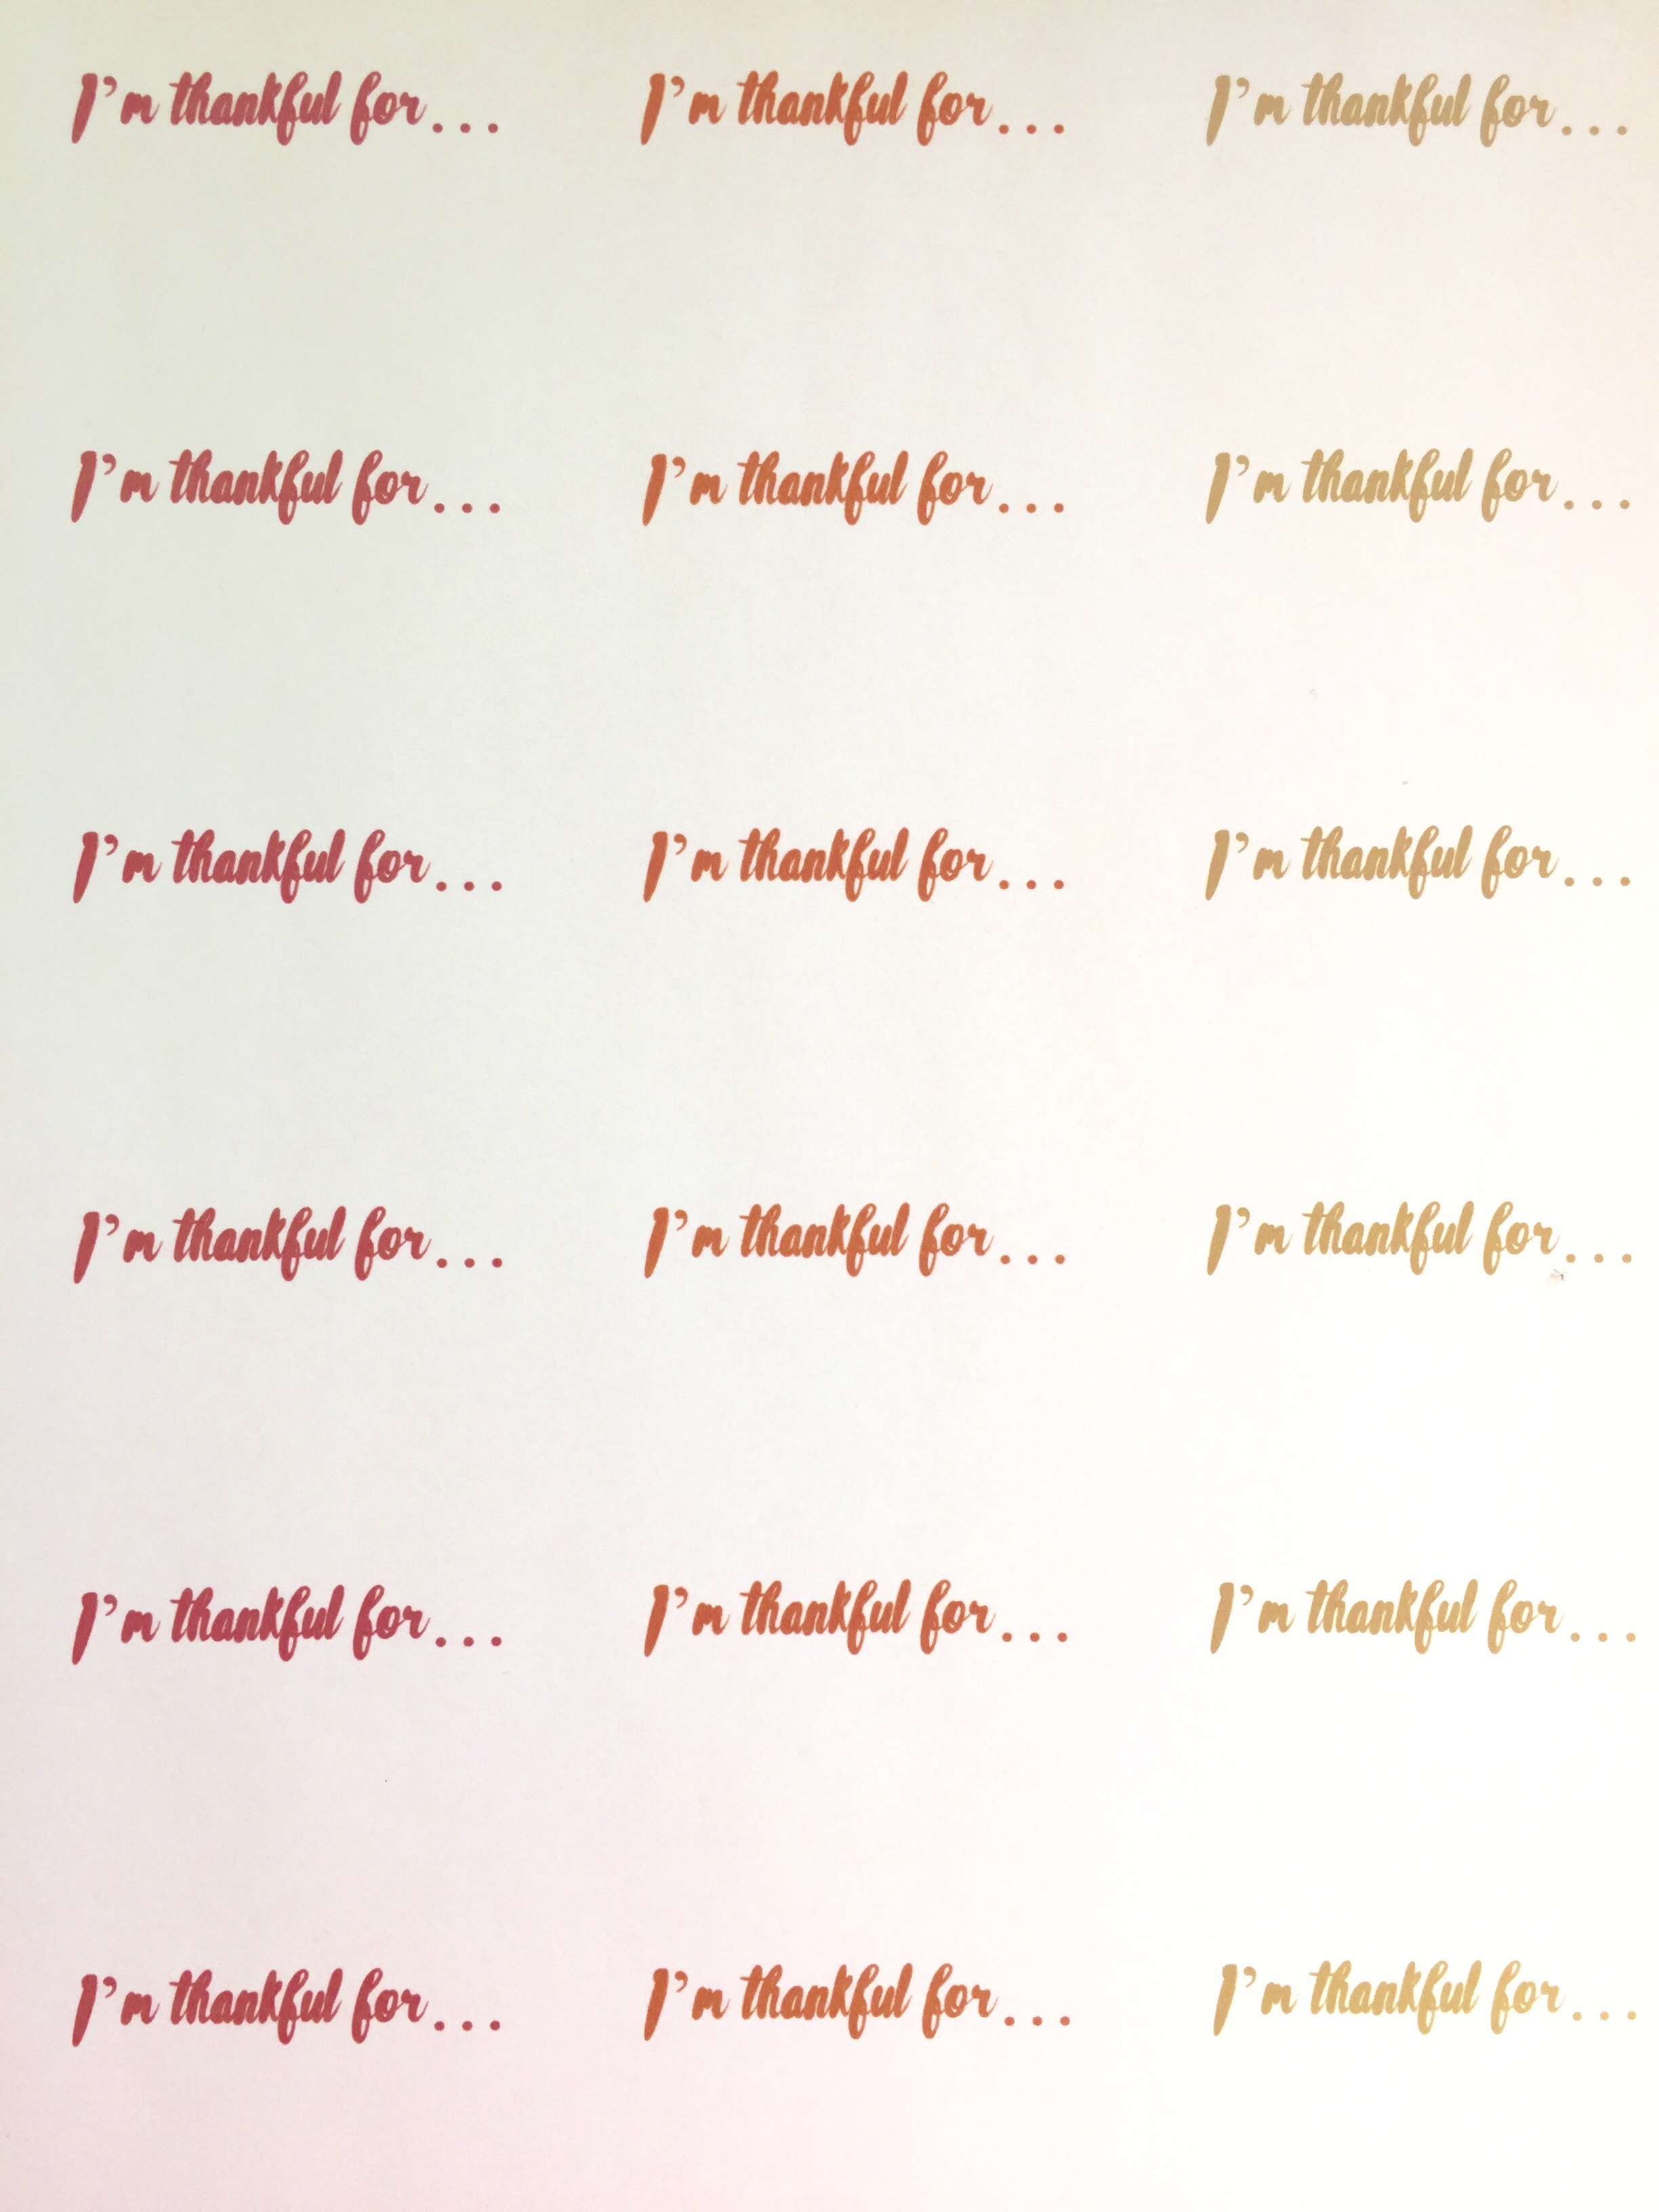
First, I created this document in Microsoft Word. It seriously took less than five minutes, but you don’t even have to spend that long because I created a printable version for you! Stay tuned, the link is at the end of the post!
I printed the design on some white card stock and cut up the little cards. I grabbed a couple of fall colored Sharpies to use when we write our messages.
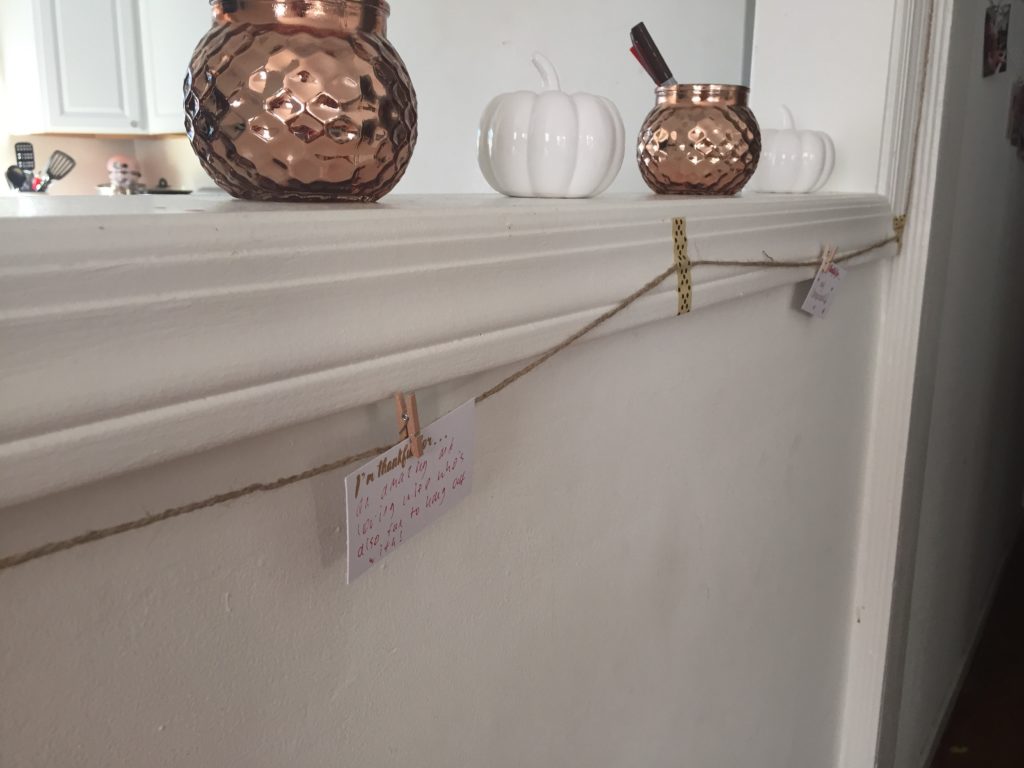
I then used some fall colored washi tape to hang a piece of burlap string. We have a window cut out in between our kitchen and living room, and it is the perfect place for hanging banners and the like (especially since we don’t have a mantle).
I then used mini clothespins to hang our thankful for signs all around the banner. The goal is to add a new one each day, so by the time we get to Thanksgiving, we have a whole list of things to be grateful for. I made Matt get in on the action too, we’ll see how long he keeps up with it!
Obviously the first things that came to mind for me were the big ones, namely Matt and Squirt. But there is also room to be thankful for the little things in life, like coffee!
This was such a simple project and I love that it adds a touch of fall decor to the living room. But even more than the aesthetics, I love that every time I walk by it I am reminded of what an amazing life I am living right now. You really can’t go wrong with that! As a bonus, I didn’t have to buy anything for this project, everything I used I already had around the house! Score!
If you would like to print out the thankful for cards for yourself, you can use this link to find a printable version. I hope you enjoy, and I would love to see pictures of your cards in action if you decide to use them! Tag me on Instagram or Twitter, @falonloveslife! What are you feeling thankful for this November?